Single-ply waterproofing that provides a durable, less-expensive alternative to traditional copper
5 MIN READ
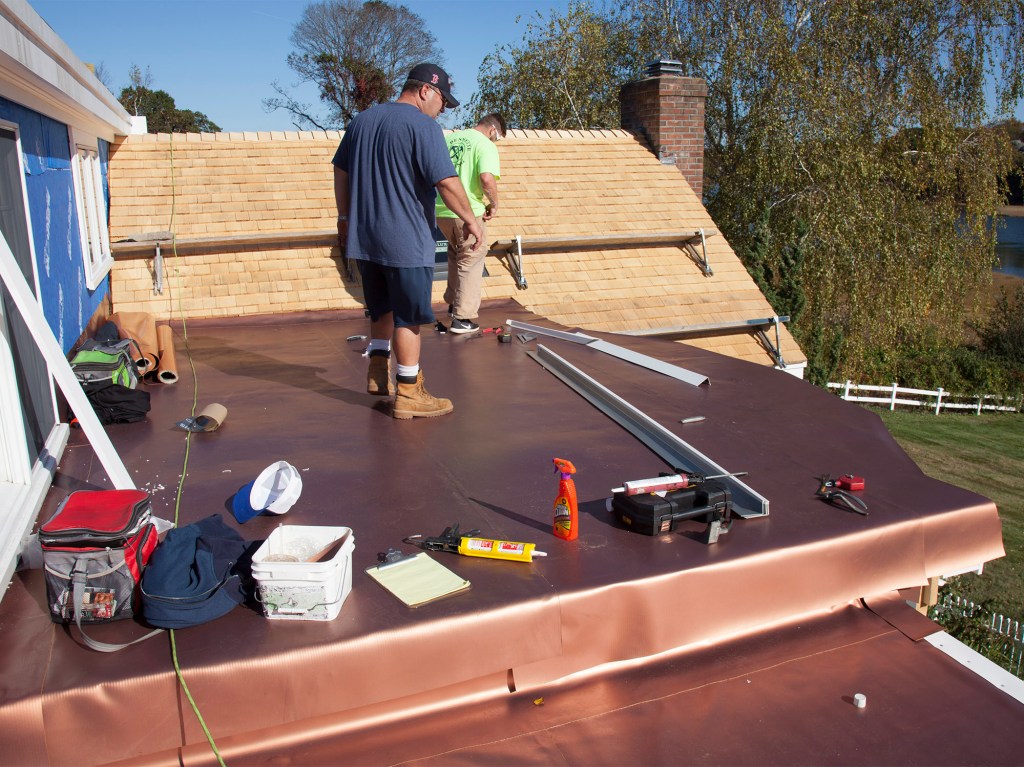
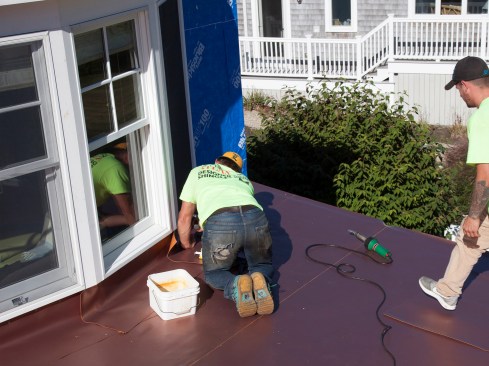
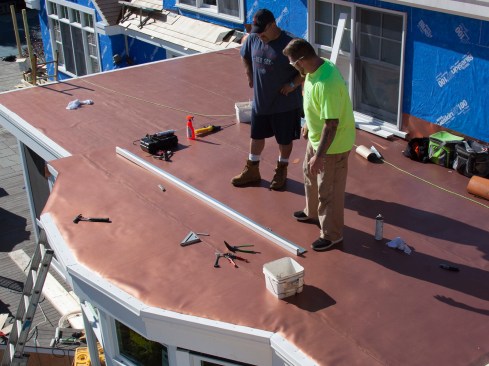
Matt Quigley and Roger McCool of J Bennette Roofing, Inc. install a new, copper-colored European-made 60-mil, polyester-reinforced PVC membrane by Sentinel Copper Art (soprema.us) in the coastal town of Cohasset, MA.
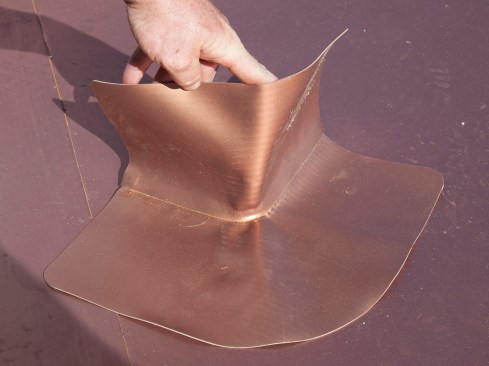
As a certified installer of just about any type of roofing you can think of, my company enjoys a competitive advantage when working with products whose manufacturers restrict the number of installers per geographic region; to get the material, a homeowner typically has to go through a certified installer. This year, my crew and I spent several days on a full-house remodel in Cohasset, Mass., replacing existing EPDM roofing with Sentinel Copper Art (soprema.us), a European-made 60-mil, polyester-reinforced PVC membrane. It has actual powdered copper metal incorporated into its chemical mix, resulting in a single-ply waterproofing membrane that weathers, or oxidizes, over time to a classic copper patina.
This PVC material has a number of benefits. Its reinforcing scrim provides high puncture resistance, which is an important feature around here because seagulls drop clams on the roofs, and the shells make sharp shards when they break. Unlike EPDM, ponding conditions don’t void the warranty, so a no-slope roof is actually a go with PVC. That’s because once you weld the seams, they’ll never separate again, period. Another plus is that while EPDM can leach nasty solvents into the runoff, PVC sheds clean water, making it a great choice for cisterns and agricultural water capture.
The windows on the second floor of this house looked out over a couple of low-slope roof areas, and the owners wanted to see something more attractive there than black EPDM, or even white PVC or TPO. (A white roof has about 88% reflectivity, forcing us to wear shades during installation.) When I showed them a sample of the copper membrane, they were sold on the look. We sell Copper Art roofing starting at an installed cost of about $10 per square foot. Compared with solid copper, that’s maybe one-third the cost, and it’s probably three times faster to install, too. The following slideshows will demonstrate the steps we took to complete this re-roofing project.
1
of 7
After stripping the old EPDM roofing and fiberboard underlayment…
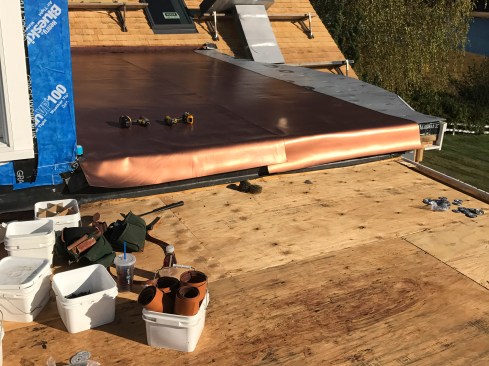
After stripping the old EPDM roofing and fiberboard underlayment, the existing deck was bloom cleaned, then rigid foam underlayment was installed. The rigid foam provides a smooth base for the PVC membrane, as well as protecting it from minor deck imperfections, such as slightly proud nail heads. When rolled out, the 60-mil Sentinel Copper Art membrane is heavy enough that it lays flat.
On this re-roof project, two different rigid foam underlayment p…
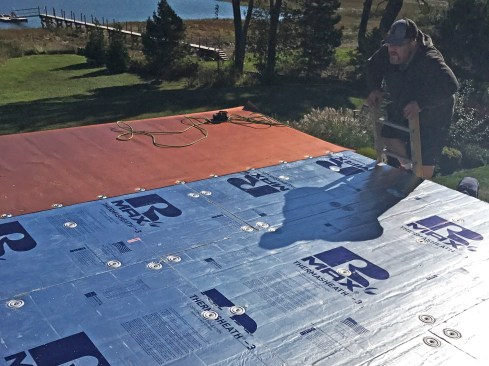
On this re-roof project, two different rigid foam underlayment products were used. Here, a 1/2-inch-thick polystyrene protection-board was installed. The author avoids using fiberboard underlayment because unlike fiberboard, the polystyrene underlayment doesn’t absorb water, ensuring a dry base in the event that the underlayment is left temporarily exposed during installation — once fiberboard gets wet, it tends to stay wet and can even promote rotten plywood decking.
On one roof area, a raised-perimeter trim around the roof called…
On one roof area, a raised-perimeter trim around the roof called for additional build-up, so a 1-inch-thick underlayment (R-Max Thermasheath-3) was installed. For both the 1/2-inch and the 1-inch thicknesses, the underlayment was fastened to the deck with using common screw-down plate fasteners on nominal 2-foot centers.
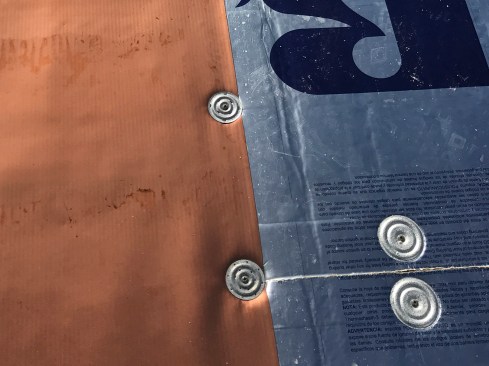
The author prefers to mechanically fasten the membrane to the de…
The author prefers to mechanically fasten the membrane to the deck. Here, proprietary, 2.4-inch “membrane stress plates” (or “seam plates”) were installed along the up-slope edge of each 6-foot-wide course, on 12-inch centers. Note, these membrane stress plates are different from the ones used to fasten down the insulation.
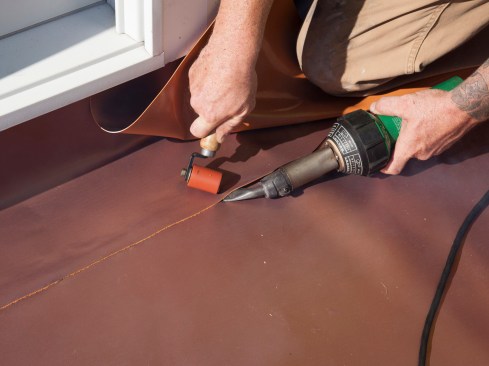
With membrane laid out and cut to the roof’s shape, the “fie…
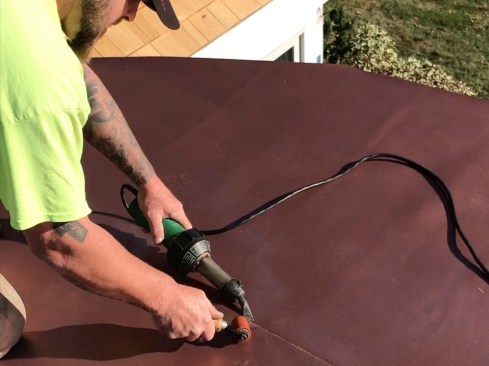
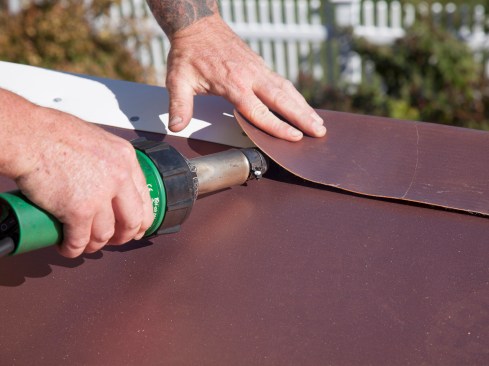
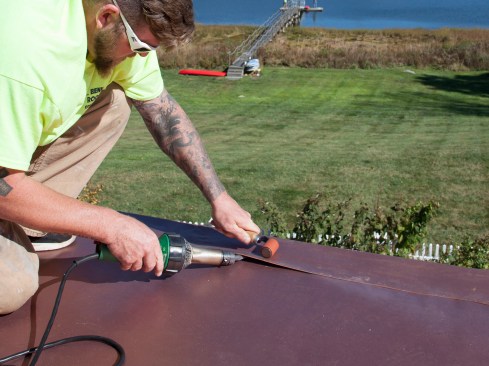
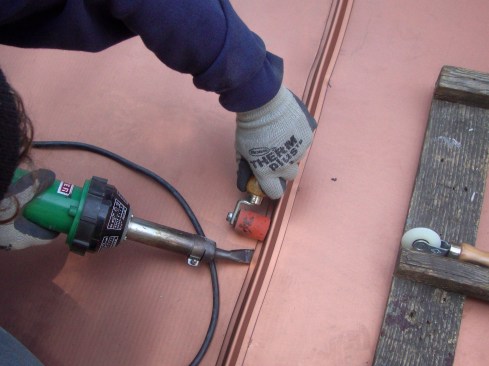
With membrane laid out and cut to the roof’s shape, the “field” seam work was welded first. Welding PVC is straightforward, though it takes some practice. First, the installer back-welds the seam by inserting the Leister torch nozzle about 2 inches under the lapped membrane (heating for a wider weld connection), while immediately pressing the pieces together using a seam roller, rolling 90 degrees to seam. On the outside edge, the seams are briefly heated by slipping a torch nozzle under the membrane edge at 45-degree angle, and then immediately pressed together using a seam roller, rolling at a 45-degree angle. The resulting weld is permanent and waterproof—it’ll never come apart again.
To weld the seams, the author’s crew uses a Leister hand-held,…
To weld the seams, the author’s crew uses a Leister hand-held, 1,500W torch, with power adjustable from 80W to 1,500W, and a temperature scope from 100°F to about 1,300°F. While cold weather doesn’t delay installation (you can even weld PVC in the rain), you do have to adjust the welding temperature upward to compensate. Likewise, in hot weather, you need to lower the welding temperature accordingly.
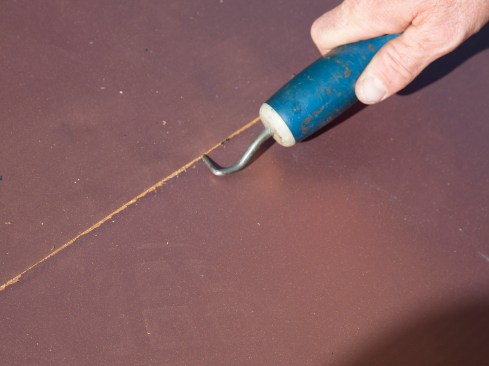
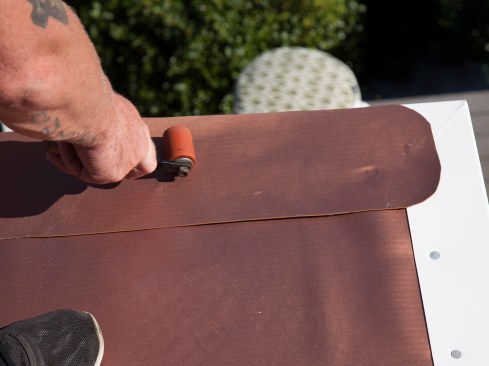
A properly welded seam has the characteristic “bleed” along …
A properly welded seam has the characteristic “bleed” along the seam edge, where molten material is squeezed out ahead of the seam roller. That tells you that you have a fully welded bond; voids or fishmouths are easily seen. Smaller fishmouths can be re-welded, while larger ones are usually patched. A pointed, cotter pin extractor is used as a seam probe to check for any loose spots along the welded seam that would void the manufacturer’s warranty.
Underlayments
After stripping the old roofing and fiberboard underlayment, we installed new, 1/2-inch-thick polystyrene underlayment as a smooth base for the membrane. Unlike fiberboard, polystyrene underlayment doesn’t absorb water, ensuring a dry base in the event we have to leave it temporarily exposed. Also, once fiberboard gets wet, it pretty much stays wet and can even promote rotten plywood sheathing—it’s the cheap stuff and we never use it.
Raised perimeter trim around one of the areas of the roof called for additional build-up, so we installed 1-inch-thick R-Max Thermasheath-3 as underlayment there. For both the 1/2-inch and the 1-inch thicknesses, we fasten the underlayment using common screw-down plate fasteners on nominal 2-foot centers.
Mechanical Fastening Preferred
When rolled out, the 60-mil Sentinel Copper Art membrane is heavy enough that it lays flat. It comes in 63-inch-long rolls, which weigh roughly 150 lbs. and covers 344 sf. It can be installed fully adhered using a flocking-backed membrane and approved adhesives, or it can be mechanically fastened, which is the method we typically use. Certain applications or specifications do require adhesive bonding, but it’s overkill in most residential situations.
Mechanical fastening avoids the prep, the volatile goo, and the 50°F low-temperature limitation that go with the fully adhered method. Mechanical fastening also satisfies high-wind code requirements, a real concern on an oceanfront property like this one. We use proprietary, 2.4-inch “membrane stress plates”—we call them “seam plates”—along the upper edge of each 6-foot-wide course, on 12-inch centers. These plate fasteners have barbs and ribs on the underside to better resist membrane uplift. The 6-inch overlap of the next membrane course covers the fasteners. Along the roof’s perimeter, a heavy-gauge drip edge fastened with roofing nails secure the membrane to the deck.
Heat-Welded Seams
Welding PVC is straightforward, though it takes some practice. Click here to see a short video demonstration. We heat the seams briefly by slipping a torch nozzle under the membrane edge, and then immediately press the pieces together using a seam roller. You should see a little bit of white smoke wafting out of the seam as you work.
We use a Leister hand-held, 1,500W torch, with power adjustable from 80W to 1,500W, and a temperature scope from 100°F to about 1,300°F. (On smaller jobs like this one, the hand-held torch is sufficient, but on large, commercial-scale work, we break out the “robot,” which semi-automates seam welding and can crank along at up to 10 feet per minute.) While cold weather doesn’t delay installation (you can even weld PVC in the rain), you do have to adjust the welding temperature upward to compensate. Likewise, in hot weather, you need to lower the welding temperature accordingly.
What you’re looking for is a characteristic “bleed” at the seam edge, where molten material is squeezed out ahead of the seam roller. That tells you that you have a fully welded bond. We use a pointed probe to check for any loose spots that would void the manufacturer’s warranty.
1
of 13
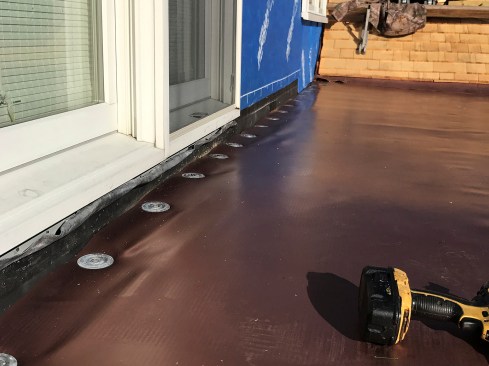
To terminate the membrane against a wall or parapet, the membran…
To terminate the membrane against a wall or parapet, the membrane is cut to the junction and fastened at the edge with the membrane stress plates.
At roof-to-wall locations, flashing strips are cut from the roll…
At roof-to-wall locations, flashing strips are cut from the roll, according to need. The strips are run “long” on to roof, then trimmed to length, later. When installing, the author’s crew places a few tack-welds on the flashing’s horizontal leg to hold the strip in place pending full seam welding.
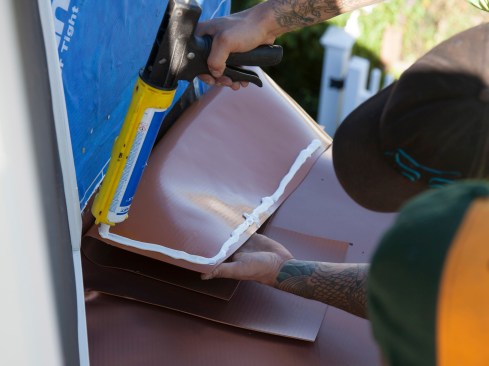
Before the flashing strips are folded up the wall, a full bead o…
Before the flashing strips are folded up the wall, a full bead of caulk is applied along the upper edge and sides. The author uses a non-sag, elastomeric, neutral-cure silicone sealant—Duro-Caulk Plus by Duro-Last roofing systems.
The author’s crew snapped caulklines 6 inches off the wall, th…
The author’s crew snapped caulklines 6 inches off the wall, then trimmed the flashing strips. A tack-weld can be seen on the lower, right-hand side of the photo.
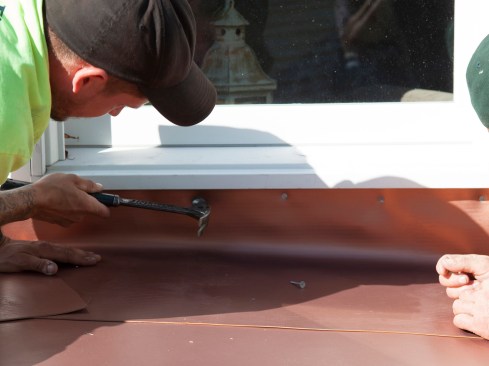
The flashing’s top edge of the vertical leg is nailed off. Usu…
The flashing’s top edge of the vertical leg is nailed off. Usually, the hail heads get covered with overhanging sidewall shingles, or in this case, window trim under the existing sill.
Lastly, the roof-to-wall flashing seams are welded. Here, the in…
Lastly, the roof-to-wall flashing seams are welded. Here, the installer welds the horizontal leg a lapped joint. The roof-to-wall flashing’s vertical side lap and 90-degree corner are also welded—all membrane-to-membrane seams are welded with the Leister.
On the perimeter edge, lengths of PVC-clad heavy-gauge stainless…
On the perimeter edge, lengths of PVC-clad heavy-gauge stainless steel drip edge were installed on top of the roof’s membrane. The drip edge comes with a weldable PVC coating, which allows for the bonding of cover strips flashing. The author usually installs galvanized and stainless steel drip edge, though copper can be special ordered (the copper has to be pre-made and sent out to have a plastisol PVC coating applied to allow for membrane bonding).
The drip edge was nailed off with stainless steel roofing nails …
The drip edge was nailed off with stainless steel roofing nails at a rigorous 3- to 4-inch on-center spacing (replacing membrane stress plates along this edge). To finish it off, a PVC cover strip was welded down over the drip edge.
Because there’s a tendency during welding for the membrane to …
Because there’s a tendency during welding for the membrane to deform at any sharp corners, the author’s crew round off all the cover-strip terminations.
Lastly, the cover flashing’s inside edge is welded to the main…
Lastly, the cover flashing’s inside edge is welded to the main roof membrane; the flashing’s outside edge is welded to the drip edge as well. When installed, the PVC cover strip is held back a little bit from the drip edge’s outside edge, so the weld’s bonding can be inspected.
For tricky, three-directional corners, pre-formed outside and in…
For tricky, three-directional corners, pre-formed outside and inside corner flashing is available from the manufacturer.
Product accessories also include surface-applied profiles (SENTI…
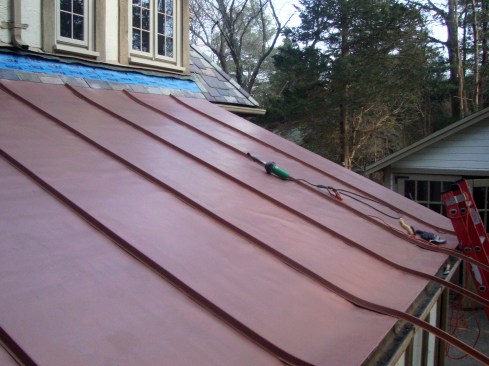
Product accessories also include surface-applied profiles (SENTINEL Profile bar) designed to give the appearance of a standing seam metal roof. These extruded PVC profiles (or ribs) are pliable and can be installed on both flat and curved surfaces, and on any slope. They are approximately an inch-and-a-quarter high by an inch-and-three-eighths wide and come in roughly 10 foot lengths.
When installing the rib profiles, first tack-weld them in place …
When installing the rib profiles, first tack-weld them in place to ensure that they are straight prior to final welding. Similar to the seam work, the profiles are hot-air welded to the membrane with the torch nozzle placed under the ribs, then immediately pressed with a seam roller.
Perimeter Flashing
We cut both cover strips and terminal flashing from the roll, according to need. To terminate the membrane against a wall or parapet, we cut the sheet to the junction and fasten the edge with stress plates. Then we fold a cover strip up the wall, using a full bead of caulk along the upper edge and nailing it in place. A few tack-welds hold the strip in place pending full seam-welding. Measuring 6 inches out along the roof plane, we then snap a line and trim the cover strip to it. Pre-formed inside and outside corner flashing is available from the manufacturer, and is the way to go for these junctures.
Along the roof’s perimeter, we install PVC-clad, heavy-gauge stainless drip edge with a bonded, weldable PVC coating. The drip edge is nailed off with stainless steel roofing nails at a rigorous 3- to 4-inch on-center spacing (replacing membrane stress plates along this edge). To finish it off, we then seal it under a weld-down cover strip. Because there’s a tendency during welding for the membrane to deform at any sharp corners, we round all the cover-strip terminations.
When mechanically-fastened membrane is first installed, it’s common to see slight waves in the surface where the material hasn’t fully relaxed onto the substrate. Over time, as the material responds to temperature cycling, the material settles to a flat, smooth appearance.