Flat-Lock Metal Roofs
What used to be called a “tin roof” is actually made from terne-coated steel. These days, this material is used mostly on restoration projects. These roofs have a series of rectangular metal panels, or pans, folded together along the edges. The seams must be beaten flat with a mallet, and then hand-soldered.
Slope
Flat-lock roofing is called for on any roof with a pitch less than 3:12. On steeper roofs, standing-seam metal should be used.
Flat-Lock Metals
Terneplate. This is the most common and inexpensive material used for flat-lock metal roofs. Originally, terne metal was a copper-bearing steel coated on both sides with an alloy of 80% lead and 20% tin. Since lead has been outlawed, a second-generation coated steel, using a 50% zinc, 50% tin alloy coating, is typically used instead but may be very difficult to source these days.
Unfinished terneplate must be painted on the underside before installation, and on the top side after installation. Use a rapid-dry water-based acrylic formulated specifically for zinc-coated steel. Typically, roofs should be repainted every 10 or 12 years.
Prefinished terneplate cannot be soldered; it is used for field-formed standing seam, not for flat-lock roofs.
TCS (terne-coated stainless steel) is a traditional material that doesn’t need to be painted to prevent the base metal from corroding. However, it has the same silver color as unfinished terneplate and may be painted for appearance.
Copper is expensive but looks great. Be forewarned that the runoff stains the house. Copper also expands and contracts more than steel, so it should be used only on short roof runs. Lead-coated copper used to be a popular choice but is no longer widely available; existing roofs are often painted for appearance with a slow-drying linseed-oil-based paint.
Flat-Lock Installation Checklist
Prepaint the underside of flat-lock metal panels, including all cleats, flashing, and drip-edge stock using a rapid-dry acrylic paint. Never use an aluminized paint, which will promote galvanic corrosion.
If using coated-steel, repaint the underside of the panels, including all cleats, flashing, and drip-edge stock using a rapid-dry acrylic paint. Never use an aluminized paint, which will promote galvanic corrosion.
- Lay roofing panels over a wood deck, preferably plywood. Do not use treated wood; the salts will attack the metal coating.
- Install metal panels over a rosin-paper slip sheet. Do not use asphalt-impregnated felt; the asphalt will attack the metal coating.
- Form pans from 20×28-in. sheets, using a metal brake (see pattern below).
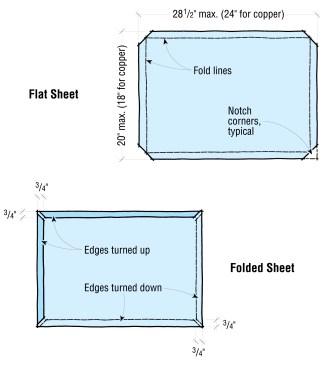
Cut flat-lock metal roof panels from 20×28-in. panels (for terneplate) or 18×24-in. (for copper), and then bend as shown.
- Panel edges along rakes and eaves lock over a drip-edge flashing (follow as shown in figure, Standing-Seam Edge Detail, below). Lock panels to L-flashing bent from flat-stock metal at vertical walls.
- Stagger panels, and secure to roof deck, as shown in the figure below.
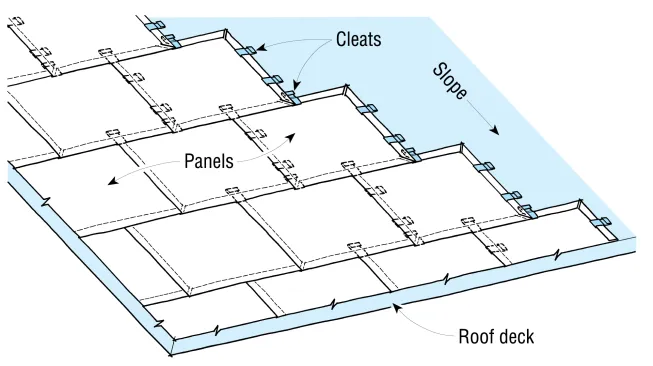
A typical layout shows how the staggered pans cover the roof. Uphill pans should always overlap the edges of lower pans.
- Use 2×4-in. prepainted cleats and two 1-in.-long roofing nails to secure panels. Fold over flap on cleat to cover fastener heads.
- Fold seams closed, crimp tightly, and beat down with a mallet and wood block. Seams should be single locked a minimum of 1/2 inch.
- Solder seams with a 50/50 solder and rosin flux, using a 3-pound minimum soldering iron. Be sure to wipe off all excess flux.
- Paint soldered roof with a minimum two coats of the same rapid-dry acrylic paint used to prepaint the underside of the panels.
Traditional Standing Seam
Standing-seam roofs shed snow accumulations quickly. Standing seam is a good choice for steep gable and shed roofs in cold climates.
Ordering Standing-Seam Metal
Traditional standing-seam roofs can be field-formed using the same materials used for flat-lock metal roofs. Pans are attached to the roof deck with cleats along one edge, while the seam along the other edge is covered by the next pan (below).

To secure a standing seam panel, a metal cleat (1) is bent over the panel stand (2), then nailed to the roof deck. The adjacent panel fits over the two pieces (3) and the entire seam is folded closed (4).
Preformed pans made of terneplate (24- or 20-in. wide) are available from Follansbee Steel (800/624-6906, www.follansbeeroofing.com).
Panel length. Standard lengths for preformed pan are 8-, 10-, and 12-ft. It’s hard to handle a pan longer than 8 ft. without wrinkling the metal.
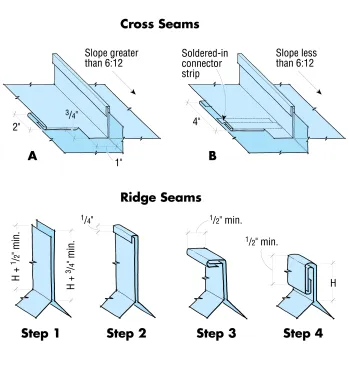
Cross seams: Use a standard cross seam (A) on roofs greater than 6:12. Roofs less than 6:12 require a more watertight cross seam (B), using a soldered-in cleat. Ridge seams: The stand at the ridge should be a minimum of 1 in. (H).
- When figuring pan lengths, allow extra for cross-seams and ridge seams (above).
- For shallow roofs (less than 6:12), allow a minimum 4-in. overlap, plus an additional couple of inches to form a deeper cross seam that accommodates a cross-seam connector strip (above).
- Do not use standing-seam panels below 3:12.
Number of pans. Measure the roof and plan for a standing seam at the centerline. Make a sketch showing the layout of the pans on the roof, and then calculate the number of pans you’ll need (below).
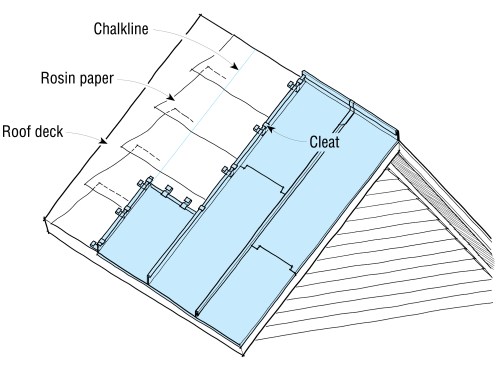
Installing a standing-seam roof is a lot like hanging wallpaper: Small errors at the beginning of the run create impossible problems at the end. Snap chalklines over a rosin-paper slip sheet to guide the installation.
Width of gable-end pans. At gable ends, cut off the upstand on the gable side of a preformed pan, and allow a 1/2-in. fold over a drip-edge. This will reduce the pan width on the roof by 11/2 in. (below).
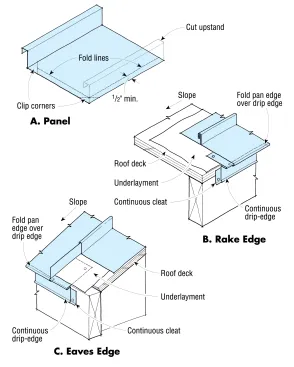
On a corner panel (along a gable end), cut off the upstand, then clip the pan corner at 45 degrees, as shown (A). Install a continuous drip-edge around the roof perimeter, then fold the edges of the pan 3/4 in. over this drip-edge, and lock in place with crimpers.
Standing-Seam Installation Checklist
- Roll out rosin paper as a slip-sheet between the roof deck and the pans. Do not use roofing felt, as the asphalt will attack the metal.
- Snap chalklines at the position of each vertical seam to help keep seams straight.
- Start at the bottom left edge of the roof and hook the first pan into the drip-edges.
- Using a mallet and a block of hardwood, flatten the seams at the drip-edges. Then, using locking-plier crimpers or roofing tongs, crimp the pan/drip-edge seam tightly together.
- Install hold-down cleats at 12-in. spacing up the right side of the pan and across the top edge of the pan. Fasten the cleats to the deck with two 1-in. roofing nails. Use prepainted terne or TCS cleats fastened with galvanized nails. For copper pans, use copper cleats and copper nails. Fold the tail of the cleats over the nail heads.
- Install the second pan above the first by hooking it into the top of the first pan and into the drip-edge. Close the seam at the drip-edge as before. Flatten the cross-seam between the two pans with a mallet and wood block.
- Anchor the second pan with cleats, and then install the remainder of the first row of pans all the way to the ridge of the roof.
- Install the first pan of the next row by hooking the triple bend over the double bend and sliding the pan up until it hooks on the drip-edge. Crimp the seam at the drip-edge, and install cleats along the right edge and top edge of the pan.
- Fold the first standing seam closed, as shown below.
- Install the rest of the pans. Remember to stagger the cross-seams and keep the pans aligned with your chalklines.

Standing-seam roof panels (at top) have folded seams and are fastened to the roof deck with concealed clips. Ribbed panels (at bottom) have formed ribs spaced by flat sections and are secured with exposed fasteners.
Modern standing-seam panels are factory-formed from prefinished galvanized or Galvalume-coated steel (see Metal Panel Coatings, below). These panels are made to custom dimensions and factory-formed with seams that snap in place. Some panel systems use cleats (or “clips”), but more commonly on residential products, the panels have a screw-flange along one edge of the panel that is concealed by the next panel.
Modern standing-seam panels are treated here as one variation of a pre-fab, vertical seam panel (see Pre-Fab Metal Panels, below). A standing-seam profile will not leave voids in valleys like a ribbed panel; it is a good choice for complex roofs that must be made watertight (Standing-Seam Detail, above).
Pre-Fab Metal Panels
Similar to “ag panels” that have kept barns dry for years, pre-fab, vertical-seam panels typically use exposed fasteners — usually a screw with a rubber gasket. Some (particularly those with a standing-seam profile) use concealed clips or screws. Pre-fab panels are typically less expensive than field-formed standing-seam and are considerably easier for contractors to install without specialized equipment.
Steel. Most metal roofing panels are made of steel. All steel panels have a metallic coating, and may also have a paint finish. The most common thicknesses of steel roofing panels are 24-, 26-, and 29-gauge. (The higher the number, the thinner the metal.)
Aluminum. Some vertical-seam roofing panels are made with an aluminum base metal. Not to be confused with an aluminized coating (see Metal Panel Coatings, below), aluminum panels are much more corrosion-resistant than steel panels. Residential “modular” panels may be as thin as .015 to .02 in. For larger vertical-seam panels, opt for a commercial-grade aluminum at .032-in.-thick.
Aluminum also has an increased potential for expansion and contraction with changes in temperature (see Thermal Response of Metal, below). This is not a problem for a small modular panel, but long vertical-seam aluminum panels should be installed panels over Z-channel purlins with clips, per manufacturer’s instructions (below).
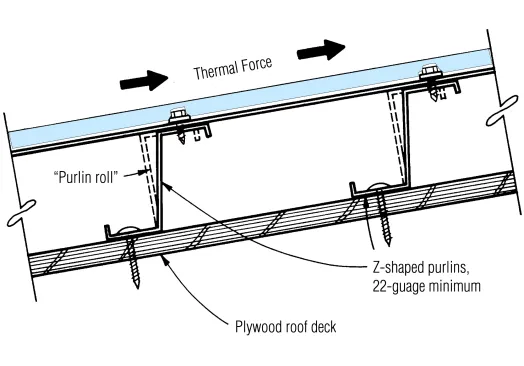
Metal roof panels installed over Z-shaped purlins will “roll” with thermal expansion of the panels. Wood strapping or hat channel will not absorb thermal expansion as well.
Rib profiles. The rib pattern in vertical-seam metal roofing varies from manufacturer to manufacturer and region to region. In the Northeast and Southeast, a popular profile is called “5-V crimp,” which has a 24-in.-wide exposure, with a double-vee profile along each edge and a single-vee profile down the center.
For cold, wet climates where ice dams and snow accumulations may occur, use a panel with the narrowest possible rib. The narrower the rib, the easier it is to seal.
Thermal Response of Metal
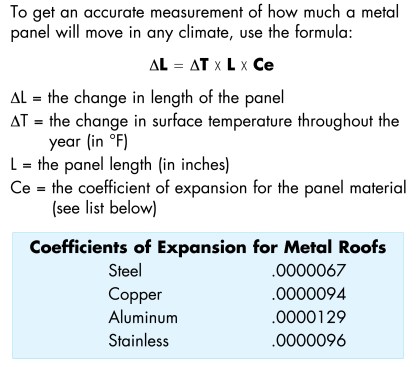
Metal expands and contracts with changes in temperature, which can be quite extreme on a roof. For example, in winter it’s not unusual for a roof panel to go from 180°F on a sunny day to below 0° at night. Under these –conditions, a 20-ft.-long steel panel would expand over 1/4 in. An aluminum panel this size would expand more than 1/2 in. If attached to plywood sheathing, the panel will “crown” between fasteners, and the force can cause screws to shear or the metal to tear around screws.
Evaluate the expected amount of change (see figure, Roofing-Calculating the Thermal Response of Metal, below). If the change in the length of the panel exceeds .15 in., consider these strategies:
- Reduce panel length;
- Install panels over Z-channel to absorb movement (see figure, Thermal Response Over Z-Channel, above).
- Choose a light (preferably white) panel in hot climates to reduce panel temperature.
Galvanic Corrosion
- Do not combine dissimilar metals. Always use fasteners, clips, purlins, and flashings of a similar or compatible metal.
- Don’t use a pencil to mark cuts and fastener layouts. Graphite is listed on the galvanic scale and can corrode a roofing panel’s metallic coating. Use a felt-tipped marker.
Fasteners for Metal Roofs
Pre-fab metal roof panels may have exposed or concealed fasteners.
Exposed fasteners for metal roofs are usually screws with rubber washers. Always install the screw in the flat portion of the panel, not on the raised rib. The rubber washer will seal around the screw. If installed through the rib, the screw will not get enough purchase to hold the panel securely, and because most of its length is unsupported, it may shear easily. Both increase the chances for blow-off.
Concealed fasteners for metal roofing may be a screw inserted through a concealed flange or through a panel clip designed to absorb expansion.
- Never use nails. The increased expansion and contraction of the panels will eventually work nails loose.
- Use screws that penetrate all the way through the sheathing 1/4- to 1/2-in.
Ordering Metal Roof Panels
Agricultural panels may be sold in standard lengths, but most residential roofing panels are often ordered in any length (down to the fraction of an inch) from a lumberyard or roofing supplier. In general, the length of the panels will be the ridge-to-eaves measurement.
- In most cases, the 11/2 in. added for the eaves overhang is balanced by the 11/2 in. subtracted for ventilation at the ridge.
- The cap flashing installed at the ridge will allow room to fudge 1 or 2 in. at the top.
Metal Panel Coatings
All sheet steel is coated with a thin layer of corrosion-resistant metal.
Galvanized
The most common coating is pure zinc, known as a galvanized coating, which oxidizes, chemically sealing the base metal from corrosion.
- The thickness of a galvanized coating is designated as G-60, G-90, or G-100. The number here refers to minimum application rates equal to .60, .90, and 1.0 ounce of zinc per sq. ft. (total coating thickness both sides).
- Zinc is water soluble. As it dissolves, it tends to recoat scratches or cut ends and is considered “self healing.” However, because the coating dissolves, it eventually washes away and the base metal begins to rust. The thicker the coating, the longer the panel will last.
Aluminized
Pure aluminum coatings over steel carry a Type II designation. (Type I is used in the automotive industry.) Owing to the truly inert nature of aluminum, these coatings don’t dissolve or wear away, providing significantly better protection than galvanizing.
Galvalume
Also known as Zincalume, if the panel manufacturer originated in Australia or New Zealand, this coating is made from an aluminum-zinc alloy. The typical coating weight AZ-55 designates 55% aluminum and 45% zinc by weight. As one might expect, Galvalume falls between a pure zinc and a pure aluminum coating in its performance.
Paints for Metal Roofing
Nearly all roofing panels have some type of factory-applied finish over the metallic coating.
Finish Warranty
Factory-applied paint rarely peels, but eventually will fade. It usually fades unevenly, so it looks unsightly. When a paint fades, it’s a breakdown of the -pigment. Depending on the quality of the paint resin, which creates a protective coating around the pigment, panel manufacturers will warrant the finish against fading. However, the warranty period on the finish is considerably shorter than the warranty against corrosion of the base metal.
Color Choices
Red, bright blue, and black pigments tend to fade the fastest. Grey (the lighter the better), tan, and white fade the least.
Paint Resins
Better quality resins in paints bond tighter and provide better protection, but even the best ones eventually chalk. There are three types:
- Polyester resins are the least expensive and of the lowest quality.
- Silicon-modified resins will retain their gloss much longer than polyesters.
- Fluoropolymers, known by such brand names as Kynar® and Fluropon®, are the most expensive and longest lasting. The more resin, the longer the finish lasts. Top-quality panels typically use a 70% formulation, while less expensive products advertising this superior resin use thinner concentrations.
- Field-applied paints. These will last only 5 to 7 years before peeling, even if applied under the best conditions.
Metal-Panel Sealing Details
House roofs, with dormers, hips, valleys, chimneys, skylights, and plumbing vent penetrations, put more demands on metal roofs. Metal roofs on houses must be built watertight by sealing all joints, side seams, and endlaps.
Sealants for Metal Panels
Thermal movement, freeze-thaw cycles, and exposure to ultraviolet light will degrade even the best quality sealants. For best results:
- Use butyl tape (1/2-in.-wide works well for panel seams). Tape sealants, which have a high solids content (about 97%), don’t shrink as much as gun-grade sealants. Most tapes for metal panels are butyl polymers, which will last 30 years or more if protected from exposure to ultraviolet light. Gun-grade sealants are usually about 70% solids, which means that when the 30% solvent evaporates, the sealant shrinks.
- Do not use silicone. Many silicone sealants contain acids, which can damage metallic coatings. Also, silicone has poor adhesive strength on metal. If butyl tape is not available, use a urethane instead.
- Always seal between panels so the sealant is hidden from the damages of ultraviolet light. Sealants smeared on the exterior of the panel will surely fail.
- At eaves, in valleys, and on the upslope side of chimneys and skylights, use rubber closure strips to seal the void created by the profile of the panel ribs. Most panel suppliers offer these closure strips in both male and female (inside and outside) configurations. Make sure a metal panel or flashing extends over the rubber closure to protect it from sunlight.
Wall Flashing For Metal Roofs
When flashing against walls — as well as skylights, chimneys, and roof hatches — use a two-piece flashing with closure strips (rubber blocks that mirror the panel profile) or preformed curb flashings (below).
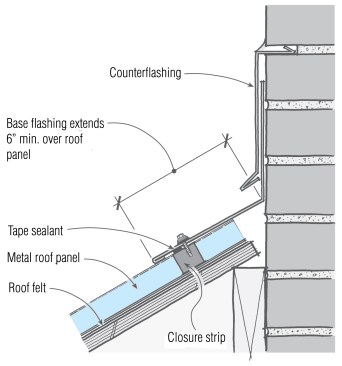
Use a two-piece metal flashing to accommodate the differential movement between walls (or chimneys, skylights, and roof hatches) and metal roof panels. Fasten the base flashing to the roof panel, but not to the counterflashing.
- Connect the base flashing to the roof panel with washered screws.
- Apply tape sealant between the roof panel and the flashing, and be sure the screw pierces the sealant or is placed on the dry side of the tape, not on the weather side.
- Seal the joint between the base flashing and the roof panel with tape sealant.
- On the upslope side of a chimney or skylight, use a cricket, or diverter, to direct the flow of water around the penetration. This cricket should be inserted beneath the upslope panel, sealed with butyl tape, and the voids at the cut edges of the roof panel sealed with rubber closure strips.
Sealing Valleys
Cutting a panel diagonally across a rib produces a large irregularly shaped void that is difficult to close.
- Use a valley flashing made from flat stock with the same coating and finish as the roof panels. Bend it to the roof slopes with an inverted “V” at the centerline.
- Cut off the rib portion of a standard male closure so you are left with several “plugs.” Position these plugs square to the panel’s length.
- Install roof panels at least 3 to 4 in. upslope of the valley centerline, and make sure the flashing extends at least 4 in. past the panel edge so the closures seal to the flashing.
- When installing roof panels over the valley flashing, apply tape sealant on the top and bottom of the plugs, and use a close fastener spacing in the pattern shown below. Screws must pierce the sealant or be placed on the dry side of the joint.
- On long valleys, use several valley sections to avoid problems with thermal expansion. Overlap the sections at least 3 in. and use a double row of tape sealant.
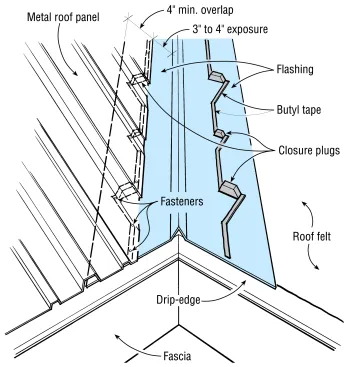
Seal the diagonal valley cuts on the roof panel with plugs cut from a closure strip. The plugs must be positioned square to the panel’s length and sealed top and bottom with butyl tape.
Sealing Round Penetrations
Round penetrations, such as plumbing vents and furnace flues, must be flashed with special rubber boot jacks that have a moldable aluminum compression ring (available from specialty contractor and commercial roof suppliers).
Sealing Vertical Seams
- Apply the tape to the top shoulder of the panel rib, making sure that the majority of the sealant winds up on the weather side of any fasteners (below).
- Do not peel away the release paper until you’re ready to install the overlapping panel. Align the panel exactly before it contacts the sealant. Once a panel touches the tape, even a small adjustment is difficult.
- Screw panel sides together, piercing through the sealant on the “dry” side with 3/4-in.-long 1/4×14 hex head galvanized screws with a #1 drill point.
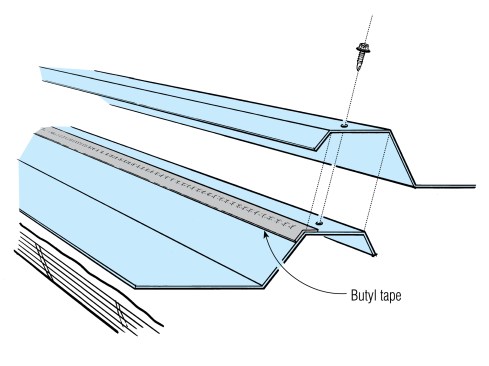
To seal the lap between adjacent panels, apply butyl tape to the weather side of the rib shoulder.
Sealing Endlaps
- Make sure the upslope panel always overlaps the downslope panel (below).
- Apply sealant on the weather side of the endlap fasteners.
- Place screws that secure the panel to the deck (or purlins) above the endlap sealant.
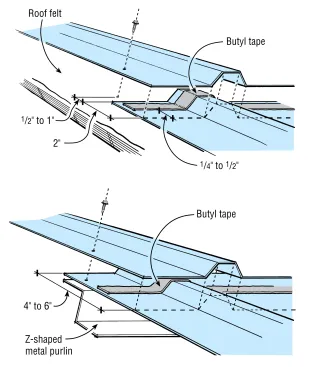
Use butyl tape to seal panel endlaps, making sure the screws that fasten the panel to the deck (at top) or to purlins and sleepers (at bottom) are placed above the sealant, as shown.
Sealing Eaves
- Drip flashing should be nailed down just enough to hold it in place prior to installing the roof panels.
- Screws to hold down roof panels should pierce through the panel, drip flashing, and deck.
- If gutters are used, take extra care to seal with rubber closures and butyl tape to prevent snow, rain, and ice from entering the panel voids (below).
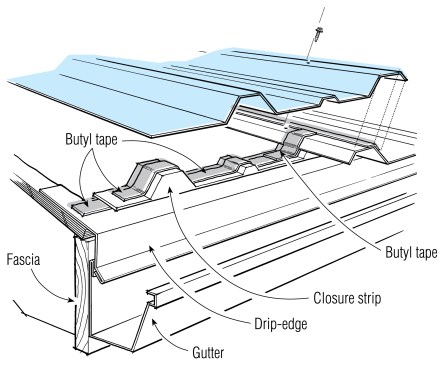
When gutters are used, seal the eaves as if they will be submerged in water. Without gutters, roof panels should overhang the drip-edge at least 4 in.
Sealing Rakes
Prefabricated commercial rake flashings are available, but these are usually too large and “boxy” for use on a residence. Instead, ask the panel supplier to furnish flat sheet stock with a matching finish to be bent into a simple L-flashing, as shown in the figure below.
- Attach L-flashing to the roof at a high rib with sealant tape. This might mean extending the horizontal leg a few extra inches.
- Fasten the L-flashing to the fascia using a metal cleat that matches the angle of the drip leg. (Alternatively, fasten through the face of the flashing with a washered screw.)

Fabricate rake flashing from flat sheet stock provided by the roof panel manufacturer. Extend the horizontal leg of the flashing so it attaches with butyl tape and screws to the roof at a high rib.
Hip and Ridge Caps
Most panel suppliers offer standard ridge components for use with their panels.
- Use a sealant tape to seal the joint between roof panel and ridge cap.
- When using long panels that are subject to substantial thermal movement, make sure the ridge cap and the panels are fastened separately to the deck.
- For hips, metal roof manufacturers typically provide metal J-trim, which is topped by a metal ridge cap (below).
- On complex roofs where snowmelt and ice damming patterns are difficult to predict, make the hip assembly watertight with plug closures and tape sealant.
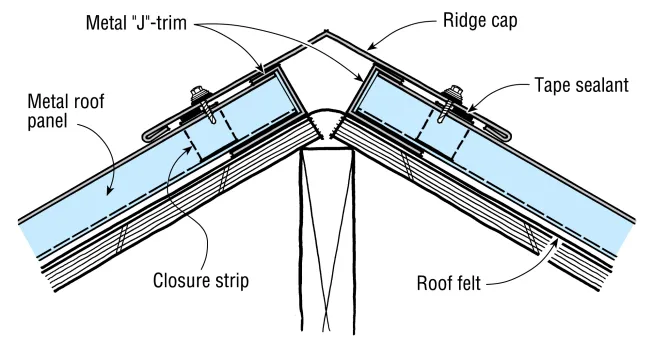
To seal hip ridges, use metal J-trim set square to the panel’s length. On simple hips in steep roofs, this assembly can be installed without tape sealant; on complex or low-slope roofs, use with rubber closures and butyl tape.


