Working on Slate
When working on existing slates, never walk directly on the roof surface. Dry slates are slippery; wet ones are as slick as ice. All slates are brittle and easily broken.
- If you must walk on the roof, spread your weight with foam insulation or plywood underfoot. Walk in the valleys, or hook a ladder over the ridge and rest it on some
sort of cushion (a double layer of batt insulation will do). - If the nails look very rusty, use extreme caution: when walked on, they could come loose.
Inspecting Slates
If possible, inspect the roof from the attic.
Evaluate Slate Conditions
The natural weathering of slates slowly chips and flakes off paper-thin laminations. Also, slates become soft and spongy as the inner layers begin to delaminate. Old, weathered slates tend to hold more moisture than new slates. This leads to further deterioration and even rot in the roof sheathing underneath.
Inspect Nails
The tips of nails can give a good indication of their condition. On the roof surface, signs of deteriorated nails include loose slates or a large number of repairs.
Inspect Transitions
When inspecting a slate roof, look closely at ridges, valleys, dormers, and other changes in roof direction. Cracked slates around a valley are a tipoff that something is trapping water. When the water freezes, it cracks the slate above it. Also look for roof cement — it’s a sign of improper maintenance.
Moss and Mineral Deposits
Excessive moss and mildew are as harmful to slates as to other roof coverings. Moss traps moisture and its roots can penetrate and damage the slate. High moisture levels in the attic can also cause deterioration. Look for mineral depos-its on the top or bottom surface of the slates, which indicate such underlying moisture problems and result in shortened shingle life.
Finding Leaks
In a severe windblown rain, even a good slate roof may get an occasional leak. Such leaks show up at inside corners, near valleys, and around chimneys. They’re most common on shallow roofs.
Nail Holes
If an otherwise sound and well-designed roof leaks during a long rainstorm, look for nail holes that were punched too low or too close to the slates’ centers. They may be letting water seep in from the end laps.
Slate Repair Checklist
Replacing a few broken slates is a simple procedure, but it must be done carefully or you can end up breaking more slates.
Measure Slates
To find the length required for a replacement slate, you can sometimes measure an exposed side at a gable end or valley. Another way is to multiply the exposure by 2 and add 3 in. as shown in Figure A.
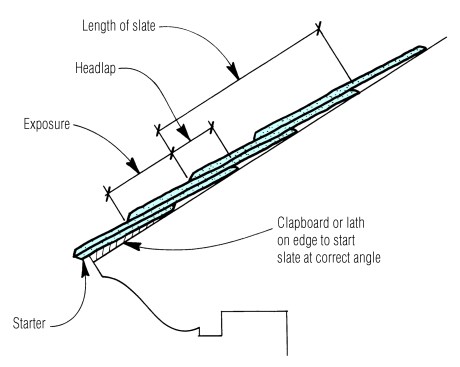
To find the size of the replacement slate, multiply the exposure by 2, and add 3 in. for the headlap. Round up to 12-, 14-, or 16-in.
Remove Damaged Slate
To remove a damaged slate, slide a slate ripper beneath it and hook onto one of the nails. Taking care not to put any upward pressure on the ripper (you don’t want to crack any undamaged slates), hammer down on it until you either cut the nail or pull it out. Repeat for any other nails.
Install Replacement
The traditional technique is to nail punch or drill one hole in the replacement slate to line up with the joint between the two slates above. Nail in the joint with a copper nail, with the head trimmed if necessary. Then slide a 3×8-in. piece of copper flashing in place to cover the nail hole (Figure B).
Nailing
Most slate roof failures are caused by improper nailing or by corroded nails or flashings. Galvanized nails, for example, may wear out long before the slates. For best results, use copper flashings and 14-gauge copper nails. They’re expensive, but they’ll last the life of the roof.
Nails should be set lightly so slates hang freely from the nails. Nails driven too far will crack the slate. Underdriven nails will crack the slate above.
Slate Hook
Another method is to fasten a copper or stainless-steel slate hook (available from most slate suppliers) in the joint beneath the slate you’re replacing, as shown in Figure C. Drive the hook’s 3-in. shaft into the roof sheathing above the headlap of the slate below it. Then slide the new slate into place and pull it down until it rests in the bend of the hook.
In mild climates where snow and ice are not a problem, a strip of copper flashing bent to hold the slate can be used instead of a slate hook.
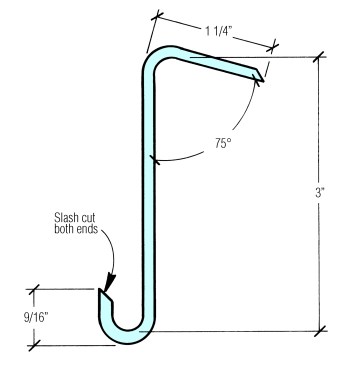
A slate hook is driven into the sheathing in the joint under the replacement slate. Use copper or stainless steel for a permanent replacement repair.
Cutting Slate
For a small number of cuts, a carborundum blade on a circular saw will do. When cutting a lot of slates, use a power tile saw or snap cutter.
Punching Nail Holes
To make nail holes, drill with carbide, or punch a hole (from the back of the slate) using the sharp point on a slater’s hammer.


