
802paint.com
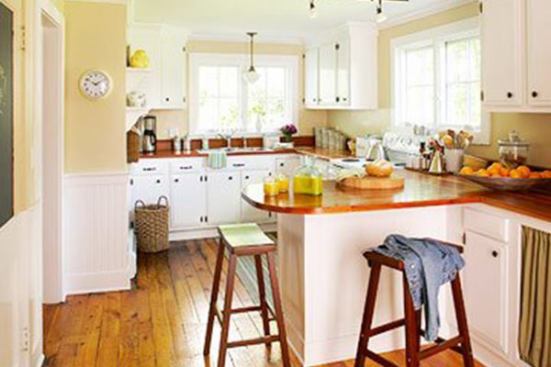
The author’s 12 year old cherry countertops.
Wood countertops are not for everyone.
They have a warm feel about them that exceeds most other types of tops. But they do require periodic maintenance that can involve refinishing, which can be necessitated by general wear and tear or by the wood’s own behavior. Wood countertop refinishing is a discipline that Topcoat Finishes has considerable experience in.
One of the more common wood behavior issues is the ordinary expansion and contraction of the wood itself. Wood moves with the season. It expands with moisture and humidity in your home, and it contracts when the air becomes dry. As an organic material, wood is very much alive. Sometimes movement can cause wood to split.
How Wood Splits:
Wood splitting, or “checking”, is when the wood opens up along the course of it’s grain. It is an obvious split or separation in the wood.
While checking is visually desirable in some wood features, such as post and beam or other rustic types of wood joinery, on countertops it can become difficult to live with.
Imagine trying to clean your countertops, and crumbs and debris keep getting swallowed up in cracks on the surface. Not desirable at all.
Checking can also compromise the finish that is on the countertops rather quickly.
What to do when Wood Splits:
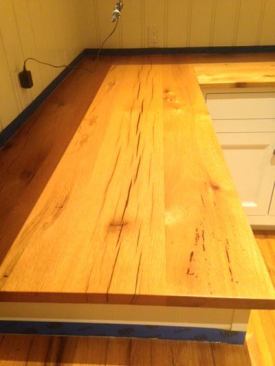
We recently tackled a wood countertop refinishing project in the pantry of a client’s home. The wood species is antique reclaimed oak. This tends to be very dry wood, so when it checks, it can get big in a hurry.
Here are the steps we took to remedy the problem:
- fill the cracks with multiple rounds of a clear wood epoxy, until proud on top of surface
- when epoxy is dry (follow mfr directions), sand the repaired areas
- inspect to make sure there are no dimples or hairline cracks within the repairs
- sand entire countertop surfaces
- apply multiple coats of desired finish
Within these bullet points, there are many tools, products and methods that could be used. It is worth noting that epoxy comes with a strong odor, so be sure to ventilate and respirate as needed when working with it. Safety is the first concern when refinishing indoors. Always follow manufacturer specs and recommendations.
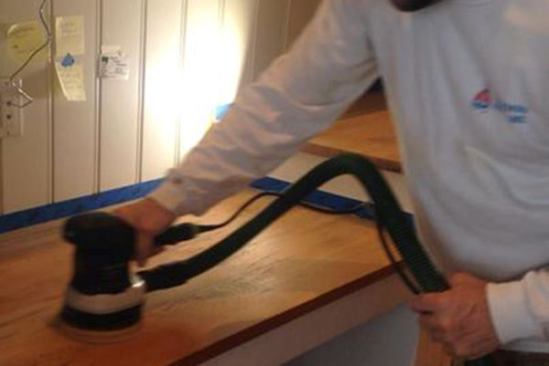
About Sanding Indoors
There are three rounds of sanding involved in wood countertop refinishing.
- sanding to strip : remove the old finish (60 grit in this case)
- sanding to prep : preparing for new finish (80/100/120/150)
- sanding to finish : in between coats (180/220/320)
Grit Steps
The sanding sequence takes place in successively finer grits of sandpaper, called “grit steps”, from 60 all the way to 320.
This sequence is critical because the 60 grit strip round opens the grain of the wood. Each finer round begins to close it back up, which is the key to building a hard, smooth and durable finish.
The decision on how far to take these steps is driven by the type of finish that will be applied.
Dust Control
Understand that sanding can be a rather dusty undertaking and is best done in the least obtrusive way possible.
On this project, we chose a 6? Festool orbital sander, the ETS150/5, complemented be a DTS400 triangular shaped sander for the edging and detail sanding. Both units were attached to a HEPA dust extractor to make sure that very little dust became airborne inside the house.
Festool equipment works together as an efficient and clean system, capturing dust at the source and reducing exposure to skin, eyes, lungs, etc.
[Related: Topcoat leads the way in Sustainable Painting Practices]
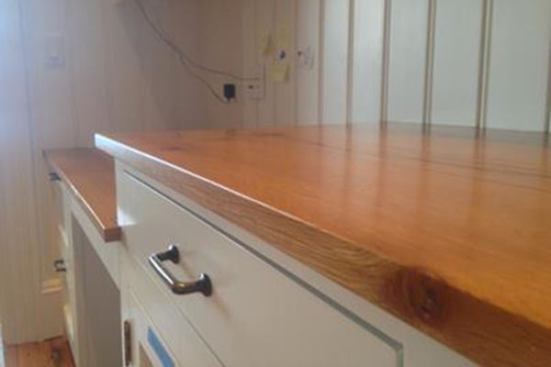
Building a Durable Finish
On this project, we chose to do a 4 coat system, comprised of two coats of sanding sealer, and two coats of an advanced waterborne clear finish in a satin sheen. There are many different product combinations from multiple manufacturers that could be used here.
Of equal importance to the finish product is the finish process. In this case, the sealer is applied to raw wood that has been prepared to 150 grit.
When dry, this coat is sanded at 180 grit, and another coat of sealer is applied. The sealer is a fast drying product, so we are not having to wait very long between application and sanding. The second coat is sanded at 220. First coat of finish is applied. When dry, sand at 220. Final coat of finish is applied and allowed to dry.
Finish is allowed to cure, per manufacturer specifications, prior to returning to service.
Contact Topcoat through this website if you would like to arrange a consultation.
Click here to read the original article.
Topcoat tests and reviews new product technologies, in many cases, months in advance of their release to the public. Our projects and state of the art shop facilities are the testing grounds for our paint tool reviews. For more information, visit topcoatreview.com


