
My company has specialized in cedar sidewall shingling in California’s San Francisco Bay area for the past 31 years. In my opinion, there’s not a better-looking or more practical siding than tight-to-trim cedar shingles with straight, consistent course lines and nicely woven corners. Here’s how we approach a typical job.
The Right Shingle
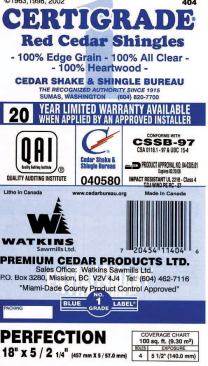
We usually install western red cedar shingles that carry a Certigrade label from the Cedar Shake & Shingle Bureau (604/820- 7700, cedarbureau.org). For most sidewall applications, Certigrade No. 2 Red Label and No. 3 Black Label shingles are fine, but for some architectural designs and in areas with extreme climate conditions, we prefer premium No. 1 Blue Label shingles. These bundles contain 100 percent edge-grain shingles, which hold paint and stain better than flat-sawn shingles and are less prone to cupping.
But even Certigrade shingles can be poorly milled – and therefore frustrating and time-consuming to install – so we often go a step further and recommend R&R KD (rebutted and rejointed kiln-dried) shingles. R&R shingles are remanufactured from No. 1 and No. 2 Certigrade shingles so that their sides are parallel and their butts straight and fuzz-free. Kiln-dried shingles are more stable and less prone to cracking than green shingles, partly because the poor-quality pieces are exposed and culled during the drying process.
Shingle width. Most shingles sold in North America conform to CSSB-97 grading rules, which also specify shingle dimensions and bundle composition. In a No. 1 bundle, shingle widths range up to 14 inches, with fewer than 10 percent of the shingles sized between 3 and 4 inches (we call these narrow shingles “sticks”). In a No. 2 bundle, sticks can make up 20 percent of the bundle; in a No. 3 bundle, up to 30 percent of the shingles can be sticks. A wall sided with a lot of narrow shingles looks busier than a wall with a good mixture of wide and narrow shingles and takes longer to install, so No. 1 shingles are always preferable.
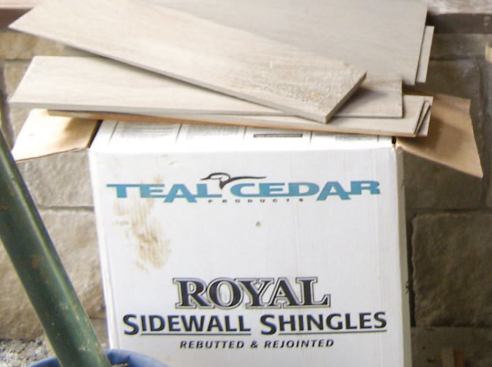
While green No. 1, No. 2, and No. 3 shingles are packaged in bundles, R&R shingles are packaged in boxes. Some mills offer what is called a 100 percent two-pack, an in-house specification that means that only two shingles make up each row in the bundle or box. A 100 percent two-pack box with 56 rows contains 112 shingles, compared with 168 shingles in a 100 percent three-pack box, though each will have the same amount of coverage. For best results, I ask my distributor for a 40/60 percent mix of two-pack and three-pack boxes when I’m installing R&R shingles.
The number of boxes needed to cover a square depends on shingle size and exposure. For example, three boxes of 18-inch-long R&R Perfection shingles installed with a 5-inch exposure will cover 100 square feet. After calculating the total area to be shingled – subtracting only for large openings – I add another box for every 80 lineal feet of starter, and add an additional 5 percent to 7 percent for waste.
Even though I work with reliable suppliers, I still inspect each bundle or box when the shingles arrive. I’m looking for a good mix of widths, and butts that are clean and uniform. I’m also looking for tight grain: The more growth rings per inch – 12 to 20-plus is a good range – the longer-lasting the shingle. More growth rings per inch means the tree grew slowly. Fast-growing “spring/summer” wood is softer and wears away faster than harder, slower-growing “winter wood.”
Layout
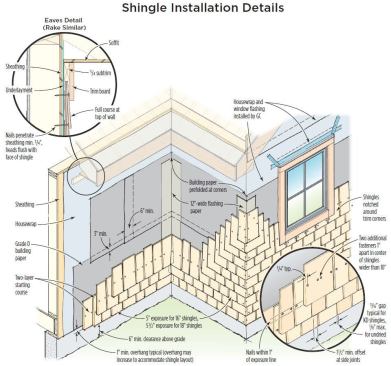
To my eye, a shingled wall looks best when it has a full course of shingles at both the bottom and the top. A smart layout can help us avoid time-consuming short courses and locate sconce blocks for exterior lights, receptacles, and plumbing stub-outs.
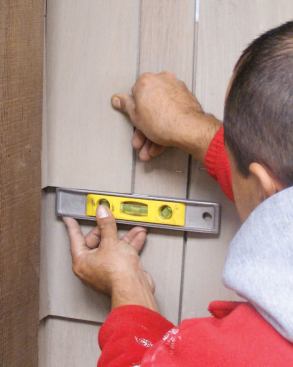
We start layout by marking a level reference line around the entire building with a laser level. We use this line to lay out the courses, keeping in mind that we want to start and end the wall with full shingle courses if possible. We also use the level reference line to check that the structure is level and to anticipate problems with the soffits, windows, and doors.
To keep things simple, we try to lay the coursing out to either one or two major horizontals or to the front of the building. We also try to minimize course exposure changes, and we don’t adjust courses around windows and other openings. Trying to adjust courses for several different heights results in uneven exposures, complicating the job and slowing us down.
With 16-inch shingles, a 5-inch exposure typically provides a four-ply build-up; 18-inch Perfection shingles with a 5 1/2-inch exposure give similar coverage.
Wall Prep
After layout and before papering, we inspect the walls to make sure the sheathing is nailed off. If there are errant nails or other protuberances, we remove them or pound them flush. If the sheathing is overhanging at the outside corners, we trim it flush. We also check that the trim and flashing have been correctly installed and finished and that all stub-outs are in place.
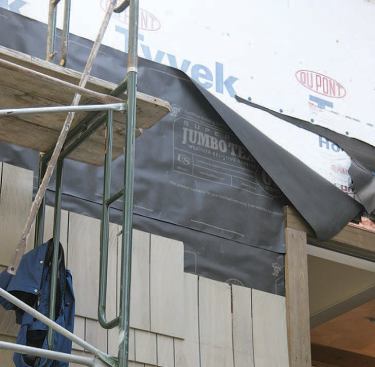
Underlayment. A weather-resistive barrier beneath the siding provides an extra layer of protection against extreme weather and is required by most state and local codes. Most of the time, we use a double layer of Fortifiber’s Super Jumbo Tex 60-minute Grade D building paper (800/ 773-4777, fortifiber.com). This asphalt-impregnated kraft paper isn’t as thick or as heavy as ASTM D226-rated Type 1 asphalt felt (about 6 pounds per square vs. 12 pounds per square), but it’s less brittle in cooler weather and is flexible enough to sharply crease for inside and outside corners. We’ve found that in our climate, the double layer of felt paper is just as effective as rain-screening at allowing the back of the shingles to dry out. To prevent the paper from getting wet, we install only as much as we can cover with shingles that same day.
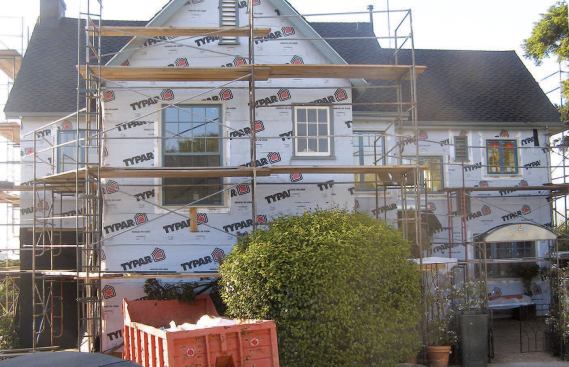
I also sometimes recommend housewraps like Tyvek or Typar, particularly for projects in the rainy season. Felt paper that gets wet tends to bubble out between fasteners, and shingling over bubbled paper can lead to cracked and split shingles. Housewraps don’t have this problem, so the entire house can be wrapped and kept reasonably dry. To prevent cedar extractives from bleeding onto the underlying housewrap, I always overlay the wrap with a single ply of Grade D paper as we shingle.
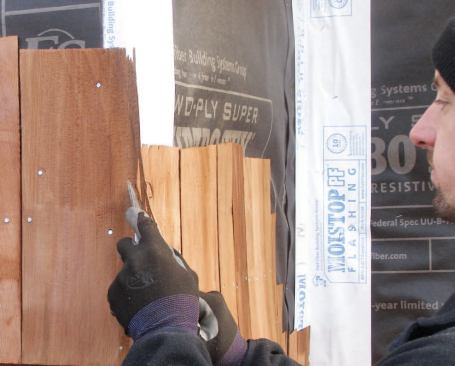
At inside and outside corners, we prefold the building paper for a tight fit. For additional weather protection at corners, we install a layer of Fortifiber’s 12-inch-wide Moistop flashing paper over the building paper.
We also like to caulk the vertical sides of trim to the underlayment ahead of time so that the caulk is dry by the time we start shingling. Some shinglers lay the shingle edge in wet caulk, but we think that approach wastes time and makes a sticky mess. For caulking, we use Fortifiber’s Moistop polyurethane sealant, which is compatible with all of the building papers, underlayments, and flashings that we use.
Installation
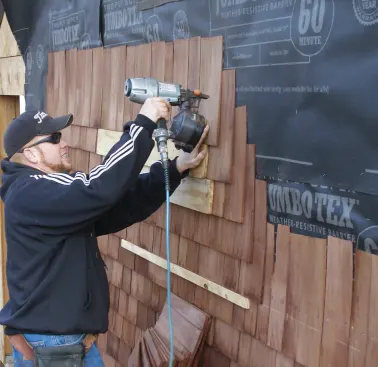
Our crews typically consist of two journeymen shinglers and an apprentice. The apprentice rolls out and installs paper and caulk, keeps the journeymen supplied with shingles, and makes cuts on the table saw. With this three-man team, we can install three to four squares per day.
Whether we work from full staging or pump jacks depends on the job. Most of the time, we work from scaffolding that’s already been set up by the general contractor. But I like pump jacks too, since they’re a little more portable, can get into tight spaces, and are faster to set up. My crews like them because the work platform can be raised and lowered as needed to align with the area we’re shingling.
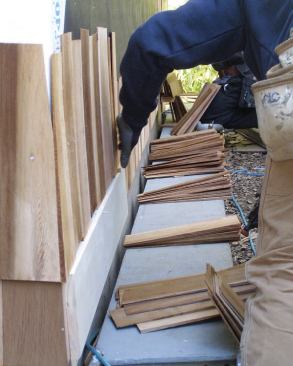
Prepping the shingles. Before we start shingling, we open a bundle or two and sort through the shingles. Wider 12-inch to 17-inch shingles get set aside into a separate pile because these are best for motoring through areas that require time-consuming cutting. We distribute the rest into handfuls placed at 3- to 4-foot intervals along the wall, with the tips of the shingles facing the wall. We also sort tips, cuts, sticks, and wide shingles into bins. Economy of motion is key, so we try to make the materials handy without overcrowding the work area.
As we sort through shingles, we cull any hard and brittle ones that are likely to crack or warp after they’ve been installed. Some shingles have hidden vertical cracks along the grain that show up if the shingle is flexed parallel to grain. If a shingle cracks when we flex it, we don’t use it.
Starter course. The two-layer starter course should be installed straight and level, and have a minimum 1-inch drop below the top edge of the foundation. Sometimes we’ll overhang the foundation by as much as 4 inches to accommodate the layout and start with a full course, as long as we maintain the minimum 6-inch clearance above grade.
Remanufactured shingles are square and uniform in length, so we can simply snap a chalk line on the felt paper for the top edges of the shingles to follow. When shingles aren’t uniform, we align them along their bottom edge, by setting up either a string line or a straightedge. We often use less expensive No. 2 or No. 3 shingles for the undercourse, but they have to be finished to match the other shingles.
As we install shingles, we offset the side joints by at least 1 1/2 inches over the underlying shingle and locate fasteners 3/4 inch from each edge and within one inch of the exposure line. On shingles that are wider than 10 inches or so, we also use a couple of fasteners approximately 1 inch apart in the center of the shingle. Kiln-dried shingles can swell and buckle after installation, so we space them about 3/16 inch apart. Since shingles that haven’t been kiln-dried will shrink after installation, we space them no more than 1/8 inch apart so they won’t leave wide gaps as they dry. The cup of the shingle goes in toward the sheathing.
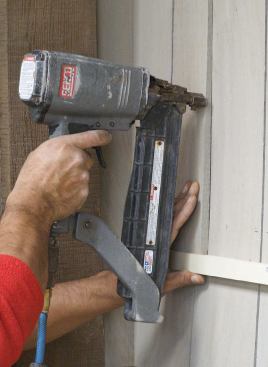
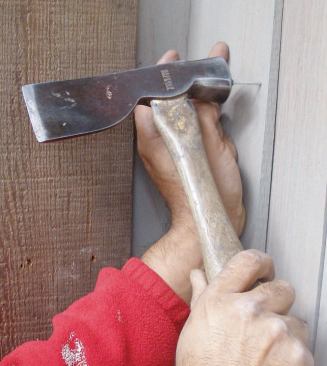
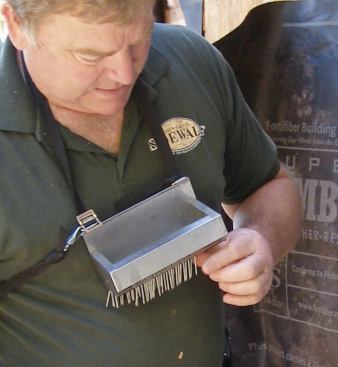
Fasteners. For field work, my crew likes to use Hitachi NV 65AH coil siding nailers with HD ring-shank nails, though we also use 7/16-inch crown staplers. For exposed work, small last cuts, or anything that has to be hand-nailed, we use 1 1/4-inch-long stainless steel 4-penny ring-shank nails when we’re installing 16-inch and 18-inch shingles, and 6-penny ring-shank nails when we’re installing 24-inch shingles. Fasteners have to be long enough to penetrate all the way through 1/2-inch or 5/8-inch sheathing, or at least 3/4 inch into thicker sheathing. When we’re hand-nailing, we use siding hatchets instead of hammers, because they have sharp, gauged blades that are handy for trimming shingles and gauging course height. Instead of putting our nails in pouches or aprons, we put them in nail strippers, which are small aluminum boxes that strap to the chest. Nail strippers orient the nails with the points down, so we don’t have to fumble with them or roll them in our fingers to get them to point in the right direction.
Outside Corners: To start a corner, nail up the first shingle so…
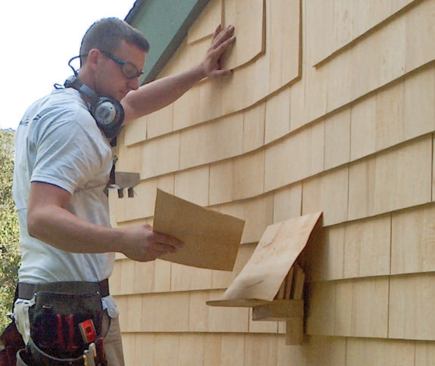
Stacking boards. Another way we speed production is by using stacking boards and mules when we shingle. Stacking boards are simply straightedges ripped from 3-foot-long 1-by stock so that they measure just under the desired exposure in width. We predrill a pair of 5/16-inch-diameter holes 8 inches from each end of the boards so that we can temporarily fasten them to the wall with nails. The holes are angled up and located at the top edge of the board face so that the nails penetrate the shingles right at the exposure line, rather than in the middle of the exposed shingle.
After completing the double starter course, we measure down from the reference line at each end of the wall and snap a chalk line for the second course. Then we attach the first stacking board a hair under the chalk line, so that the shingle edges will just barely cover it. As we place the shingle butts on the board, we make sure they’re not sitting cock-eyed or out of plumb as we nail them off.
Once the second course has been fastened, we stack a second board onto the top edge of the first board, which sits proud of the face of the shingles, and repeat the process. As we work up a wall section, we’ll stack as many as five boards at a time, though three boards seems to be about average.
After working up a few courses, we can slide mules – or work platforms cobbled together from a couple of boards and a shingle offcut – under a finished course at waist height to hold our shingles and tools. To make shingle selection faster and easier, we lay the shingles on edge and make sure the tips are facing the same direction. Sorting the shingles in descending order according to width – with the widest in back and the narrowest in front – allows us to quickly see and grab the right size.
After completing our first run of five courses, and every few courses thereafter, we measure the courses against our reference mark to verify that our exposure is aligned with the layout.
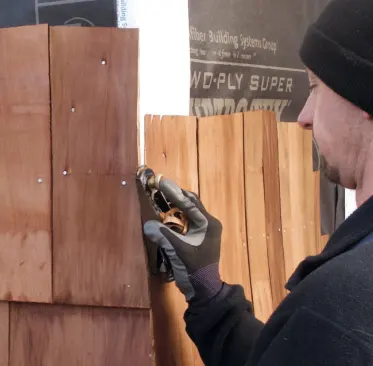
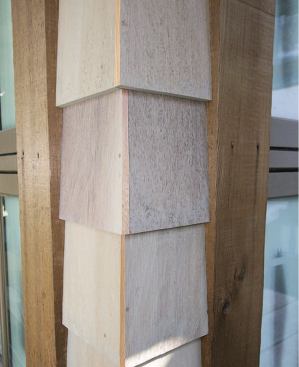
Corners. I like to weave both inside and outside corners (see “How to Weave Corners,” facing page and above). I think that woven corners look better than corner boards, and corner shingles with alternating exposed edges resist water intrusion better than corner trim with long vertical joints. Because these shingles need to be cut and planed, we build corners out of shingles with tight, straight vertical grain.
Windows and doors. It’s possible to slightly adjust course exposures so that courses align with window trim and other prominent features on the wall. But this method slows production down significantly, so we don’t use it unless a client specifically requests it.
As we come to within 2 feet of any vertical trim – such as a window, door, or corner – we place a full shingle against the trim first, then infill. This is easier and faster than trying to fit the last shingle against the trim, because that shingle usually must be trimmed to fit. At the corners, we notch the shingles in an L-shape around the trim, which helps avoid vertical joints that might allow water intrusion.
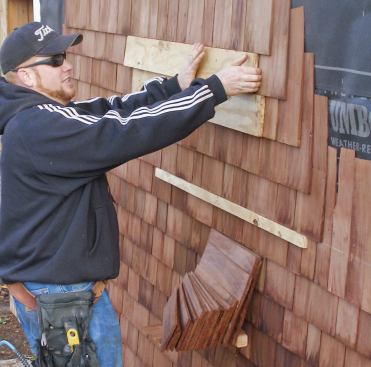
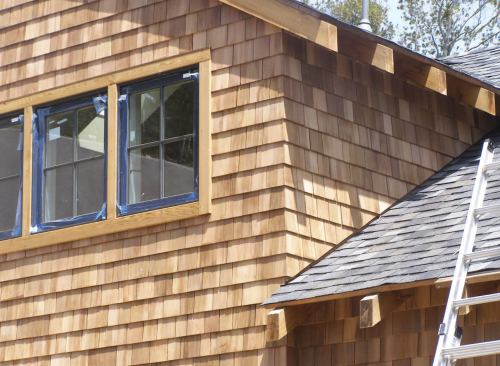
Dormers. Wherever sidewalls meet a pitched roof, we start the shingles on 1-by stock laid flat on the roofing. This leaves a consistent and straight 3/4-inch gap between the roof deck and the sidewall after the spacer is removed.
To speed installation along these diagonals, we precut the butt ends of a number of shingles. We set up the miter gauge on our table saw to match the roof pitch and cut a selection of tall, medium, and short shingles. Then, as each course proceeds from the corner back toward the roof, we reduce shingle height accordingly, from taller to shorter, so that we maintain the proper built-up thickness along the course’s diagonal bottom edge.
Finishing Last Cuts
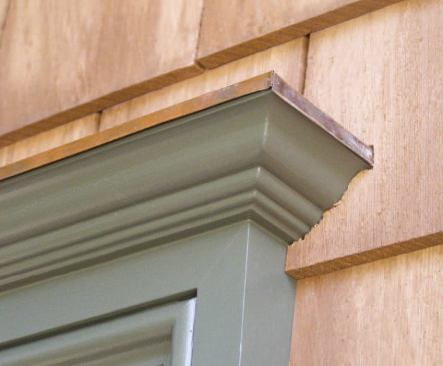
At the top of the wall under eaves, soffits, and rakes, the last couple of shingle courses have to be trimmed to fit. Some GCs think they’re doing us a favor when they rabbet the edge of their trim to receive our shingles, but with 4-ply shingle coverage this gap isn’t nearly deep enough. It’s better to pack out the trim a minimum of 1 inch, leaving plenty of room for the shingles to slip underneath. Trim boards can also be fastened over the tops of the shingles to cover the exposed nails and batten down the last course. We always squirt a little adhesive behind each top shingle as we hand-nail it into place.
Cost
Shingling costs can vary widely depending on such factors as the shingles used, the size of the job, and the number of door and window openings. As a general guideline, though, we charge about $900 to $1,200 per square in labor and materials to install natural unfinished shingles, and $1,350 to $1,500 per square for factory-finished shingles.
Peter Sutton operates Marin County Sidewall Co. in Petaluma, Calif.
How to Weave Corners Outside Corners
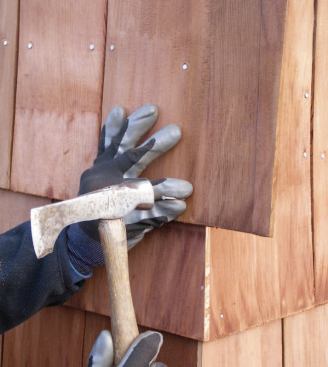
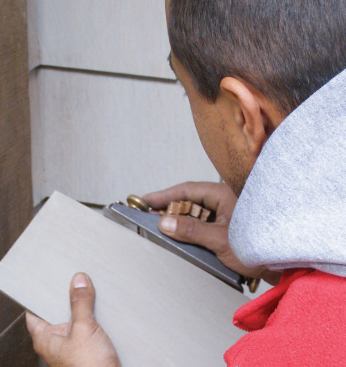
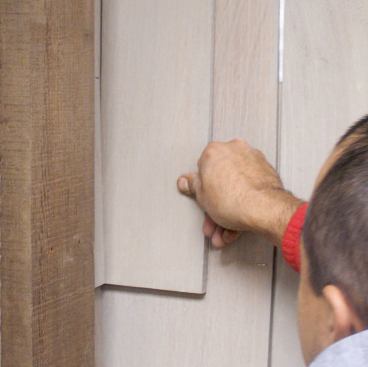
To start a corner, nail up the first shingle so that it overhangs the corner by at least an inch. Use extra nails at both the tip and the butt to prevent this first shingle from moving or pivoting during trimming. Next, trim the excess off with a sharp utility knife or the blade of a shingling hatchet to within about 1/2 inch of the finished size. To fine-tune the fit, use a block plane to shave the shingle down close to flush with the wall.
The second shingle should cover the edge of the first, again overlapping the edge by about 1 inch. Trim this shingle too with a utility knife and finish it with a block plane, taking care not to scar the face of the first shingle as you plane the second shingle flush. To finish the joint, drive a 4-penny nail into the edge of the first shingle approximately 1 inch up from the butt and 1/8 inch in from the edge. This will help prevent the shingles from curling and opening up at the joint.
Inside Corners
One common way to finish inside corners is to butt the shingles to 1 1/8-inch by 1 1/8-inch cedar trim, but they can also be woven. To do this, trim material off the bottom of the edge of the shingles (rather than from the top of the edge, as is done with outside corners). After installing the first inside corner shingle, butt the second one on the facing wall against the first and level it with a small torpedo level. Just a few strokes with a block plane along the inside edge are usually sufficient to get a tight fit. The edge of the second shingle should fit snugly against the first shingle and will hold it in place without extra nailing.


