Easier Air Sealing
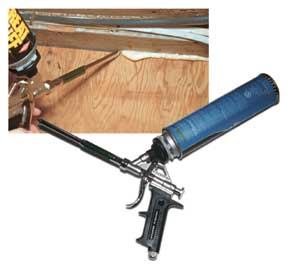
According to many building scientists, the average American home leaks so much air that it’s equivalent to cutting a 2-foot-diameter hole in an exterior wall. So naturally, building comfortable, energy-efficient homes means trying to plug as many holes as possible by air-sealing doors and windows, mechanical penetrations, and cracks. Polyurethane foam is the most effective and versatile material for this task, but using straw-dispensed spray foam has always frustrated me. The process isn’t difficult or time consuming, but plastic straws bend and clog while oozing blobs of foam everywhere. Plus, any unused material left in the can is wasted because the unsealed nozzle soon becomes hopelessly plugged. I’ve tolerated this mediocre dispensing system for years because I wasn’t willing to spend $100 for professional dispensing equipment — until recently, when I bought a Flexible Products foam gun (Flexible Products; 800/800-3626, www.dow.com/greatstuff/pro). A pro-duty foam gun, like those used by insulation and weatherization contractors, probably doesn’t look like any other tool in your collection. It most closely resembles a gravity-feed spray gun used for automotive painting. The tool allows greater precision than straw-dispensed cans, because the amount of material released is adjustable, and the slim, 12-inch nozzle helps with placement. In addition, slip-on syringes and flexible plastic nozzles allow you to seal even the smallest, out-of-the-way holes and cracks. And you don’t have to finish a can all at once either, because the valve for dispensing material is at the end of the nozzle. So foam left inside the gun is never exposed to air, preventing it from hardening. It’s easy to ruin a gun, however, if you remove an empty can without thoroughly cleaning the tool or reloading it with a new canister. While most manufacturers offer aerosol solvents for periodic cleaning, even the best solvent is unlikely to fix a gun clogged with hardened foam.
With a slim nozzle and adjustable flow, a professional dispensing gun fits in tight spaces and minimizes the irritating blobs and bombs of foam common with straw-dispensed cans. The foam will keep for 30 days when left on the gun, but leaving it on longer could ruin the tool.
Gun-dispensed foam usually comes in larger, 20- to 33-ounce cans that screw on top of the gun, upside down. The inverted can helps get the maximum yield from a can and, according to the manufacturers, provides a more ergonomic design.
Professional guns really shine when sealing around doors and windows because the adjustable flow prevents overfilling and bowing door jambs and window frames. And their longer nozzles seal cracks along the band joist more easily than the shorter nozzles found on straw-dispensed cans or tubes of caulking.
As an added incentive, several years ago foam makers started offering pressurized polyurethane-based construction adhesives that are dispensed using the same guns, eliminating the repetitive strain of squeezing perhaps dozens of quart-sized tubes of subfloor or drywall adhesive. The adhesive bead is uniform and goes down quicker than traditional construction adhesive. If you have any doubts about how well it sticks, just get some on your hands.
After making the switch, I’m hesitant to go back to straw-dispensed foam: Not only is the gun-dispensed foam neater, but it’s also less expensive and there’s less waste. A pro-style can costs about $16 to $20 and is the volume equivalent of maybe six cans of the stuff sold at the home center for about $30. At that rate, it doesn’t take long for a $100 dispensing gun to pay for itself.
Back to Top
Metabo Power Grip
If you think cordless screwdrivers are exclusively for DIYers, you probably haven’t seen Metabo’s new pro-duty Power Grip (Metabo, West Chester, Penn.; 800/638-2264, www.metabousa.com). It won’t replace your collection of hand screwdrivers, but its 4.8-volt motor and slow turning speed make it perfect for installing accessories like switch plates and locksets. In a JLC test, it worked especially well for adjusting and aligning a kitchen’s worth of cabinet doors. The ergonomic Power Grip weighs a fraction (1.4 pounds) of what a cordless drill weighs, making it ideal for the kind of tasks that a cordless drill is too big for. The variable-speed screwdriver spins at a maximum of 230 rpm with 44 inch-pounds of torque. A well-placed and comfortable rocker-type trigger controls forward and reverse without a separate switch. A magnetized spindle accepts 1/4-inch hex-shaped bits with a 3/8-inch keyless chuck available as an option. A variable clutch prevents stripping or overtightening, and while the product literature claims only a five-position clutch, I counted 20 detents, offering enough precision for any small driving task. In addition, turning the clutch to the drill position locks the spindle, permitting hand turning of difficult fasteners.
Probably the coolest feature of the Power Grip is its shape. The uniquely contoured housing and small size make it comfortable to use in awkward locations and easy to keep in your tool belt. And the slim nose avoids scratching finishes or damaging materials like a fast-spinning chuck could. But if you’re looking to drive long fasteners into hard materials, better look elsewhere — this isn’t that kind of tool.
The Power Grip Kit includes a plastic carrying case and two 4.8-volt rechargeable batteries. The little batteries take a couple of hours to charge up but last a surprisingly long time.
The Power Grip is handy but expensive. The street price of $139 is almost as much as the price of a quality cordless drill. But if you find yourself needing a little more precision than your cordless drill can offer and spinning a screwdriver by hand isn’t your idea of efficiency, the Power Grip might be the solution.
The Power Grip’s small and ergonomic housing a slow turning speed make installation of accessories like wall plates drawer pulls easier than with cordless drill. large rocker switch controls 4.8-volt motor without separate forward reverse switch.
Back to Top
Permit Protector
Keeping track of job-site paperwork can be easier with a Permit Caddy (Conarroe Companies, Lafayette, Colo.; 303/665-3140, www.permitcaddy.com), which organizes all of your receipts, lists, and permits in one location, while protecting them in a rugged plastic sleeve. With three large pockets, a couple of alligator clips for posting lists or schedules, and holders for business cards and notepads, the bright yellow organizer has a place for everything. It’s clear that someone familiar with residential construction came up with the idea, or at least offered some design input. For example, the grommets used to hang the caddy are spaced at 16 inches, and document pockets shed water, preventing damage to important papers. The caddy even includes small suction cups for mounting on a window and Velcro straps for attaching a set of plans. It costs $30.
The Permit Caddy provides plenty of protected storage for all your important construction documents and keeps everything within easy reach. Built-in handles mean you can take it to meetings or building inspector’s office.
Back to Top
Rabbit Planes
Scarf joints on long runs of base or crown can be tricky to conceal, often leaving a slight ridge at the transition. Typical solutions are sanding or taking off another sliver on the miter saw, but shaving off such a small amount is challenging and sanding is slow and tedious. In addition, the joint is often inconsistent, transitioning nicely in one area and leaving a ridge in another.
Now, instead of laborious sanding and fitting, there’s a tool made especially for the task. The Bunny Plane (Collins Tool Co., Plain City, Ohio; 888/838-8988, www.collinstool.com), which takes its name from its larger cousin, the rabbet plane, is Dave Collins’s latest invention and one of the coolest hand tools I’ve seen. (Dave is the same carpenter who invented the Collins Coping Foot, a replacement shoe that converts a typical jigsaw to a freehand coping saw.) The Bunny’s design is not new: Violin and guitar makers have used similar tools for centuries. What’s new is the tool’s introduction to the construction site.
The tiny rabetting plane comes in two versions: The first has a flat sole designed to smooth flat surfaces or outside curves (see above), while the second has a 3/4-inch-radius, rounded sole to work on inside curves, like cove moldings. Five different blades are sold to complement the rounded plane, allowing a precise fit on virtually any small radius.
These planes are so small — about 3 inches long overall — that I feared they would be difficult to hold and control. But the ramp where shavings are ejected also acts as a finger hold, and the Bunny’s tail handle fits comfortably in your palm. This tool is all about close-tolerance machining; the fit and finish make knife changes and adjustments easy. Tiny knurled knobs loosen easily yet hold the blades securely. The 1095 tool steel cuts cleanly and can be resharpened.
I used the tool for cleaning up joints on crown molding, base cap, and scotia, improving the quality of my work while saving a little time. Remodelers and trim carpenters would do well to consider a set. While the tools aren’t cheap, $140 for the complete set, including a holster, seems like a fair price. It could be argued that a gouge or carving chisel would do the same thing for less money, but the Bunny Planes excel at their task. If you don’t lose them to an envious coworker, they’re an investment that should last a lifetime.
Although the plane is tiny, about 3 inches long, tool surprisingly comfortable to use. long handle fits in palm of hand, and blade housing acts as a finger hold. Knurled knobs allow for easy changes yet hold without slipping.
Adjustable for joist hangers up to 12 inches, the JoistMate keeps hanger straight and frees one of your hands starting nails. Using red alignment mark behind wingnut speeds layout, because you need make only layout mark.
Back to Top
Joist Hanger Helper
When setting joist hangers, I’ve always used a joist trimming to gauge their proper placement. The problem is being able to hold everything in place while starting a nail. With one hand occupied with the scrap and hanger, and the other with a hammer, there are no hands left for holding the nail. Most hangers have those little tabs to temporarily hold the hanger to the ledger, and sometimes they actually work. Other times, a lag screw or bolt securing the ledger is in the way, a knot flattens the tab, or the little tabs just aren’t long enough to get a good bite. A new tool from Starr Products Inc. makes this whole process easier and faster. The T-shaped JoistMate (Starr Products Inc., Bellingham, Wash.; 888/378-2777, www.starrproducts.com) holds the hanger with powerful magnets while an adjustable fence rests on top of the ledger and places the hanger at the correct depth. The tool spaces the vertical legs correctly to receive the joist, and it adjusts to set single-joist hangers from 2×4 to 2×12. The magnets have enough grip to hold larger, double or triple hangers, but with those you have to space the vertical legs yourself. This tool is a time saver and costs only about $20.


