As of this writing, Boulder and 16 other counties in Colorado are still reeling from the disastrous floods that tore through the state last September. Record rainfall of more than 17 inches in some parts of Boulder county sent water rushing down every canyon and gully from the Continental Divide all the way east across the state, leaving an estimated 20,000 houses damaged or destroyed.
Michael Springer
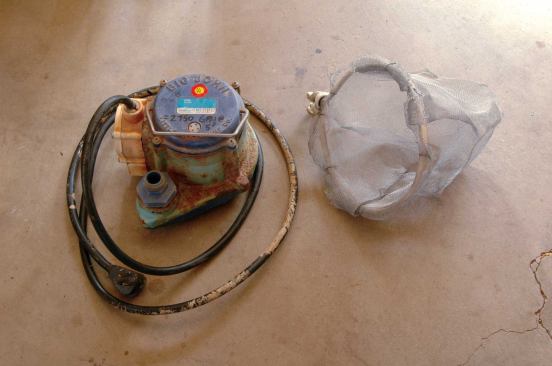
A small, reliable sump pump with an internal pressure-activated …
Witnessing this 500-year flood event was stressful for all involved, but the aftermath and cleanup proved to be even more taxing. Contractors instinctively reached out to help past clients, but many were unprepared for what they found when they were finally able to reach flooded properties. No one knows when a disaster like this will strike his or her community; in this article, I’ve pulled together the many lessons learned during the first weeks of Colorado’s recovery effort, with the hope that they will help other contractors be better prepared, and so be able to respond more effectively, should a similar event occur in their backyard.
Pumping and Mucking Out
Once you can gain safe entry to a salvageable building damaged in a flood disaster, the first step is to evacuate the water and remove the soggy debris. Mold can set in quickly and is difficult to remove once established. And it needs to be taken very seriously; besides causing allergic reactions and other respiratory ailments, mold can wreak havoc on a home’s property value.
Floor drains. Often the sewer or septic outlet that the basement drain flows to will be flooded and may even back up into the house. It is important to check the floor drain first: You wouldn’t want to discover that a day of pumping could have been avoided simply by removing a plastic grocery bag from the drain grate. Wearing rubber gloves, take off the drain grate and dig around for mud, rags, or other materials that may be creating a blockage.
Sump pits. In a house that has a sump pit, the existing pump might have failed during a power outage or may have just blown its breaker. Proceed with caution, but first check the installed pump to see if it works. If it doesn’t, the pit will still provide the best place for you to set a working pump. In a crawlspace, find the lowest point and create a place to pump from by digging a pit several inches deep.
Pumps. A trash pump (also called a sewage pump) is the best choice for removing a lot of “chunky” water in a hurry. A large gas-engine unit can work without electricity (utility power can take days to be restored) and can handle mud, sludge, and other solids with ease. A friend related to me how a small rock that had been sucked into his crawlspace sump pump had stopped it dead. If he hadn’t crawled through the water to clean it out, it would have meant a devastated ground floor rather than just puddles in his crawlspace. (He was also lucky that the power stayed on in his neighborhood).
Unless you have your own pump, however, during a disaster you may be stuck using whatever type of pump you can get your hands on. By the second full day of rain in Boulder, the rental yards and area stores were cleaned out of pumps of all sorts.
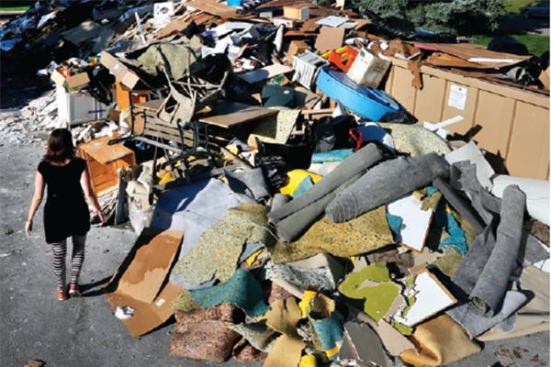
Hauling and Disposing of Flood Debris
Flooding creates countless tons of waste. In Boulder and other flooded towns, if an affected building was not wiped out completely, the floodwaters still turned building materials, furnishings, and treasured possessions into hazardous waste overnight. Warm weather and wet conditions made every pile of trash a moldy health risk that had to be taken care of as quickly as possible. Since the normal waste stream was instantly overwhelmed, the city and county governments stepped in to help clean up the area, providing three different forms of aid to residents: roll-off containers that were hauled off and replaced a couple of times a day;free drop-off at commercial waste transfer stations, limited to storm-damaged materials from a specific city or county; and free curbside pickup, which was instituted after it became clear that many residents had no plans to dispose of the thousands of refuse piles that sat in driveways, yards, and alleys for weeks after the flooding. This service was also limited to residential waste; commercial buildings and multifamily apartments and condos with centralized trash pickup were excluded.
If you use a sump pump, create an external intake filter by setting the pump inside a 5-gallon bucket with lots of small holes drilled in it; even better, wrap the pump in a piece of screen or hardware cloth. I prefer to use screen because the pump can sit closer to the floor or even be set down into the floor drain opening. You may still need to clear debris from such homemade filters when they get clogged, but they will protect the pump from being damaged.
Remember, you are fighting gravity and friction while pumping, so use the fattest, shortest hose you can. Avoid sharp bends and kinks in the hose and don’t lift the water any higher than you have to. Be sure to situate the outlet end of the hose well downhill of the building—water pumped out into the yard may find its way through the saturated soil and end up back in the house.
Many portable submersible sump pumps cycle on and off via a pressure switch, so they won’t turn on unless they are under several inches of water. This can be a problem once the water is just a few inches deep. With a float switch, though, you may be able to pump all but about one inch of water. Float switches are easy to rig manually because the external floats can be wired or taped into an “on” position—but be careful not to burn out the pump by running it dry.
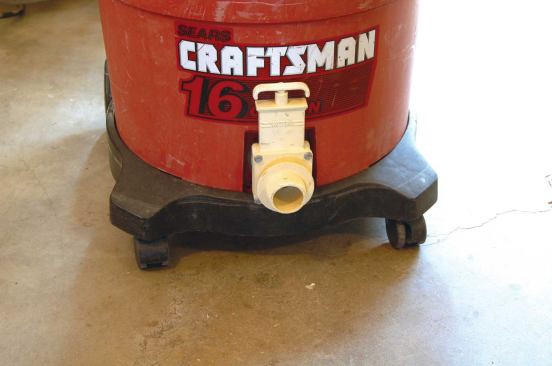
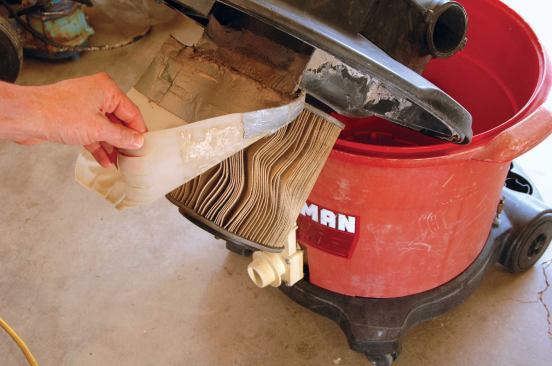
Wet Vacs. Regardless of the type of pump you use, you will be left with lots of water on the floor. At that point, you can either bail the remaining water into a bucket with the pump in it, or switch to a wet vac. Wet vacs are very efficient at sucking up water and sludge, and the bigger the vac, the better. When it comes to this kind of work, I rely on a big, inexpensive vac with a large-diameter hose. It works fast and holds a lot of water, and the filter is relatively cheap to replace after extra-dirty jobs like this. I know these vacs can be used with the filter off for wet use, but I prefer to leave it on to protect the motor from excess moisture and nasty contaminants.
As with the pump, use the shortest hose you have and avoid loops or low spots in the hose that will act as a trap. Prop a flat nozzle about 1/4 inch off the floor in a corner or at the lowest spot in the floor, and use a large push broom or floor squeegee to direct the remaining water to the vac.
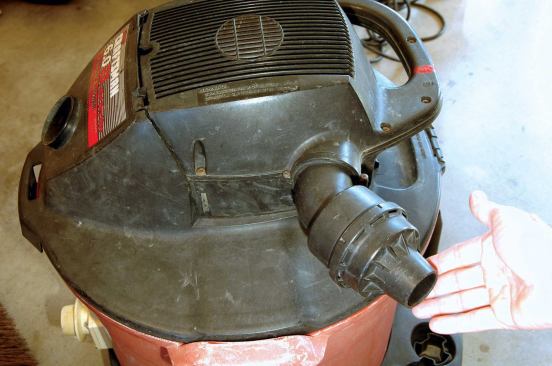
My vac has a float ball to block off the suction when the vac is full of liquid, and you can tell when the ball seals because the motor sound changes to a high-pitched whine. Some fancier vacs shut off via an electric circuit that the water closes. Just be sure you know when your vac is full of water; otherwise, you will find out when you hear a loud pop and see a puff of smoke, and all the lights go out.
Full of water, my 16-gallon vac weighs about 150 pounds. The easiest way to empty it is to drop a pump into the tank for several seconds. On jobs without a pump present, fill the tank only part way and empty it into 5-gallon buckets that you can carry out. Once when clearing a flooded crawlspace, I left the vacuum on the main floor above, rolled it to the doorway when full, and drained it into a bucket through the vac’s drain port.
Be sure to dump the water outdoors, downhill of the house. Dumping the water into the toilet may result in water rising back up the basement floor drain.
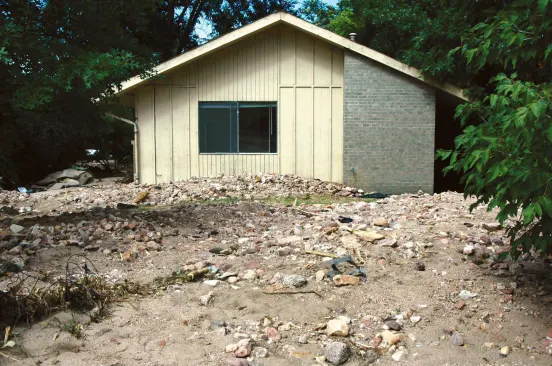
The Value of Sand Bags
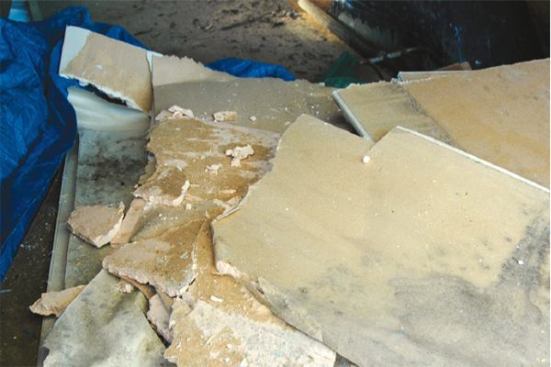
We've all seen television footage of people using sandbags to protect buildings against flooding. While it seems futile—the rising water inevitably flows between and over the top of the makeshift barrier—the fact is that, during a flood, half of the benefit provided by placing sand bags around a building comes from the reduction of sediment infiltration.
Until you've seen it firsthand, you may not realize how much damage sand and silt can cause—much more than water alone. Water can be drained and dried out of walls, basements, and crawlspaces, but sediment will fill up every available nook and cranny, clogging drains and ruining electrical devices and gas appliances. And since it contains suspended organic matter and unknown levels of bacteria, you can't count on it to dry into harmless dirt and sand; it has to be removed.
Water may crest a protective wall made of sand bags (or staked-down straw or hay bales), but most of the heavier sediment won't go over the top with the water. So if you have a chance to build even a short barrier wall around property you are trying to protect, it may reduce the damage—and cleanup effort—significantly.
Second-Stage Cleanup
After a flooded basement is pumped and mucked out, all wet and contaminated building materials must be disposed of quickly to restrict the growth of mold and remove the residual moisture from the building. During the week after the flood, I visited a site that was undergoing the second stage of cleanup by groups of volunteers supervised by the local Flatirons chapter of Habitat for Humanity.
Flooring. Soaked carpet and padding should be the first thing to go. Cut it into strips a few feet wide, roll up as much as you can handle, and crosscut the strip. To carry these dripping wet materials upstairs and through finished living space without making a mess, cut the rolls to fit into a bucket or garbage can. For tile and other hard flooring, common sense will dictate what should be removed. If sewage was present in the floodwater, it is probably safer and easier to remove the flooring than to clean it in place. For “clean” floodwater, it depends more on the amount of water damage. Vinyl flooring might be just fine, but hardwood floors probably won’t be worth saving.
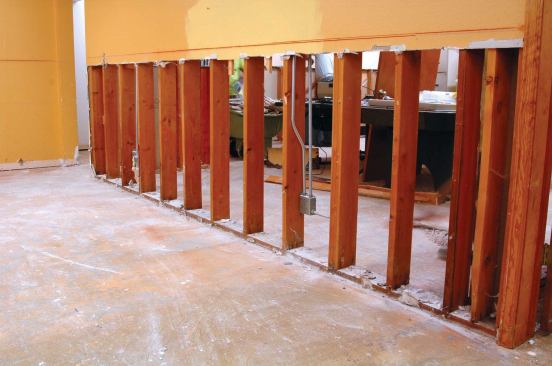
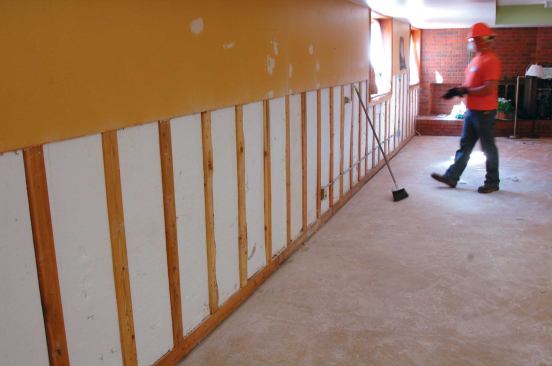
Drywall. For shallow flooding, some people skimp, and remove drywall only to a level that is a few inches above the height of the floodwater. But that means patching and finishing will require workers to bend or work on their knees, adding labor expense. The professional approach (for flooding less than 4 feet deep) is to deeply score the existing drywall 48 inches above its bottom with a utility knife and pry it off the wall from the bottom up.
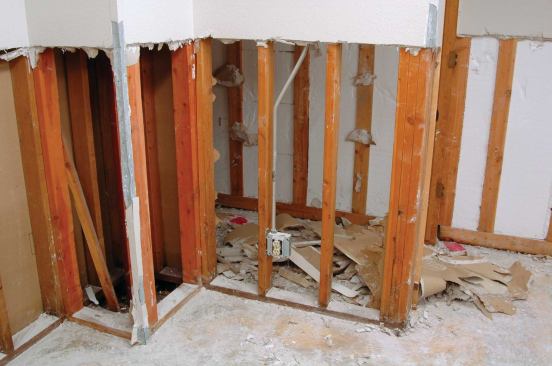
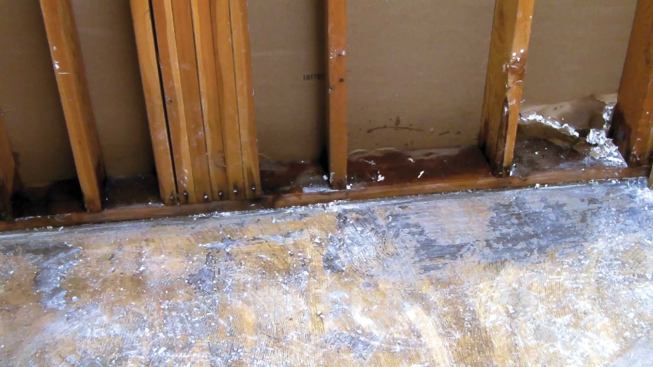
Wood. Studs and furring strips are often left in place to dry out. As long as the wood is sound, it should be okay. Floor plates, furring strips, and any other wood in direct contact with concrete will hold moisture for a long time and should be chemically treated to suppress mold growth and allowed to dry.
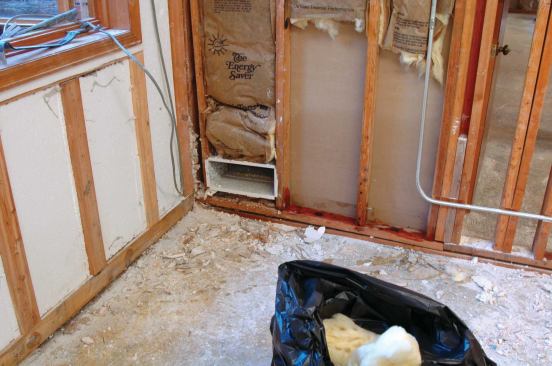
Insulation. Fiberglass insulation that has been saturated should be cut out and discarded. Less-porous foam insulation is often left in place to dry out, but not in all cases. Closed-cell and open-cell foams offer no food for mold, but they can hold moisture in for a long time, so make sure any wood that is in direct contact with foam is dried and treated. For the same reason, concrete walls behind foam insulation should be given enough time to dry thoroughly before drywall is hung over the insulation. Generally, this will require removing the foam, then replacing it after the concrete has had time to dry.
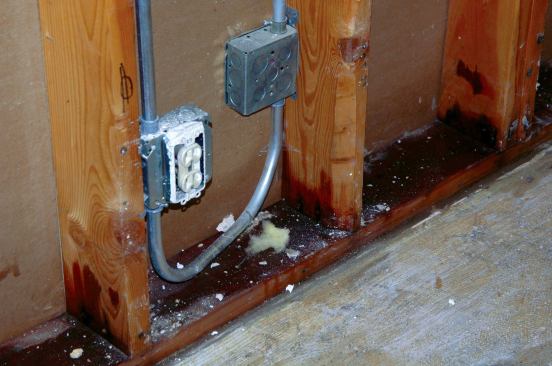
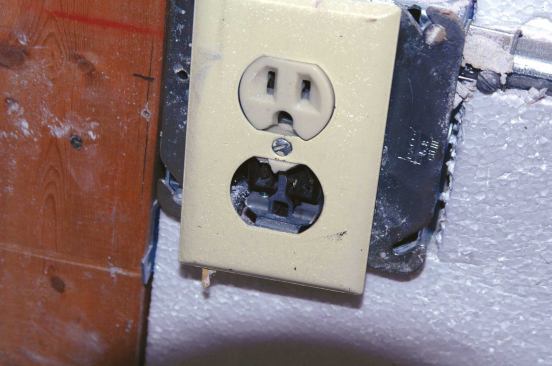
Electrical wiring. Romex-type nonmetallic cable and plastic boxes should be okay to leave in place, but conduit and armored cable can hold water inside, which presents a danger. Do not use these circuits without inspecting for soaked wiring and consulting an electrician. Also, don’t trust any electrical device that has been underwater. Flooded receptacles and switches should be replaced. Even if they dry out completely, sediment or other fine debris from the flood water that washed into a device could lead to insufficient contact or shorting.
While I was at the Habitat site, a volunteer using a shop vac illustrated the seriousness of this danger pretty effectively and got a good scare in the process. After running the vac for a minute or so plugged into a receptacle wired through conduit, the device exploded with a flash that lit up the room like lightning. The plastic face of the receptacle was incinerated, leaving bare metal contacts visible. I’m not sure if it shorted out due to water in the device or in the conduit, but it made clear the point about not using flooded devices.
HVAC ducts. Ducts that were underwater should be dismantled and cleaned out or replaced. And don’t forget to clean out and dry the bottom of the furnace cabinet. Get a professional opinion on the state of the furnace and hot-water heater: If water made it up to the blower, pump motor, or burner, they may be ruined.
Hazardous Waste
None of the available disposal options could take landfill-prohibited items, however, which were handled as follows:
- Separate roll-off containers were provided by local waste disposal and recycling facilities for recyclable metals, including most appliances (except those containing refrigerants). Some organic materials, such as yard and food waste, were also commercially composted rather than hauled from remote areas to the landfill.
- Paints, automotive fluids, and other chemicals had to be taken to a hazardous waste disposal facility.
- Electronics and appliances containing refrigerants had to be taken to a designated drop-off facility, which also accepted other recyclable materials, such as plastic and rigid foams.
- “Dirty” dirt—mud, silt, and sand contaminated with chemicals and sewage—had to be landfilled. Only sediment from streams that was deposited away from buildings was reused as fill.
Asbestos and lead paint. Information on debris containing asbestos or lead paint was contradictory. A county website said that if asbestos was not known to be present in a building, you could treat waste material as non-asbestos flood debris. But a state website outlined more stringent guidelines. The same was true for lead paint. No guidelines or warnings were posted regarding the handling and disposal of lead paint debris in a disaster area, so it was not clear if RRP rules had to be followed during cleanup.
No contractors allowed. None of the disposal services provided could be used by contractors. Even though the services were paid for with public funds, a resident could not hire a hauler to transport debris to a public container site and expect to have tipping fees waived. Similarly, any flood sediment deposited on the street by a contractor was ineligible for city-funded curbside pickup. Showing a building permit proving that the waste came from a home within the disaster area would not serve to waive the fees. According to the Boulder County Resource Conservation Division, this rule was designed to protect the homeowners, who would be charged a tipping fee by contractors either way. Only having the homeowner with you in the truck at the time of drop-off would serve as enough proof that what you were hauling was from a legitimate site.
The lesson here for contractors is to charge clients full price for hauling and disposal—and not to expect to take advantage of any disaster services or programs intended to help clean up the damaged properties in an affected area. And the lesson for homeowners is that as soon as they hire a professional to help them, they lose any publicly-subsidized services and benefits provided to citizens in an area affected by a disaster.
Sanitizing
Once you’ve removed the water and wet building materials from a flooded structure, the next crucial step is to clean, sanitize, and thoroughly dry both living and storage spaces. As with the previous stages of cleanup, the relative cleanliness of the floodwater makes a difference as to how drastically the affected space must be treated. The established scale for flood events is as follows:
- Category 1 is clean water, as from a burst or leaking supply pipe, or fresh rainwater or snowmelt leaking through a roof.
- Category 2 (gray water) is groundwater or water flooding in from outside, but it could also come from the drain side of a dishwasher or clothes washer.
- Category 3 (black water) is sewage that often backs up through soil pipes and spills out of toilets, shower and sink drains, and floor drains.
Cleaning and sanitizing. Before a space is dried out, it needs to be cleaned well. A cleanup contractor I interviewed uses a pressure washer on walls and floors for any category 2 or 3 cleanup—it’s a lot easier than trying to scrub every nook and cranny of every furring strip, wall stud, radiator, and so on. The wash and rinse water is collected by a large truck-mounted water extractor similar to a carpet cleaning extractor.
At this stage in a flood cleanup, all surfaces contaminated by floodwater or backed-up sewage must be cleaned and disinfected. This work should be left to a professional cleaning company, but in a pinch, the old standby is diluted bleach (mold sites recommend 1 cup per gallon, a 1:16 bleach-to-water ratio). Use a large spray bottle to coat any surfaces that were wet with floodwater—wood framing, soil pipes, concrete walls and floors. Just go easy around the furnace and hot-water heater, because chlorine is corrosive when it contacts steel and iron. Give the bleach a little while to soak in, then rinse everything from the walls down with fresh water. As before, squeegee the water with a push broom and collect it with the wet vac.
Frankly, though, this process is best left to the pros. Chlorine bleach is toxic not only to the microbes and spores you are attacking, but to you as well. Using it means wearing an effective respirator and goggles, avoiding direct contact with skin, and providing fresh air while applying it.
The pros use broad-spectrum, anti-microbial cleansers and, according to commercial supply houses and disaster restoration contractors alike, the latest botanical formulations are revolutionizing the industry. Unlike traditional formulas, these products don’t require any PPE during handling, making them safer and easier for workers to apply. Also, these disinfectants don’t have to be rinsed, so they provide lasting bacteriostatic and fungistatic protection. After wet cleaning, a second application of disinfectant is used to sanitize affected surfaces.
Scrappers
After an event like this, metal scrappers come out of the woodwork looking for anything metal for its scrap recycling value. They aren't supposed to remove things from trash containers or refuse piles without permission, but they will ask for and gladly take furnaces, water heaters, appliances, ductwork, pipes, conduit, wiring, and any metal junk that you may be removing from a damaged property. Having scrappers carry off these heavy and bulky items may save you a lot of effort, and the fact the materials are being recycled is also a plus. However, for copper, brass, lead, stainless steel, and aluminum, taking them into a commercial recycling company yourself may net you some easy bonus cash. Every time I used to take in a bucket of old faucet parts and copper tubing and wiring scraps saved from remodeling jobs, I would walk out with an extra $30 in my pocket.
Mold remediation. Unless mold is detected in a building, a separate treatment to prevent mold is usually not required. If any mold is detected or even suspected, bring in a trained and certified mold remediation contractor. Even if you are aware of all the requirements and methods of treatment, you don’t want to be liable if a flood-damaged building you worked on ever develops mold in the future.
Be aware that mold has to be physically removed; any “dead” mold left in place still presents a hazard to the building and its occupants. Be sure that anyone dealing with mold follows established remediation guidelines, like those published by the Institute of Inspection, Cleaning, and Restoration Certification (iicrc.org). The IICRC is a non-profit organization that develops ANSI-approved standards for water-damage restoration and mold remediation that professionals in the industry look to.
While you are working in an area where you suspect mold is present, the Centers for Disease Control (CDC) and the EPA recommend using at least an N-95 NIOSH-approved particulate respirator mask to prevent breathing in airborne microorganisms. An N-100 respirator mask is a step above that, and half- or full-face respirators with canister filters offer even better protection.
Regardless of your previous experience with seemingly harmless mold in shower stalls or under sink cabinets, any exposure should be treated with caution. A friend of mine recounted how spending just a few nights in an apartment with flooded walls and floors (caused by a plumbing leak) triggered a two-year bout with adult-onset asthma.
Drying Out
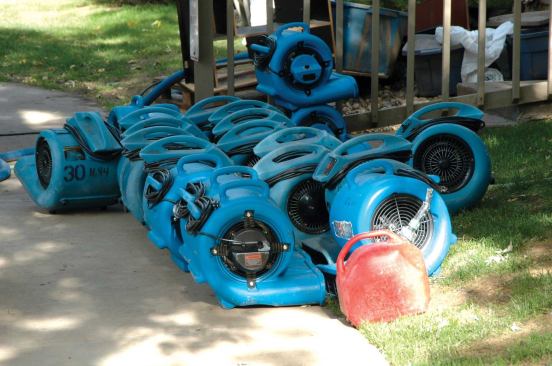
Once everything is cleaned, the final step is to dry out the space. If you are renting equipment, keep in mind that the experts around here told me they typically have to keep their machines running for three to five days. If you live in a more humid area or if cold weather sets in, it may take longer to dry things out. The large tool-rental chain in Boulder said they brought in five semi trailers with more than one thousand pieces of drying equipment right after the flood—and it was all put into service right away. The demand for machines was in the following order:
- Dehumidifiers. These are the most effective tools for drying out a building because they actively condense moisture out of the air. Large, high-capacity mobile units dry air more quickly than household units do. In regions with high ambient humidity, during the heating season, and in spaces without ample ventilation (like basements and crawlspaces), a dehumidifier is essential for drying a building.
- Air movers. Also called carpet driers or carpet fans, these distinctly-shaped fans blast a high volume of air along the floor to promote evaporation. They are typically used in conjunction with dehumidifiers: The powerful stream of air pulls the moisture out of materials at the surface, and the dehumidifier draws the moisture out of the air. During warm weather in relatively dry areas like Boulder, air movers and other fans may be enough to dry out a space as long as there is good ventilation with fresh air at low humidity.
- Air scrubbers. These recirculating fans have a series of three or four filters to clean particulates out of the air. The third filter is a HEPA filter, which can trap fine mold spores, and the optional fourth filter contains activated charcoal to absorb odors.
- Moisture content. While the building is drying out, use moisture meters to monitor the moisture content of the wood that was wet. Sample readings should be taken all over, but it’s especially important to check areas where the wood stayed wet longest and dried slowly, such as stud wall plates sitting on concrete. Some cleanup contractors prefer using moisture meters with probe pins, while others prefer the nonintrusive scanning type.
I learned of two methods for determining when a building is dry. One company I interviewed said it keeps the machines going until every reading it takes is at 9% or below. Another company said that its target number is within 4% of readings of known dry areas in the same building, which means drying to between 4% and 11%. Either way, materials in the building need to be brought well below the 17% moisture content that will harbor mold.


