A job usually isn’t done until it’s painted, and sometimes–despite your best efforts to avoid it–you’re going to have to pick up a brush or roller and make it happen. Here’s how to make sure that you don’t regret the outcome. Follow these steps for best results, and then make sure you call your painting sub earlier next time.
Patience Pays Off
Everyone wants to throw drop cloths down and start rolling. That’s a mistake. Walk the job again and answer these questions:
- Is the place clean enough for paint?
- What needs to be protected? Where are the finished floors, stain-grade fixtures, switches, outlets, and phone jacks that will need to be taped?
- What needs caulking and spackle?
- Do I need staging?
- Is there sufficient lighting?
- Do I have time to call another sub?
Trim Prep & Crew Assignments
Divide your crew into two groups: One caulks wood joints starting with crown molding, then casings, then base; the other fills nail holes and damaged trim. Four workers can caulk, fill, and sand a 3,000-square-foot home in one day.
Push Caulking. Cut the tube at a comfortable angle for your arm and push forward at the same rate you dispense material–don’t pull. Pushing forces caulk into the joint while the gun tip “wipes” it down. This prevents using excess caulk and minimizes wiping.
Filler. Lightweight, shrink-free spackle is better than oil-based putty: It packs easily into nail holes and dries quickly (about 60 minutes). Don’t sand it; use a clean, damp rag to wipe away the excess.
Wall & Ceiling Prep
Priming Prep. Break into groups again. Group one lays drop cloths; group two covers permanent fixtures, switches, phone jacks, and outlets with tape, and covers furniture. Next, check for surface dust on new drywall by running your hands over the surface. If dust appears, dampen cellulose grout sponges and wipe down all tape seams and skim-coated areas.
Time to Prime. Prime the corner where the ceiling and wall intersect with a brush first, then roll the rest, making sure there are no drips. Prime the wall corners, base, and casings next. Move in the opposite direction as the guy rolling so you’re not standing on top of each other.
Paint the Town
Once the primer is on and dry, it’s time to paint.
Ceilings First. Have your best workers cut-in the ceiling color along the wall with a brush. Then, roll out the first coat in one direction; roll the second coat in the opposite direction.
Trim. Next, start the trim and casings. Over-paint the trim onto the wall, but try to keep the overlap less than 1/8 inch. Tip: Diluting trim paint with an ounce or two of water or solvent allows the paint to flow better off the brush. Let your trim and casing paint dry overnight.
Tape. Unless you are experienced enough to hand-cut razor sharp lines, load your tape gun with safe-release tape. Go over the tops and sides of window, door, and base casings, holding as straight a line as possible.
Next, overpaint the tape with trim paint where it meets the wall. This fills valleys under the tape where adhesion is poor, or where the joint has an inconsistent surface. This works well on orange peel or knock-down textured walls, too.
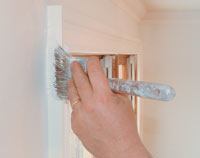
Paint Cut-in, Part 1. While the trim paint dries on the tape, use a 3-1/2-inch brush to cut the inside corners in. Roll the outside corners. Work with one wet–but not dripping–edge of the brush. Dunk the brush about 1-1/2 inches into the paint; wipe only one side on the rim of the can.
Start in a corner, pulling the brush away from the corner and keeping the wet side of the brush down. Once started, put less paint on the brush and work back into the corner. Continue around the room, leaving a 3-inch border for the roller.
Paint Cut-in, Part 2. Now, go back over the trim-painted tape and apply the wall color. For the second coat, repeat the process; however, start on different areas of each wall to achieve uniform paint coverage.
After overnight drying, you can carefully remove the safe-release tape: Pull up and away from the painted surface, leaving razor sharp lines separating the wall and trim. If you peel the tape before the paint cures, you’ll have to score it with a utility knife. Cured paint will “break” along the tape, leaving an edge–and a job–both you and your customers will be happy with.
–Edward Dai owns Pristine Painting & Custom Finishes in Las Vegas.
TOOL BOX
Tools I Rely on for Best Performance.
Roller Naps.
For smooth surfaces, I use the Sherwin-Williams Contractor series 1/2-inch pile polyester nap. For semi-rough texture, the 3/4-inch is a good choice.
Brushes.
I use angled Purdy brushes. The angle allows the brush tip into an inside corner. A 2-1/2- to 3-inch brush is good for most cut-in and trim work. A 1-1/2- to 2-inch brush is good for small casings.
For latex paint, a nylon filament brush is the best. For oil paints, a natural bristle (either white or black hair) is the best choice.
Hyde 5-in-1 Tool.
Great for opening paint cans, gouging loose drywall or plaster, lifting wallpaper, and even setting nails.
Spring-Activated Nail Set.
Sets finish nails without a hammer.
Aluminum Straight-Edge.
For cutting along base molding or compressing carpet out of the way.
“Duster” Paint Brush.
Whisks away dust before applying paint. 5-Gallon Paint Strainers. For removing paint debris before rolling.
High-Quality Drywall Knives.
For fills and repairs. Slim Roller Arm. For painting behind refrigerators, toilets, and other hard-to-reach spots.
Caulk Gun.
Better caulk guns pull the caulk back into the tube when you stop squeezing. I use a Newborn Bros. Drip-Free caulk gun.