Like most finish carpenters, I spend a lot of time measuring, marking, and cutting trim. Anything that speeds up this part of the job really helps my bottom line, so I’m always on the lookout for ways to boost my efficiency. About a year ago, for instance, I switched to a laser measuring device, and I’ve been pleased by how much it has increased the speed and accuracy of my measuring. But it wasn’t until I was given the opportunity to test the SawGear Automatic Length-Measuring System that I realized it was possible to similarly improve my cutting.
The SawGear (New Bedford Tool and Gauge Co., 360-254-0661, www.sawgear.com) consists of an aluminum measuring bar (or fence), a flip stop, and a power head with a digital LCD screen and keypad. Unlike most length stops, which must be positioned by hand, this one moves along the measuring bar in response to dimensions entered on the keypad. There’s no need to measure or mark; you just punch in the dimension, butt the stock to the stop, and make the cut. It’s faster than measuring and marking, and it’s more accurate: As long as the device is calibrated, the piece you cut will be exactly the dimension you enter.
We received the SawGear last summer and have been using it ever since. Since I wasn’t sure how well it would work, I started out small, using it to cut face-frame cabinet parts and precut door casings in the shop. The lengths came out perfect. Next I took the tool on site, where we had similar success using it to trim a Craftsman-style house.
How it Works
The keypad and screen send commands to a computer-controlled motor inside the power head. The motor is connected to a geared shaft that fits into a hole in the top of the measuring bar, where it positions the stop by advancing and retracting a belt. It does this with incredible accuracy; if you wanted, you could set lengths in increments as small as 1/64 inch.
Assembly
The SawGear is designed to be mounted next to a miter saw. There are two mounting options: a universal bracket that fits commercially produced stands, and a simple bench-mounting bracket that can be screwed to a homemade stand or a modified stand (like the one I use). The measuring bar slips onto the brackets and is held in place by thumb screws. It can be installed to either side of the blade; we cut from the right, so that’s where we put it.
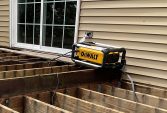
Installing the power head is a matter of slipping the shaft into the mating hole on the measuring bar and then securing it with a pair of pivoting cam locks. The unit assembles without tools and is easily broken down for storage and transport.