I build about eight custom and spec homes a year, mostly in new residential developments. It’s mountainous in Utah, where I live, so we have a lot of sloped sites. This winter I tried out a new product that works really well on a slope — precast garage slabs.
We were building a spec home on a steep lot in a subdivision. I had built the same plan four times before, and it always sold well. This time was a little different because of the grade: The earlier houses happened to be on flat lots, but this lot dropped off 12 to 14 feet from the front to the back. The back wall of the basement needed a 4-foot-high foundation wall just to get up to floor level in the basement. We decided to wood-frame the whole back wall of the basement, creating a walkout onto a patio underneath a covered deck.
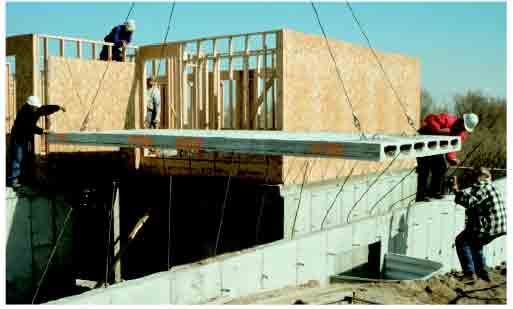
The problem was that the common foundation wall between the house and the back of the garage needed to go 12 feet deep just to get the footings down onto good ground. I’m sure you can imagine the hassle and costs to bring in 8 to 12 feet of gravel to fill in that hole so we could pour a 550-square-foot garage slab. We’re talking about more than 200 cubic yards of gravel to hold up a 4-inch slab — that didn’t look very cost effective.
Spandeck Installation Details
Figure 1.There are two main options for setting the precast deck components onto the basement wall: You can either set the slab inside the foundation on a shelf (left) or set it directly atop the sill (right). Mudsills for the garage walls are attached to the foundation with anchor bolts as in any garage, but blocking is nailed in the stud bays to form a dam for the topping slab pour. Asphalt felt paper is applied to the perimeter walls before the topping slab is poured.
A local contractor is also a rep for Eagle Precast, a Utah company that makes a precast 8-inch slab that can freespan up to 30 feet. Once I thought about using their product, the decision to go with a garage over a full basement was a no-brainer. I added an extra 550 square feet of space in the basement of the house — space that ended up costing about $8,000 to $10,000, finished. That’s only $15 to $20 a square foot, compared to an average price of $125 or more per square foot for a typical home around here.
This basement is also better than the usual basement space, because there’s no need for a center girder or posts. The slabs come 8 feet wide by 24 feet long and make the whole span with no support. In fact, they can handle as much as a 30-foot span, easily carrying loads of 100 psf or more. The 10-inch panels can go even farther.
The only drawback was ceiling height. The panels had to sit on a 4-inch shelf inside the basement wall, which lowered the ceiling by 8 inches. The downstairs room ended up with only 7 feet of headroom once the basement floor was poured. But it will still make an excellent media room when it’s finished, or a great storage room.
On the next house I started, I decided to pour 10-foot basement walls in the garage basement area, then install a 28×45-foot precast garage slab. It’s on a flat lot, so there’s no walkout, but we managed to get 9-foot ceilings downstairs. On that house, the cost worked out to roughly $18,000 to gain 1,380 square feet — still less than $15 a square foot. That’s pretty tough to beat.
Figure 2.The author set his precast slabs into an 8-inch-deep shelf in the foundation wall. The shelf must provide at least 3 inches of bearing for the precast slabs. Half-inch rebar cast into the foundation wall at 2 inches o.c. will be bent down over the precast sections before the topping slab is poured, to lock the assembly together.
Layout Decisions
Considering the value added, the whole process is pretty easy. The first thing you have to determine is whether you want to set the slab on top of the foundation or recess it (see Figure 1). I wanted the slab recessed, so I had the foundation contractor put a ledge in the foundation all the way around the garage.
The ledge is 3 1/2 inches wide and 6 inches tall (the slabs need only 3 inches of bearing minimum on each end). The foundation contractor also has to put in rebar all around the foundation to bend over the top of the slab after it gets dropped into place (Figure 2). This ties wall, slab, and topping slab into one tight piece.
The topping slab is necessary for a couple of reasons. For one thing, the suspended slab is pretty ugly and has big hooks sticking out of it that are cast in for the crane to use when setting it in place. The other reason is to provide enough slope to your garage floor to get water out. I poured the garage floor at 6 inches deep against the house, sloping to just 4 inches deep at the garage door.


