To get the best performance from insulation, either the framer has to build an airtight shell or the insulation contractor has to install an airtight product. It’s a proven fact that insulation R-values are compromised by uncontrolled air leakage into the building shell. Convective air currents moving through wall and ceiling bays can bypass poorly detailed insulation almost as if it weren’t there at all, with consequences that can come back to haunt the builder.
As a GC who also specializes in diagnosing home energy performance, I receive a steady stream of calls from homeowners, property managers, and other builders requesting help with energy-related issues. Surprisingly, most of these problems occur in new or newly-renovated homes. Common problems include drafty interiors, frozen pipes, high heating bills, ice dams, and comfort complaints. And yet these buildings also have code-approved levels of insulation, tight windows and doors, and high-efficiency heating systems. What’s going on?
What’s happening is a breakdown in the building sequence at the point where the framer stops and the insulation contractor starts. At that point, at least when air sealing is involved, the typical construction plan becomes vague or incomplete. This lack of continuity increases the likelihood that thermal and air bypasses will get built in to the project. Any space, large or small, that comes between the air barrier and the insulation is a possible conduit for leakage.
Same Old Frame, Almost
To eliminate this disconnect, my company handles both framing and insulation in-house. Our framing methods are identical to standard practice in every way: 2×4 or 2×6 studs on 16-inch centers, plywood sheathing, dimensional or engineered lumber joists, and stick or truss roof framing assembled in typical fashion. Our goal is not to make the building absolutely airtight — an elusive goal at best — but to reduce the aggregate amount of leakage and to manage the flow of air entering and exiting the shell. Our typical target is a building with a passive rate of exchange of about 1/10 ACH per hour (.1 ACH). After we insulate a job but before the drywall is hung, I perform a blower-door test to measure how tight the insulated shell is.
Over time, the test results have shown us where to concentrate our air-sealing efforts during framing. Fortunately, what’s required adds little time or effort to the standard workflow. Instead of ordinary sill sealer, we use a rubber (EPDM) gasket between the foundation and mudsill.
The 5 1/2-inch-wide gasket is designed to provide a positive seal under a heavy structural load; it also serves as a moisture barrier between the concrete and wood. After setting, stringing, and squaring the rim joists, we run a bead of construction adhesive over the joint between rim and mudsill. We’ve tried EPDM gaskets under the rim, but they tend to get in the way. Adhesive is less expensive and nearly as effective. It’s important to take this step before rolling the floor joists into position; otherwise, rim sealing becomes a long, hard slog. Glue-and-nail subfloor installation has become standard industry practice. However, not everyone glues the edge of the rim joist on the assumption that the walls hold the subfloor down at the edges. In fact, this is a common point of air entry, which we handle with a continuous bead of adhesive. We frame and sheathe the walls on the deck before standing them on a rubber gasket tacked around the perimeter of the deck. I buy my gaskets from Resource Conservation Technology (410/366-1146, www.conservationtechnology.com) and Denarco (269/435-8404). These companies carry a good selection of gaskets designed for sealing a variety of framing configurations.
Because I’m convinced that air doesn’t move through plywood, I sidestep the whole housewrap debate. Instead, shortly before installing the siding, we tape all the horizontal seams and any other cuts in the sheathing that aren’t backed by framing. We use either DuPont Contractor Tape (DuPont Tyvek, 800/448-9835, www.tyvek.com) or 3M Builder’s Sealing Tape (3M, 888/364-3577, www.3m.com) or both.
Gaps and Penetrations
Once the shell is tightened and weathered in, we turn our attention to interior air gaps and passages. Plumbers and electricians create their share of holes between bays and between floors. Expanding foam caulk does a good job of sealing around wire and pipe penetrations. If left open, these holes become interconnected convective air conduits to the roof soffits and attic.
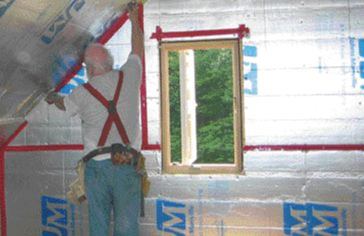
Packing fiberglass around the jambs of a window or door isn’t particularly effective at stopping drafts, especially when the gap’s too narrow to stuff. Expanding foam doesn’t move with the frame’s expansion and contraction cycles, and runs the risk of distorting the jambs on installation. Instead, we use another EPDM gasket configuration made for the task. The soft rubber slides into narrow cracks without undue force and provides a positive seal that moves with the framing. Cracks too narrow to slide a gasket into get caulked with silicone.
It’s a good idea to size rough openings slightly larger than standard to ensure that the gasket has sufficient space to expand and seal.
Sealing the Ceiling
Balloon-frame configurations and open plumbing and mechanical chases provide prime conduits for cold attic air to enter the heated space. In new construction, these types of through-the-floor gaps are required to be fire-stopped with some form of noncombustible material, typically sheet metal. But fire stopping alone isn’t so tight that moisture-laden air can’t find its way into the attic. So we seal all the seams between fire stop and flue or chimney with a high-temperature silicone caulk.
Ceiling strapping, a typical framing detail in New England, can create a common air bypass, and a big one at that. The 3/4-inch-wide gap introduced by the strapping between batt-type insulation and a drywall ceiling can allow cold soffit air to travel between the two, effectively short-circuiting the insulating layer.
Even in ceiling configurations that aren’t strapped, batt insulation is unlikely to lie in absolute contact with the ceiling board and can permit the same kind of infiltration. The result is a cold ceiling and a customer comfort callback. In this situation, adding another layer of insulation to the attic does little but waste money. To reduce soffit air infiltration, we direct incoming air above the insulating layer into the attic, using custom-cut soffit blockers of 1-inch rigid foam board that fit snugly between the ceiling joists or rafters. The top edge of the baffles is contoured to fit a typical foam insulation baffle, and the seams are sealed with expanding foam.


