Plastering isn’t the oldest profession, but it may be close to it. Coatings have been applied to the outside of structures for almost as long as people have been building shelter. Originally, plaster consisted of mud alone. As technology advanced, lime-based compounds were used. Modern-day Portland cement was invented in England in the early 1800s. It gradually gained popularity in the United States and was widely available by the 1890s. Traditional three-coat stucco is nothing more than a Portland cement-based exterior plaster, which is a mixture of cement, sand, and water. Cement-based stucco has a long history of proven performance in a variety of climates here in the U.S., from the hot, dry Southwestern deserts to cold Northern winters and the humid Southeast. Any problems with stucco are more related to a lack of uniformity and skill in stucco application than to the products themselves. In the past 15 years, in response to this, manufacturers have introduced many new stucco products, including fiber-reinforced “one-coat” stuccos with acrylic polymers. These products have the perceived advantage of faster installation time and fewer shrinkage cracks as the coating cures. Despite the apparently “enhanced” performance of these products, I believe that the original recipe for stucco still best withstands the test of time. Properly installed three-coat Portland cement stucco provides the building with a dense, monolithic, protective shell. It requires very little maintenance and can easily last over 100 years. Three-coat stucco is easy to repair or patch and resists weather, impact, fire, insects, and rot. It is also vapor-permeable, as well as watertight in its entire depth. These are clear advantages over new synthetic exterior-finish systems.
Preparing the Substrate
Stucco can be applied to just about any wall system, including wood frame, metal frame, masonry, ICF block, Rastra (a particular type of ICF with a textured surface made of 85% recycled foam plastics and Portland cement), pumicecrete, poured concrete, straw bales, or adobe. Regardless of the wall system you use, quality stucco starts with a suitably rigid structure. Good stucco will be strong enough to resist cracking as the building undergoes normal movement, but stucco is not structural. Stresses from ground movement, foundation settlement, or most commonly, framing or structural movement will crack stucco. Earthquakes may be beyond your control, but foundation settlement and framing movement are not. Most of the structural movement I see is the result of changes in the moisture content of framing and sheathing materials. Plywood can move enough to crack stucco if it is improperly spaced or nailed. For every 4% change in moisture content, lumber will change 1% in size. These dimensional changes primarily occur perpendicular to the grain and can result in significant structural shifting. The finished thickness of stucco is only 7/8-inch. Irregular or uneven framing at plate lines, along shear panels, or at bowed studs can leave the stucco too thin at these places, resulting in cracks. Keep the framing straight enough so that the stucco won’t have any excessively thin areas. If I happen to see bowed out framing before starting a job, I’ll recommend furring out the rest of the wall so that the stucco can achieve an even 7/8-inch thickness in that area.
Flashing and Weather Barrier
The fact that stucco is highly vapor-permeable doesn’t mean that you can forget about the effects of water and water vapor on framing and sheathing. It’s important to protect the framing and sheathing from any rainwater that does get behind the stucco (see Figure 1).
Figure 1. A properly installed weather-resistive barrier is essential to protect the structure from moisture intrusion. Here, 60-minute Type D kraft paper is being installed. |
Make sure that the backup system of flashing, weep screeds, and a weather-resistive barrier is carefully installed. I have covered this subject at length in another article (see Stucco Flashing Details, 10/98), so I won’t repeat it here. But the best way to think about the backup system is to imagine that you are all done with the prep work but the stucco hasn’t been applied yet. If you were to spray water on the building with a hose, it should all run off without any water getting to the framing or sheathing (Figure 2).
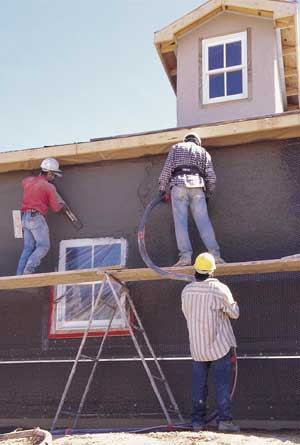
Figure 2. Lath can either be stapled — the fastest method — or nailed. Special furring nails (inset) are designed to hold the lath off the wall so that it’s properly embedded in the stucco. |
|
Lath
Some stucco-compatible surfaces — for example, porous masonry, concrete, and Rastra — will accept stucco without the use of metal lath. The surface should be clean and sufficiently damp and rough to ensure a proper bond. I’ll often verify that I’m getting a good bond by doing a test patch. If I’m not satisfied, I can always attach lath or use a bonding agent. A Portland cement dash coat of one-and-a-half parts sand to one part Portland cement will also promote adhesion. Wood sheathing, ICFs, and adobe all require metal lath. Metal lath comes in many forms, including wire fabric, commonly called “stucco netting” (which looks a lot like chicken wire but isn’t); expanded, or diamond mesh; and expanded metal mesh with flat or 3/8-inch ribs. Lath must be corrosion resistant for exterior use, and must be overlapped and fastened properly (see Figure 2, above). While pneumatic staples have become common on many sites, furring nails are a better option. The advantage of furring nails is that they put the wire in the center of the scratch coat, thus providing better reinforcement.


