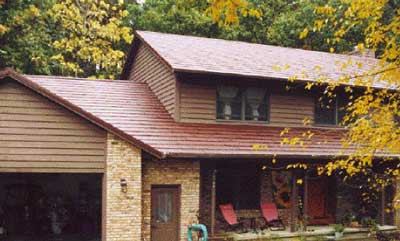
When most people hear the words “metal roofing,” they think of ridged or corrugated ag panels, or perhaps standing-seam roofing. Metal shingles are less familiar, but they’re my favorite roofing material. I’ve installed dozens of metal-shingled roofs over the past ten years or so.
When I bid a metal-shingle roofing job, I charge two to two and a half times what I would to do the same job with a good grade of asphalt shingles. But because a metal-shingled roof should last at least 50 years, it’s cheaper than asphalt in the long run. Customers appreciate the added value, and they like the distinctive textured look. And from my point of view, the light weight of metal shingles — about 40 pounds per square for the aluminum shingles I use, compared to 150 pounds or more for asphalt — does away with a lot of heavy lifting.
But working with metal shingles requires a different attitude than working with conventional shingles. The relatively short life expectancy of an asphalt roof helps limit the effects of installer error. Many mistakes that represent potential leak points don’t develop into actual leaks before the roof is replaced.
A metal-shingle roof, on the other hand, should outlive the roofer. So it’s essential to get all the details right, especially around roof penetrations and in other tricky areas. Most metal-shingle manufacturers offer hands-on training in how to install their products correctly, and that’s by far the best way to get started on the right foot.
| Installer Training Most metal-shingle manufacturers offer some sort of installer training, but the only program I have firsthand experience with is the one offered by Classic Products at its facility in Piqua, Ohio. It consists of two days of hands-on training on a full-sized test deck inside the factory. The deck includes just about every feature and roof penetration an installer would be likely to encounter in the field. Different sessions are offered for each of the company’s roofing products, and they rotate so that each session is offered several times a year. There’s no charge for the training itself, but participants are responsible for their food, lodging, and travel expenses. If you can’t take time to go to the factory, the company will send a trainer to your job site. I arranged for that once when setting up a new crew, and it worked out well. There is a charge for that service, but it’s at least partly offset by the fact that the trainer actually works on the site, adding another pair of hands to move the job along. — L.D. |
Aluminum or Steel?
Metal shingles are available in both aluminum and steel. I prefer aluminum because it won’t rust if the paint is scratched. It also weighs less than steel, making it easier to work with.
Reflective finishes. I use aluminum shingles from Classic Products (800/543-8938, www.classicroof.com), which come in a variety of “spectrally reflective” Kynar paint finishes. These absorb colors in the visible light range, but reflect infrared and ultraviolet rays to reduce thermal gain and cut cooling costs, even when dark-colored shingles are used (see “Cool Roofs for Hot Climates,” 6/03). The reflective finishes used to be an extra-charge option, but Classic recently made them standard across its product line.
Smooth or granular? In addition to the smooth base coat, all of the company’s steel shingles receive a textured powder-coat finish to resist scratches and prevent rust. Aluminum shingles are available either with or without the textured topcoat. The smooth shingles are subject to minor scratches from foot traffic, but these are inconsequential because they’re invisible from the ground and the aluminum substrate won’t rust. My customers split about evenly between those who like the shiny paint and those who prefer the textured powder coat. The textured finish is made up of several colors, giving it a blended look that’s something like an asphalt shingle.
Preparing the Deck
The light weight of aluminum shingles makes them ideal for reroofing applications. By using 2 1/2-inch nails, we’ve successfully applied metal shingles over three layers of existing asphalt shingles. Building inspectors will usually okay this as long as there’s no visible sag in the roof framing. According to Classic Products, most worn-out asphalt roofs will already have lost more than 40 pounds of ceramic granules per square, so the added weight of the aluminum shingles shouldn’t pose a problem.
Underlayment. Whether you’re roofing over an existing asphalt roof or a new deck, the first step is to apply an approved underlayment. We used to use 30-pound felt, but now we use a multi-layer synthetic material called RoofTopGuard II, which is made in Finland and marketed in North America by Nemco Industries (604/922-5481, www.rooftopguard.com).
It’s very tough, more slip resistant than felt, and it can serve as a temporary roof for six months or more. What I really like about it, though, is its light weight: A 60-inch-wide roll contains ten squares of material and weighs just 40 pounds.
Shingling the Field
Fastening methods vary from manufacturer to manufacturer, as well as among different product lines from the same manufacturer.
Starter strips and nailing clips. In the case of Classic’s rustic shingles, for example, the hooked butt of the first course of shingles engages a slot in a combination of starter strip and drip-edge at the eaves.
The shingle is pulled upward into position and secured with two threaded aluminum nails. Neither penetrates the roofing itself: One passes through a prepunched hole at the top right-hand corner, and the second is driven through a prepunched hole in a metal nailing clip that engages a flange at the shingle’s upper edge.
Classic’s lower-profile Oxford shingles are hooked to the starter strip in about the same way but have no integral nailing tab at the top edge. They’re secured to the deck with five nailing clips per shingle.
With both styles, additional locking flanges secure the edges of the shingles where they meet. Above the eaves starter strip, the butt of each shingle engages the upper edge of the course below. There are no exposed fasteners, and thanks to the mechanically interlocking shingle edges, the resulting roof is capable of withstanding 110-mph winds.
Foam inserts. Steel shingles are pretty crush resistant, but you can damage the aluminum ones by walking on them carelessly. The manufacturer recommends working from above, where possible, to avoid deforming the metal.
The alternative is to install a manufacturer-supplied polystyrene insert under each shingle before it’s fastened down. The inserts increase the cost of the job by about 4% to 7%, depending on the style of shingle, but it’s well worth the added cost. Besides protecting the shingles during installation, the inserts prevent them from being damaged by the chimney sweep or satellite TV guy who comes along after us.
Flashing
Factory training really pays off when it comes to flashing. There are manufactured solutions to many common conditions, but others are best handled with site-bent flashing made from matching coil stock. For the occasional roof that calls for something totally unexpected, a factory expert can help you figure out what’s needed and even fabricate the solution for you if necessary.


