Back when I worked for a commercial drywall contractor, we sometimes created decorative effects by layering the drywall. Usually this involved little more than a step at the perimeter of the ceiling, a simple panel, or some other very basic shape. I always wondered why no one tried carrying the concept further.
When I went out on my own, I got my chance: I started doing what I call “drywall art,” layering the material to create “murals” on walls and ceilings. I don’t do it on every job, of course — but when a customer wants something out of the ordinary, it’s a unique option I can offer them.
Design and Layout
I begin the process by making a drawing of what the final mural should look like. Once the design is complete, I screw a full layer of drywall to the studs, same as I would on any wall. If this were a painting, the first layer would be the canvas. In this case, it’s the base that the cutouts are fastened to.
To make the cutouts, I’ve found it easiest to put sheets of drywall on the floor and draw the mural full-size.
Cutting and Installation
After the mural is drawn, I put the sheet of drywall on sawhorses and use a spiral saw with a drywall bit to cut out the pieces. For areas with multiple layers, I cut the first piece, then trace and cut some more. It’s easiest to cut all the pieces at one time. To keep from getting confused, I number and stack the parts as they are cut.
Once all the pieces are cut, I fasten them to the wall, a process akin to assembling a giant puzzle. I use a combination of drywall screws and drywall adhesive to attach the pieces. The only way to catch the studs is to use longer screws for each successive layer of drywall.
In places where there is more than one layer, the edges will not be perfectly aligned at first. I fix this by using a razor knife to carefully the trim the edges flush. A drywall rasp would also work.
Exposed Edges
Normally, you would put J-bead or L-bead on the exposed edges of drywall. But when pieces are stacked more than one layer thick, that doesn’t work. Arch beads don’t bend enough to follow tight curves or complicated shapes.
Therefore, on most of my drywall murals I skip the bead and finish the edges by skimming them with a thin coat of all-purpose joint compound. Since all I need to do is fill the dimples and imperfections, I wipe most of the mud off with the knife. Mud doesn’t bond well to dust, so before applying it, I use a shop vac to clean the edges.
Then I tape the seams, spot — or fill — the screwheads, and finish any bead that did go on.
Bead. The straight outer-frame pieces on the basement mural shown here did get bead — a vinyl bullnose. Before stapling it to the wall with a hammer tacker, I sprayed the back with 3M drywall vinyl bead adhesive. A paper-edged tape-on bead would have worked, too. Metal bead, though, wouldn’t have; the bead didn’t land over framing, so there was nothing to nail it to.
Taping and Finishing
The next step is to finish taping the wall. Topping compound is a little easier to sand than most all-purpose joint compounds, so I use it for the last couple of coats. When the mud is dry, I lightly sand the skimmed edges of the cutout pieces with a sanding sponge. Then I vacuum them and use a fine bead of latex caulk to fill the hairline cracks where the layers hit the wall. Caulking this joint is very effective; I have never had trouble with cracking.
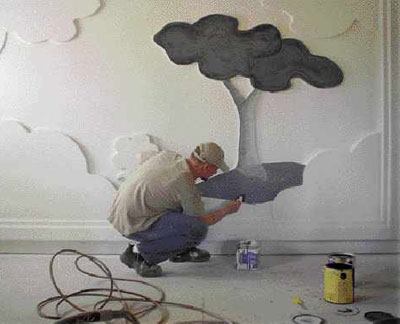
Color. The original plan for the basement mural was to use different solid shades for each layer, going from white to gray to black. After experimenting on the tree, however, I ended up creating a more realistic look by varying the shading within each piece.
On other jobs, I’ve chosen to paint the raised sections of drywall the same color as the rest of the room.
Cory Merrymanis a drywall contractor in Morley, Mich.


