After working as a superintendent for a local contractor for five years, I started my own construction company — building custom presold homes and additions — in February 2004. Two years later, I decided to build my first spec house, on a lot I purchased at a municipal tax auction. Fuel prices were increasing and I wanted to explore practical ways to increase the energy efficiency of the homes I built; a spec house, I reasoned, would give me the freedom to try some new energy measures.
There was a further incentive: The Energy Policy Act of 2005 offered a $2,000 federal tax credit for any new home that used 50 percent less energy for heating and cooling than a “typical” new home. Since I had already been building Energy Star homes, I was eager to find strategies that would allow me to qualify.
Tax Credit Details
The Energy Policy Act references the 2003 International Energy Conservation Code with its 2004 Supplement. The credit, which remains available through December 31, 2008, covers only heating and cooling energy and requires that 10 percent of the energy savings be the result of improvements to the building envelope. (For more information, go to www.energystar.gov).
While the federal credit is independent of the Energy Star program, the same rating contractors — certified Home Energy Raters — monitor the program. I worked closely with Craig Marden of Conservation Services Group, a local Energy Star auditing company, to identify the best combination of practical, proven methods to achieve the goal. We looked at three main areas for improvement: windows, mechanical equipment, and insulation.
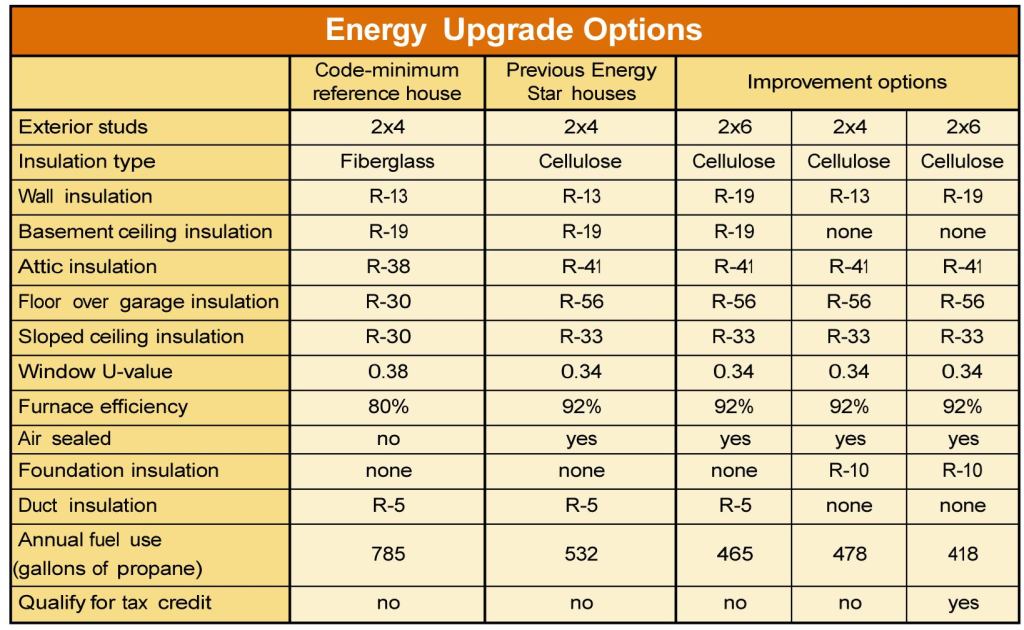
As it turned out, the windows I had already been using, Pella ProLine double hungs, were fine, as was the Frigidaire propane furnace, so those two items required no upgrade. I had already been air-sealing my previous Energy Star houses, which was critical for meeting the federal criteria. So I focused my attention on insulation and bringing the mechanical equipment and ductwork into conditioned space (see illustration).
Foundation Insulation
We determined that I would need R-10 foundation insulation. This would also transform the basement into conditioned space, which would have an important benefit: I would no longer have to insulate beneath the first floor, or any ductwork running through the basement. Moreover, insulating the foundation would bring the furnace and water heater inside the thermal envelope and provide a tempering effect on the space.
I first had to decide whether to insulate the inside or the outside of the foundation. While exterior insulation is better from a thermal point of view, it’s also more difficult to execute. On this particular house, the lot was level and the foundation would have minimal exposure, so I decided to use Warm-N-Dri insulation board (800/438-7465, www.owenscorning.com/around/insulation/products/warm-n-dri.asp) on the exterior.
I chose the fiberglass board for two reasons. First, insects seem to like to nest and tunnel through polystyrene insulation but not in the fiberglass board (see “Insect Infestations in Buried Foam,” 10/98). Second, in addition to insulating, the fiberglass board acts as a drainage mat, letting groundwater fall through to the footing drain. My site was very well-drained, so I wasn’t worried about the insulation becoming water-logged and losing its effectiveness.
Because concrete is a poor insulator, the exterior insulation must be carried up to the sill plate to eliminate a “cold bridge” through the top of the concrete wall. Otherwise, a significant amount of heat can be lost through the narrow section of exposed concrete.
Installation. The Warm-N-Dri insulation board is held in place by pressing it into the system’s spray-on waterproofing membrane, called Tuff-N-Dri. (This combination is backed by a 30-year warranty for the customer and is superior to the damp-proofing commonly used on poured foundations in our area.) I also added some concrete nails to help prevent the boards from shifting during backfill.
The only problem I had was at the top of the wall, where some of the drainage stone placed by the excavator fell behind the board. I tried to scoop the stones out, but succeeded only in helping them fall in deeper. Ultimately I was able to press the board into the few stones that got in and flatten it against the foundation. Next time I’ll use additional nails at the top of the wall, and perhaps place a tarp or a U-shaped cardboard shroud over the top to prevent stones from falling behind the board.
To keep the insulation board from protruding beyond the framing at the base of the walls, I used 2×8 mudsills and cantilevered the floor framing over it. As usual, I used a foam gasket under the sill, and also sprayed a bead of polyurethane foam along the sill’s outside edge to ensure there were no air leaks. Where the joists run parallel to the foundation wall, I held the rim joist back 2 inches from the outside edge of the sill, so that loads from above would be transferred directly onto the concrete.
To protect the top of the board and provide a finished appearance, I had my siding contractor cover the above-grade portion with vinyl-coated coil stock.
Upgraded Framing
I had previously thought it made the most sense energywise to frame with 2x4s rather than 2x6s and pay close attention to air-sealing and insulation details. I always took pains to seal around doors and windows and miscellaneous penetrations. Having never seen a good fiberglass insulation job, I had also switched to blown-in cellulose in the walls. I use Par/PAC (877/937-3257, www.parpac.com), a method that relies on reinforced plastic stapled tightly to the inside of the studs to confine the insulation, which is then blown in at high density so that settling over time is not a problem. The cellulose automatically fills in around pipes and electrical boxes, and plugs any small air leaks in the shell. For my typical 2,400-square-foot house, Par/PAC costs about $1,000 more than fiberglass.
Even though my previous 2×4 houses had met Energy Star requirements, I found that in my climate 2×4 exterior walls wouldn’t qualify for the tax credit. So I upgraded to 2x6s, which allowed for an increase in wall R-value from 13 to 19.
Dealing With Ductwork
I’ve always sealed the ducts in my houses, which greatly improves the efficiency of any forced-air system and creates a healthier indoor environment. On this project I went a step further and made sure all the ducts ran inside conditioned space. As I mentioned above, adding foundation insulation meant the basement was now conditioned space, so I was able to eliminate the insulation on any ductwork in the basement.
In previous houses, I had sometimes run ducts through the unconditioned attic, so these also had to be insulated. The house featured here had knee walls upstairs; by insulating the sloping roof plane behind them, I created a conditioned area that allowed me to run the ductwork without insulating it. (Bringing knee-wall space into the thermal envelope also makes room for recessed shelves and storage areas.)
Preventing Windwashing
In addition to increasing the overall wall R-value, I took steps to reduce windwashing of the attic insulation, as required by the 2004 IECC. I first used precut cardboard baffles, but the interface with the polystyrene vent chutes on sloped ceilings was troublesome, and I ended up having to stuff the gaps with fiberglass. While cardboard baffles fit well for truss roofs, they don’t work as well for a stick-framed roof because the lapping of the ceiling joist over the side of the rafter is a difficult area to seal. So we spent a lot of time cutting the cardboard to fit.
Then I heard about a new plastic baffle called AccuVent (610/376.1900, www.brentwoodindustries.com) and decided to give it a try. The product was not yet stocked in my area so I purchased it directly from the manufacturer. It turned out to be much easier to cut than the cardboard baffles, and faster to install. Instead of attaching to the top of the top plate, which limits stapling access, the AccuVent baffle has a vertical tab that you staple to the front of the plate. This feature made it possible for me to install AccuVent under a 4/12 dormer pitch where I couldn’t hold the stapler upright to install the cardboard baffle.
Wherever we had to make a transition between the AccuVent and standard polystyrene roof vents, we used expanding foam to seal the gaps. The manufacturer of AccuVent now sells extensions that mate with the baffle profile, for use in cathedral ceilings and other insulated roof planes.
Tax Credit Recalculated
At the end of the project, I was disappointed to learn that the $2,000 tax credit was somewhat of an illusion, because I had to deduct that amount from my expenses before determining my income. Thus I had in essence an extra $2,000 in income to pay taxes on. Assuming a 40 percent total state and federal tax rate, I had to pay an additional $800 in taxes — meaning the credit was actually only $1,200.
Even so, I think the process of improving the energy efficiency of my houses was worthwhile. In fact, I went on to build a second house that qualified for the tax credit. I didn’t have to change many of the techniques I had already been using, and the additional costs were fairly easy to absorb in the market value of the homes. Most important, at a time when more and more buyers are demanding efficiency, I’ve been able to demonstrate to potential customers that they don’t have to sacrifice their design goals to achieve big reductions in energy use.
Paul Huijing owns Paul Huijing, Inc., Construction & Engineering in Wilbraham, Mass.


