I’ve been framing custom homes for more than 25 years, and I’ve learned that a well-planned layout is the key to an efficient job. Errors are bound to occur: Clients are unpredictable, general contractors can forget to relay important details, framers are always in a hurry, and plans are often inconsistent. A job hindered by mistakes and changes goes slow, costs money, and becomes discouraging for everyone involved. But with a little planning and a well-detailed layout, I can often avoid these problems by following these layout rules.
RULE 1: Study the Plans
I don’t just roll up to a site, pull out a crisp set of unread plans, and pound away. Before I get to the site, I thoroughly review the plans and mentally put the frame together. I study the roof frame first to determine my stud heights. I check the interior ceiling elevations, looking for any balloon frames and rake walls. I find all the beams that need to be installed. I study the elevations, looking for any conflicts. Failing to check for design errors at this stage is an invitation to a framing disaster.
Plan quality. Layout is always a challenge, and the quality of the plans plays a big part. Due to the high cost of hiring professional architects, builders can often get saddled with inadequate residential plans drawn by poorly trained building designers. Some of the designers I work with do excellent work, but many provide plans without specification sheets, with scant section views, and with inconsistent dimensions. The general contractor and the framing contractor usually wind up spending hours together making these half-baked plans work. I recommend the good designers whenever possible. But if my clients opt for someone else, I won’t hesitate to tack on extra money at the bid stage for working with crummy plans.
Once I have a basic understanding of how the frame will go together, I examine other critical details, including windows, interior trim, exterior finish, and structural requirements. As I gather the information I need, I write it directly on the layout pages of a set of job-site plans. And because the job site wreaks havoc on plans, I mark up an additional set of plans to keep at the office for future reference. Armed with a freshly marked set of plans, with no questions left unanswered, I’m ready to snap some lines.
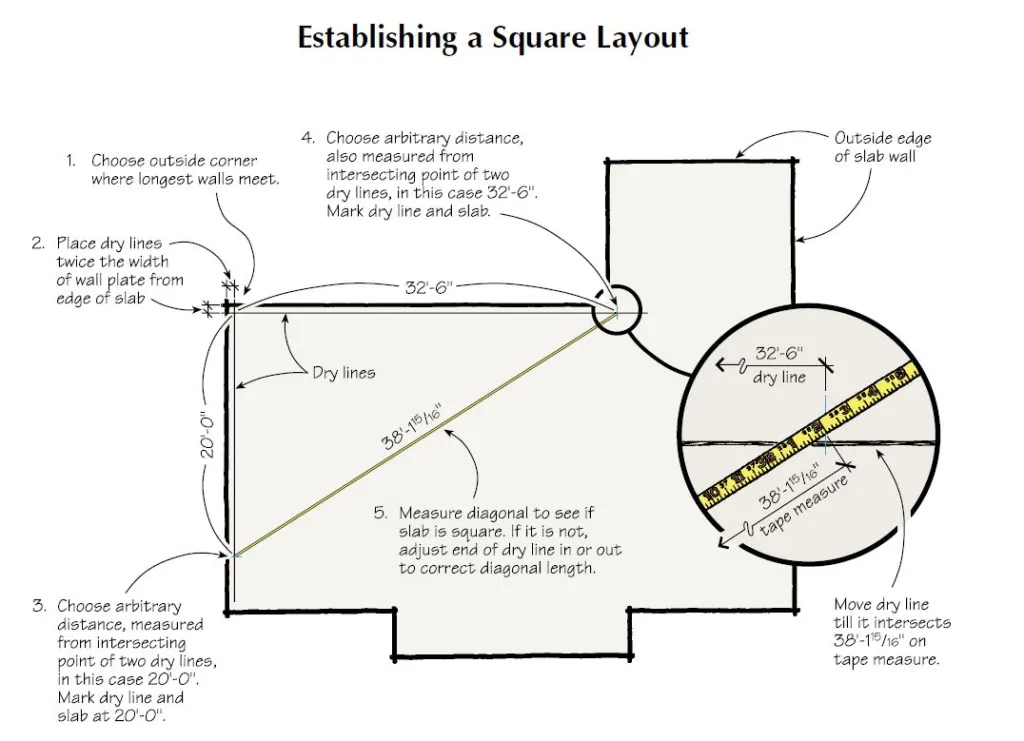
RULE 2: Make it Square
A slab or subfloor is almost never perfectly square, so the first thing I do is establish a set of square reference lines. Using a couple of 100-foot tapes and a calculator, stretch two dry lines along the edges of a corner of the deck, set back twice the width of the future wall plates. I look for an outside corner where the two longest walls meet so the diagonal will be at least 30 feet. If the perimeter of the deck is too chopped up, I square the lines off a long interior wall.
Plug the length dimensions into a Construction Master and calculate the diagonal, then adjust the lines until the measured diagonal matches. Now find out how far out of whack the deck is by measuring from the edge of the deck to the dry lines. If needed, move the lines so the bottom wall plate will hang out over the edge of the deck a little, being careful to keep the lines square in relation to each other. When the lines are where you want them, measure toward the edge of the deck the width of the wall plates and make a set of marks, then snap the lines. You can now use this set of square base lines to pull all of the other dimensions.
Exterior dimensions. After my base line is set up, I snap out the exterior walls. The important thing here is to make the exterior dimensions match those on the plans as closely as possible. This is especially important on a house with roof trusses, because the truss manufacturer is building from plans received a month or so ago, not from what’s built on site. For a house with a truss roof, I keep the exterior walls within 1/4 inch of the plan. There’s a little more wiggle room with a stick-built roof, which can be cut to fit whatever dimensions the exterior walls get framed. Once I have the outside dimensions under control, I move on to the inside walls.
Three-Step Layout
Framing layout includes three basic steps: snapping, plating, and detailing.
Snapping
I measure and snap all the walls at one time. I prefer to use a geared chalk box for speed and fill it with standard red chalk blended with red mortar dye. This leaves a line that’s not easily removed. I also carry a blue chalk line that is used to override errors.Plating
Once all the layout lines have been snapped on the deck, I spread long lengths of 2-by plate stock over the deck, and cut these to length, mirroring the lines snapped on the floor. In order to properly plate the walls, a carpenter must visualize how the walls will fit together. Plates must be cut so each end will either butt to a wall or receive one. Tight-fitting and clean, squarely cut plates are a must for a plumb frame.Detailing
Plate details are like a map, telling the carpenter what and where all the framing parts will go. With a series of pencil and crayon marks on the plates, I describe everything necessary to frame a wall, from stud lengths, beam pockets, and hold-down posts to window and door sizes. Clean and complete detailing is essential for a smooth and efficient framing job.Two tools that come in handy for detailing are the channel marker and layout stick. The channel marker is a template tool that lets you quickly mark all corner and wall intersections. The layout stick is a 4- foot-long pattern that makes 16- and 24-inch on-center stud marks (see photos). —D.D
RULE 3: Lay Out With Trim in Mind
Don’t overlook interior trim during framing. Before I start my layout, I find out what size trim will be installed. If it’s not yet defined, I push the general contractor and client to choose the trim.
Hallways are typically planned small or get squeezed tight to make room elsewhere. The first place I look is the end of a hallway, where I’m almost sure to find the largest possible doorway being crammed into the narrowest possible space, leaving room for only the skinniest whisper of trim. Casing ends up being shoved tight to the drywall with no reveal, or worse, must be ripped down to fit. Knowing my casing size in advance, however, I can snap out the hallway to work for my trim.
For example, to lay out enough room for a 2-foot 6-inch door with, say, a 2-1/4-inch door casing, the minimum hallway width required is 38 inches before drywall.
This leaves room for a king stud and trimmer on either side of a 35-inch header, resulting in a 32-inch R.O. with 2 inches for the jamb and some shim space. Once drywall is on, a 1/2-inch reveal remains between each edge of the casing and the wall. For 3-1/2-inch casing, I’ll make the hallway 41 inches wide to leave a nice reveal. When “detailing”, I mark an additional stud alongside the king stud for extra nailing for the trim.
Another tight spot is a bedroom door in a hallway that opens right against a perpendicular wall inside the room. To gain wall space in the bedroom, the designer typically crams the doorway tight to the adjacent wall. From the hallway side, there may be plenty of room for casing, but it’s often a squeeze on the other side. In this case, measure from the inside corner the width of the casing, then add the drywall and the reveal. To keep the door tight to the wall but still leave a minimum reveal with 2-1/4-inch casing, plan for a single king stud.
Bathrooms are typically small and filled with lots of stuff. Often, a bathroom wall must fit both an entry door and a vanity (). To accommodate these, mark the vanity edge at 21 inches for the cabinet plus 1 inch for the counter nosing and 1/2 inch for drywall – a total of 22-1/2 inches. To leave room for 2-1/2-inch casing and a pleasing 1-1/4-inch reveal, mark the face of the king stud at least 24 inches from the wall. Check to see if the door will fit (don’t make the door less than 2 feet 6 inches). If it looks like the casing will get hacked, widen the room.
Kitchens. Most kitchen base cabinets are 25 inches wide including the counter nosing. When a door has been placed tight to a cabinet, I allow a minimum of 27 inches from the intersecting rough-framed wall to the face of the king stud. This gives just enough room to fit in the casing.
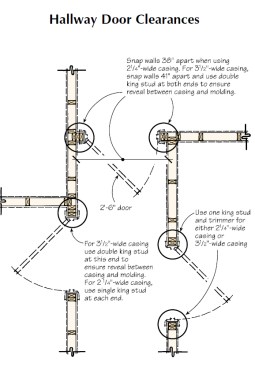
When framing a doorway in a narrow hallway, make sure there’s enough room for casing. When using wider casing, the author adds an extra king stud where necessary.
RULE 4: Know Your Windows and Doors
There’s nothing quite so unsettling as realizing that the pile of windows that just arrived on the job site won’t fit the framed openings. Before starting any job, make sure to confirm the window manufacturer’s specs.
Rules of Thumb for Window & Door Headers
Windows
Window width R.O. + 3 inches
Sample R.O.: 3'-6" x 4'-6"
Header: 42 in. + 3 in. = 45 in.
Note: Check with window manufacturer for R.O.
Doors
Door width call-out + 5 inches
Sample call-out: 2'-8" x 6'-8"
Header: 32 in. + 5 in. = 37 in.
Pocket-Doors
(Pocket door width call-out x 2) + 5 inches
Sample call-out: 2'-6" x 6'-8" POCKET
Header: (30 in. x 2) + 5 in. = 65 in.
Note: For full-height pocket doors, headers must be one lumber size narrower than a standard door header to accommodate track.
Bypass Doors
(Single door call-out x 2) + 4 inches
Sample call-out: PAIR 3'-0" x 6'-8" doors
Header: (36 in. x 2) + 4 in. = 76 in.
Note: This accounts for a 1-inch overlap between doors.
Window R.O.. Most of the windows I install are aluminum or vinyl. Like wood and clad windows, they differ in size from manufacturer to manufacturer, typically ranging from 1/2 inch under to 1/2 inch over the window dimensions called out on the plans. A call-out for a “3040” window (meaning 3’0″ x 4’0″) might require a 35-1/2×47-1/2-inch R.O. or a 36-1/2×48-1/2-inch R.O., or something in between. A call to the manufacturer is the best way to be sure. In some cases, the call-out matches the R.O. exactly. But if there’s any difference, I’ll mark the correct opening size on the plan ahead of time to use when detailing.
Even if the plans include a spec sheet for wood window sizes, check them out beforehand. Don’t count on them to be accurate. The burden of finding out the windows’ proper R.O. falls to the framing contractor. If you don’t check ahead of time and the openings turn out wrong, you’ll be fixing them on your dime.
Plenty of windows these days include half-round arches, elliptical arches, and transoms. Some are stacked on top of each other or mulled together. When the elevation shows such specialty windows, I always make a call to the supplier and get the low down on how to detail the rough openings.
Egress. Even though all plans must be issued through a local building department for plan check, it’s cheap insurance to double-check that all the bedroom window openings meet egress code. Remember, too, that any window that comes within 18 inches of the floor requires tempered glass. I always bring this to the client’s attention, in case they want to raise the window sill height and save a few bucks.
When detailing the window locations on the framing plate, stay aware of local code requirements for a window’s proximity to a gas meter. More often than not, the actual gas meter location will be different than what’s indicated on the plans, or not noted at all.
Window changes. Nothing ruins a day like hearing the clients say, three weeks into a job, “We want wood windows instead of aluminum ones.” The rest of the day gets spent yanking out headers and sills on a sheathed two-story wall. I try to nip this in the bud by insisting that the windows be a firm decision before layout stage – “no take-backs.” Most clients don’t realize windows aren’t usually interchangeable by size, type, or manufacturer.
To detail a standard window header, I add 3 inches to the R.O width. This accounts for the two trimmer studs. If the window or door opening is greater than 6 feet, the standard rule of thumb calls for double trimmers. Engineering may require an increase in header size, or a change to 4-by trimmer studs, so I always review the calc sheet attached to the plans (a requirement in California, where I work).
Recessed windows. I also check the elevations for recessed windows, common in stucco exteriors. Sometimes the floor plans show a standard opening, while the elevation shows a recessed detail. Recessed windows need extra framing, and the headers can easily run an additional 6 inches in length (). To detail door headers, I add 5 inches to the door call-out. For example a 3-foot 0-inch door requires a 41-inch header. This accounts for two trimmers, the door jamb, and shim room.
Pocket-door rough openings need two more inches in height than standard 6-foot 8-inch doors. On the West Coast, it’s common to use solid 4×12 material as header stock for standard doors, and 4x10s for pocket doors. The R.O. width of a pocket door is figured by doubling the door width and adding 5 inches. For example, a 2-foot 8-inch pocket door has a 69-inch-long header (32 inches + 32 inches + 5 inches).
Most of the closet door openings I frame are for bypass sliding doors. The R.O. is 1 inch smaller than a standard opening of that size, allowing the two doors to overlap. For example, while I’ll frame a standard opening for a pair of 2-foot 6-inch doors using a header length of 65 inches, I’ll cut the header to 64 inches for a bypass door.
RULE 5: Work With Your Subs
I make sure that I take care of the subcontractors that follow the framing. It’s easy to obstruct their access, so I plan ahead to keep framing out of their way. Look out for these folks, so when it comes time to ask for something to be moved or relocated, you’ve got a friend.
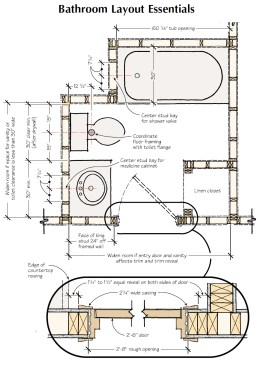
When a vanity butts the entry wall in a bathroom, make sure there’s plenty of room for door casing and a reveal. The author typically locates the inside face of the king stud at least 24 inches from the corner framing to allow for the drywall, vanity cabinet, and countertop overhang.
Bathroom rough-in. In the bathroom, the first thing I check is the toilet. Code requires the commode to have a minimum 30 inches of total clearance – 15 inches from the center of the flange to the walls on each side after drywall, as in . Make sure there’s enough space when there’s a vanity next to the commode. If there’s less than 30 inches for a vanity, I’ll move a wall to gain more space.
When framing the subfloor, make sure a joist doesn’t interfere with the toilet plumbing. I make a point of allowing at least 4 inches of joist clearance on each side of the toilet location.
The rough opening for a standard bathtub is 5 feet. I snap out the opening on the floor no less than 5 feet 1/8 inch and no more than 5 feet 1/4 inch. This gives the right amount of wiggle room to fit in a tub. A tub recess usually gets snapped out 30 inches deep. However, this typically puts a stud smack in the middle of the shower valve. To stay friends with the plumber, detail the plates so that studs land 7-1/4 inches from each side of center, creating a standard 14-1/2-inch stud bay with plenty of shower valve clearance.
I start the backing blocks to catch the top edge of the tub at 15 inches off the floor. When a tub-shower enclosure is used, center the blocking (2x4s turned flat) at 72 inches off the floor. Make sure a joist isn’t in the way of the tub drain when framing the floor.
Most vanity tops are 22 inches wide, and when a half- or full-height privacy wall is drawn to separate the toilet and vanity, I snap out the privacy wall so that it’s no less than 26 inches long. If you need to add a towel ring, add 12 more inches.
Laundry rooms are usually crammed with cabinets and appliances, and it’s important to know all the dimensions ahead of time. Washers and dryers are approximately 27 to 30 inches wide and about 26 to 28 inches deep, not including hoses and flex duct. This means a washer and dryer alcove must be at least 3 feet deep, and no less than 5 feet, 6 inches wide (preferably 6 feet 0 inches). If a client requests a window behind the appliances, I keep the window sill no lower than 48 inches from the floor. Make sure any door is at least 2 feet, 8 inches wide, or the dryer might not fit.
Kitchens. Years ago, it was standard practice to install blocking for cabinets in the kitchen walls, but after years of framer neglect, most cabinet installers have given up expecting this. Most cabinet boxes today are made Euro-style, using a cleat fastened to the wall that matches a receiving cleat on the cabinet back. But I still offer continuous backing in the wall, using 2×6 or 2×8 blocks framed at a height of 90 or 96 inches, depending on the size of the uppers.
Lighting. The hallway seems to be one place where ceiling joists invariably end up in the way of the electrician. Can lights are common here, so I check the electrical plan and confirm it with the general contractor. Because it’s easy to forget about lighting, I put a reminder on the floor plan (or ceiling joist plan, if there is one) and on the floor itself. For can lights, I keep my ceiling joists at least 7-1/4 inches clear of center (a 14-1/2-inch-wide centered opening works in most cases).
Kitchen lighting can range from rows of mini-can lights to huge fluorescent light wells. Although this doesn’t affect the initial wall framing, it’s wise to nail down the kitchen light placement as soon as possible. The can lights aren’t much of a problem, but the big recessed light wells can be. Once framed, these huge light boxes surrounded by doubled carrier joists will catch the eye of the client. Don’t wait until you frame it to bring it to the client’s attention. Avoid the punishment of having to reframe by snapping the light box out on the kitchen floor and letting the client mull over it.
RULE 6: Look Out for Structural Needs
If structural engineering requirements are included with the plans, I study the calc sheet, making sure to note any changes and additions. Here are a few things to look for.
Loads. Beam loads that transfer down to a wall below are rarely pointed out in the first-floor layout. When detailing the plates, it’s easy to overlook a second-story floor or roof beam, so I spend time locating all the structural support beams in the house. Heavy loads that land on a window or door opening must have a stronger header, which may require engineered lumber or more trimmers for greater bearing at the ends. If a beam load is placed over a stud or stud bay, a post the same width as the beam must be placed directly underneath. Other beams may require a pocket in the wall (commonly found in garage walls).

Recessed windows, common in stucco exteriors, require extra framing to create the recess. Therefore, the window headers have to be longer.
Hold-downs. If hold-down posts have been placed right next to an opening, they often act as king studs. This isn’t too bad when it’s a window opening, but for doorways it can be a real pain. The stud bolt has to go through the post but not stick past the face of the trimmer stud. This requires countersinking the nut and washer in the trimmer stud. I try to avoid this by calling the engineer to determine how much flexibility I have for moving the hold-down posts. Often there is enough wiggle room to locate the post shy of the king stud.
RULE 7: Consider the Exterior
Every exterior covering has an effect on the framing at some point. Stucco is the most common exterior I deal with, followed by horizontal lap siding (usually hardboard but occasionally redwood or cedar), T-1/11 plywood, and masonry (brick, rock, or manufactured stone).
When hold-down posts fall at the location of the king stud, the bolts must be countersunk in the trimmer (left). Sometimes this can be avoided by moving the holddown away from the opening (right), but check with the engineer before doing this.
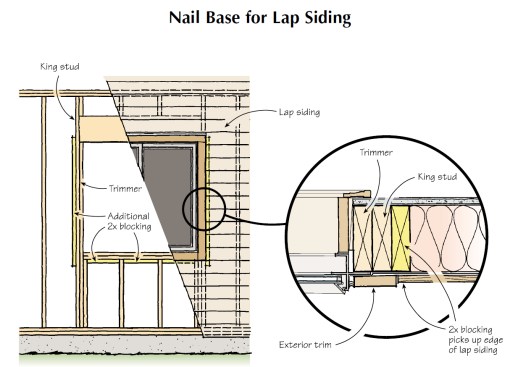
Horizontal lap siding. If the exterior calls for horizontal lap siding, I find out whether it has a flat profile or a bevel. With bevel siding, it’s a given that the trim boards go on first and the siding butts to it. If it’s a flat profile, there is a choice, so I ask the general or the client if they prefer the trim to go over the top of the siding or the siding to butt the trim. When siding butts up to trim, there is usually a backing problem. In almost all cases, the trim board will cover the framing on the sides of the windows, doors and corners, so there’s no framing to fasten the siding to. In this case I detail on the plates where backing is needed (usually no more than a 2-by the length of the opening, nailed alongside the king stud).
Stucco. If stucco is called for, I like to know if it’s a standard three-coat, or the popular two-coat foam board system. The two-coat system is approximately 1-3/8 inches thick, while the traditional three-coat is only 7/8 inch thick. This extra thickness all but obscures the bottom edge of eaves blocking unless you hold it out an inch. Even though roof eaves blocking happens way down the road, I note this on the plans early so I won’t forget it later.
Masonry also affects eaves blocking. For brick, I commonly hold the eaves blocks out 4-3/4 inches, but in the case of real or synthetic rock, it’s best to check with the mason for an exact dimension.
RULE 8: Write It Down
To make layout easier, I do the necessary homework. But let’s face it: Time is limited for going over the plans with a fine-toothed comb, and no one can carry all the layout dimensions in his head. There are just too many to remember, and eventually they’ll all get jumbled up – and many will change. The key for me is to keep a small notebook for each project that I constantly fill with all the important dimensions, and where I track changes as they occur.


