Our company, HighCraft Builders in Fort Collins, Colo., specializes in room additions and remodels. Residential construction in this area is complicated by expansive clay, hilly lots, and variable soils that can make excavating and pouring conventional concrete foundations challenging and expensive. Completing a small addition can take a surprisingly long time and typically costs substantially more per square foot than new home construction. Given these concerns, we do anything we can to make the process easier and less expensive for our customers.
A couple of years ago, we met Dr. Howard Perko, Ph.D., of Secure Foundations and Structures, Inc. (www.secureengineer.com), an engineer in our area who holds a patent on a type of helical pier. Helical piers are essentially large earth screws made from galvanized steel. They’re turned into the ground until they’re stable enough to build on. While these piers are fairly common in commercial construction and in foundation repair, they aren’t widely used as a residential foundation system. Howard decided to put an addition on his own home using helical piers as the foundation system, and he invited us to watch the installation. That showed us the advantages to that kind of construction and got us thinking about how we could use helical piers for the work we do. Since we saw the demonstration a couple of years ago, we’ve used helical piers in over a dozen projects, ranging from simple bumpouts to large two-story additions.
Advantages of Helical Piers
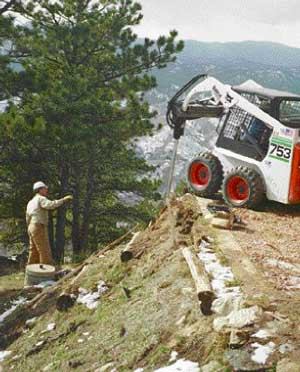
Helical piers don’t require huge spaces for site access because they can usually be installed with a mini excavator or skid-steer loader. We can often drive around a fence or through a gate to get to a backyard. We can also work on steep sites and ledges that would be nearly impossible otherwise. Compared to a concrete foundation, installation is extremely fast; we can usually shave a week or two off a project schedule. In addition, we don’t have to be concerned with weather delays — while inconvenient, freezing temperatures and rain won’t stop a job. Minimal excavation is required, and you don’t have to store the excavated soil while you wait to backfill. That means that the existing landscaping is typically left undamaged.
Piers also solve problems like digging next to an old stone foundation that would likely collapse if disturbed. They’re great for areas with shallow water tables and caving soils.
Designing a Helical Pier Foundation
Our building department won’t accept a foundation plan with helical piers unless it’s stamped by an engineer. The engineer determines how many piers are required and locates them on a foundation plan. To properly estimate the depth, number, and size of helical blades required, it’s usually necessary to have a soil test done or at least have some experience installing helical piers in the same general area. While bringing in a drilling rig to make test borings adds about $800 to $1,200 to the cost, it also guarantees a sturdy foundation that’s free from movement. Another option is to keep an inventory of lead sections (the corkscrew-shaped part that screws into the ground) with various blade configurations and a surplus of extensions. Different lead sections can be tried until the proper depth and installation torque are achieved, but we think it’s cheap insurance to get the test borings.
Determining bearing capacity. As a helical pier is screwed into the ground, the torque generated by the helical blades provides a direct means of determining soil density, stiffness, and strength. Measuring the torque allows you to determine whether the pier can support the weight of the structure. There are three basic ways to measure the torque: by using a mechanical or electronic instrument that measures hydraulic pressure at the auger’s power head; by using shear pins that break at a specific torque; or by using the machine’s maximum turning capacity, which is how we do it. Simply put, when our auger stalls while driving a properly sized helical pier, the pier has enough bearing capacity.
We like to have an engineer on site the day of an installation in case something unforeseen happens. If, for example, a pier hits cobbles 10 feet down, an engineer can approve alternate locations or additional piers. The engineer can also determine when the piers are deep enough to provide sufficient bearing and uplift resistance if a soils report was not done.
A Typical Design
Our projects built on helical pier foundations are constructed like a typical backyard deck. An average box addition might have a row of three piers installed about a foot or 18 inches from the existing foundation and another row of three about the same distance from the band joist. Joists run over dropped beams that sit on the piers. The biggest challenge with room additions is in making the foundation appear consistent with the existing structure. If the existing house has a concrete foundation (most do here), a “floating” addition looks odd. So we use a skirt wall made with treated lumber and sheets of 1/2-inch cement board that’s difficult to distinguish from a poured foundation.
Preparing the Site
As with any below-grade work, we have the utilities located several days before work starts. We try to get as much information from the homeowner as possible regarding septic, well, and sprinkler locations. The concern with helical piers is that below-ground damage can take days or weeks to show up, and any necessary repair would then be a big problem, with a new room addition sitting on top.
We order all the piers and associated components well ahead of time because those parts aren’t readily available at lumberyards. We use Magnum Piering (West Chester, Ohio, 800/822-7437, www.magnumpiering.com), and we keep extra piers and extension tubes on hand.
Installing the Piers
Depending on site conditions, we may need to scrape some soil to achieve the required 18-inch clearance between grade and the bottom of the joists. If plumbing is planned for the addition, we dig deeper to allow for easier access.
We install the piers with a mini excavator or skid-steer loader and a hydraulic auger attachment. This equipment is small and very maneuverable and works well for most locations. The process starts with the installation of a 6-foot lead (the part with blades). It’s driven down to grade, then 6-foot extensions are bolted on as needed. The leads and extensions attach to the auger powerhead with a grade-8 bolt. Installing one pier usually takes about 30 minutes to an hour.
In our area, the soils are usually soft enough to accept the piers, but bedrock and localized sections of hard rock called “rock lenses” can be a problem for helical piers. If a pier won’t advance, it’s easiest to back it out and try one with a smaller diameter that (hopefully) won’t encounter as much resistance. If that doesn’t work, you can move the pier location to the left or right. The amount you can move a pier depends on the structure, and you’ll want to consult your engineer, but in most cases you can move to the left or right about a foot without a problem. If that doesn’t work, you may have to take more drastic measures, like bringing in a drilling rig to make a “pilot hole” or pinning a concrete caisson to the offending rock. Thankfully, we’ve never had it happen, but piers sometimes get stuck and won’t advance or back out. In that case, the only solution is to either cut it off or work it back and forth until it’s free. Another good reason to get a soils report is to avoid these kinds of frustrations.
When all the piers are in place, we determine our finished floor height and cut the piers off accordingly using a portable band saw. We then bolt U-shaped saddles to the posts to accept a built-up beam. Once the beams are installed, construction is conventional. We lay joists on top of the beams, install the subfloor, and build the walls on top. We insulate the joist cavities and install plywood or rigid insulation on the bottom side of the joists to keep the floor warm. We also install 6-mil plastic over the crawlspace soil.
Skirting
To keep the look of the foundation consistent with the existing structure, we add skirting that attaches to the bottom side of the floor joists and goes down to grade level. This is simply a pressure-treated 2×4 wall with 4×8 sheets of cement board on the outside. The joints and screw heads are skimmed with mortar to make the skirting look like a poured foundation. This is the most tedious part of the process.
Pros and Cons
Now that we’ve done more than a dozen helical pier foundations, the advantages and disadvantages have become clear. Pier foundations go in faster and cause less damage to the site. They work well with almost all soil types, and their strength and integrity are verifiable, unlike that of concrete, which can vary in quality and strength. They are also long lasting. Test data indicates that in moderately to highly corrosive soils, the hot-dipped galvanizing should last 75 years or more; in less corrosive soils, it can last for hundreds of years.
There are some disadvantages, too. As discussed above, these foundations should be designed and inspected by an engineer, and sometimes a soils test is required, both of which take time. In addition, good planning and ordering are critical. Waiting while one or two missing helical pier components are ordered could stall a project for weeks. Inspections also work differently than with a conventional foundation. Most municipalities require special inspections of helical pier foundations by geotechnical or foundation engineering firms — on the plus side, the helical pier inspection usually replaces “open hole” soils and footing inspections. One final problem, discussed earlier, is that sometimes hard bedrock won’t allow adequate penetration. While bedrock can provide sufficient bearing, the piers also have to go deep enough to resist frost, expansive soils, seismic forces, and other types of uplift pressure. If you hit solid bedrock and the pier isn’t deep enough, you’ll need an engineer for a backup plan.
Cost
Our first two or three projects weren’t very profitable because of the learning curve, but now the cost is working out much better. Not only do helical piers reduce the amount of mess and excavation, they also allow us to build much more quickly on difficult lots. Sometimes we can install the piers in the morning and start framing the floor system in the afternoon.
In our area, a pier foundation for a basic 20×24 addition runs about $500 to $800 per pier. That’s about 5% to 10% less than a standard concrete foundation. For our customers, however, there are extra savings, including whatever new landscaping would cost after the installation of a concrete foundation. The real saving shows up in situations where a conventional foundation isn’t possible — on expansive soils or in steep terrain. In those cases, the helical piers can save as much as 10% to 20% over a specialized concrete foundation.
Our original interest in helical piers was eliminating excavation and its problems. But getting used to how the various parts of the foundation and skirt wall go together can take a while, and after the first couple of projects, we began to wonder if the new challenges were worth the trouble. Fortunately, everyone in our company welcomes a challenge. Creative ideas and feedback from all involved have improved the process so that we now appreciate the advantages, including some we didn’t anticipate. Last year we did two projects on lots so steep and tight they wouldn’t have been feasible without helical piers.
Dwight Sailer and Bryan Sothare the owners of HighCraft Builders, a remodeling company in Fort Collins, Colo.


