by Mike Guertin
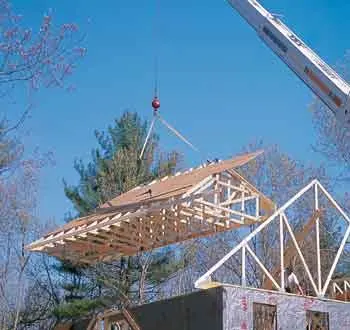
Several years ago, while discussing how to lift trusses for a hip roof, our crane operator suggested that I preassemble some of the components on the ground. I decided to give it a try, so I worked a little late that day, attaching the jack trusses to the girder trusses (see Figure 1). The lift went off without a hitch. On the next hip roof house I built, I went further with the preassembly and attached the hip trusses and corner jacks while the assembly was still on the ground. Even factoring in some extra time for head scratching, the method saved us time.
Figure 1. The girder truss (or hip girder) is the backbone of the hip roof truss assembly; most roofs require a double girder truss. Attached to the girder truss at right angles are the jack trusses (sometimes called the face jacks or end jacks). Extending at a 45-degree angle from the girder truss to the corners are the hip trusses (also called hip jacks, king trusses, or corner jacks). The short trusses that attach to the hip trusses are the corner jacks (also known, confusingly, as hip jacks or side jacks). |
Nowadays, on a single-story house, I usually just attach the jack trusses to the girder trusses before the crane lifts the assembly, since the rest of the components are easy to install in place. But on a two-story house, it’s more efficient and safer to assemble as much as possible on the ground. These days I even sheathe the hip system before lifting (see “Installing Hip Roof Trusses,” 6/97).
Laying Out the Girder Truss
I begin by squaring up and marking out one of the girder trusses while it’s still lying flat on the pile of trusses. Trusses are sometimes fabricated out of dimension, especially at the tails, so when I lay out the jacks, I don’t measure from the tails of the girder truss. Instead, I establish a line perpendicular to the top chord of the girder truss, in order to establish reference points for laying out the locations of the jack trusses (Figure 2).
Figure 2. To establish a 90-degree angle down from the girder truss’s top chord as a reference, first mark the midpoint of the top chord (a). Then pull two tape measures from the top corners of the truss, crossing the tapes at the bottom edge of the chord (b). Adjust the tapes from side to side until they register the same measurement and mark that point as the midpoint of the bottom chord. The two midpoints can then be used as reference points for laying out the locations of the jack trusses (c). |
Generally, roof trusses are spaced 2 feet on-center, but one of the spaces between jacks will usually be less than the typical 22 1/2 inches. Jack trusses and hip trusses sit in hangers attached to the girder truss. Once I’ve marked the jack locations, I install the hangers, initially using only two 1 1/2-inch nails per hanger. Later, when the second girder truss is paired with the first, I’ll finish nailing the hangers with 10d or 16d spikes that grab both girders. To support the diagonal hip truss and the adjacent jack truss, several styles of hangers are available. I usually use a universal hanger that will fit either the left or the right hip trusses (Figure 3).
Figure 3. This universal hanger supports both the hip truss and one of the jack trusses. This type of hanger is reversible and can be used on either the left or the right side. |
While the girder truss is still on the pile of trusses, I nail a single jack truss roughly in the middle of the girder. Then I roll the girder upright and carry it to a flat location, accessible to the crane, to continue the assembly (Figure 4). The area doesn’t need to be level, as long as it’s fairly flat.
Figure 4. A single jack truss nailed to the girder truss will hold it upright while the rest of the jack trusses are installed. |


