As an interior trim contractor, I know my work won’t look good if the framers are sloppy. That’s why I always carefully inspect the walls before my crew shows up — hopefully before the drywall is hung.
Sometimes, when it’s my first time working for a GC, the drywall’s installed before I even see the site. I’ll still do the inspection, but if I encounter surfaces that are lumpy, bowed, or out of plumb, I make it clear that unless the builder tears off the drywall and fixes the frame, the trim won’t look right. The builder has to do this only once to realize that it’s cheaper and easier to inspect and fix the frame before the drywall goes up.
The builders I regularly work for pay me to inspect the framing because they know that I’ll not only look for problems that will affect trim, but also point out other defects that may reduce the quality of the finished home. When I find a problem, I mark the area with spray paint and maybe write a note on the stud. The builder then has the framer — or another sub — fix the problems, and I inspect one more time.
When the repairs pass muster, the builder has drywall installed.
Door Openings
I begin by checking every door opening for height, width, plumb, and swing. I also check to make sure the jack studs align with the kings and that all studs align with headers and plates. This sounds pretty basic, and you’d think the framers would be able to get it right, but I constantly find errors.
Out-of-plane framing. Say the header projects 1/8 inch beyond the jack on one side of the wall, and the king stud projects 1/8 inch beyond on the other; now you’ve got a wall that’s 1/4 inch too thick. If this weren’t fixed, I’d have to beat and chop the drywall to get the casings to lie flat. So I mark the problem area, and the framers fix it either by hammering the framing into line or by shaving it flush with a power planer.
Check the R.O.s. A couple of years ago I was working for a new builder on a large house and didn’t have the opportunity to check the frame before drywall. The first passage door header I measured was 97 inches off the floor, and I needed a minimum of 98 inches for the custom doors, which were already on site. Going around the house, I found that every door opening was an inch too short. To get the doors to fit we had to cut out the bottoms of the headers — an all-day project that made a terrible mess.
The site supervisor had assumed the framer would get it right, and the sales rep for the door company didn’t measure the R.O.s. It was a costly mistake that had been overlooked by three different people; someone should have checked those openings before the drywall went up.
Blocking. It’s important to know in advance the width of the casings. Back when 1 5/8-inch and 2 1/4-inch casings were the norm, electrical boxes and baseboards could be fastened to the king studs. But with wider casings, you have to block electrical boxes off the studs; otherwise the cover plate won’t clear the casing. When the casing is wider than the door trimmers, I recommend putting a block at the floor, too, to catch the top end of the baseboard. This may sound like Framing 101, but oversights happen and it’s nice to catch them before drywall.
Windows and Exterior Doors
Next, I inspect the windows, to make sure that each one operates freely and, when opened slightly, leaves an even gap between sash and jamb. If the gap tapers, it means the window was installed out of square and needs to be reset. I check for the same things on sliders, and that the jamb is shimmed at the lock.
With vinyl windows, it’s common to return the drywall into the opening and butt it to the windows. When that’s the finish detail, I make sure that the windows are centered in the openings; if they’re not, the reveal between the drywall and the jamb will be uneven.
Since resetting windows is not always easy, I may recommend centering a unit by padding out one side of the opening. If the window’s getting jamb extensions, the finish carpenter can even the reveals.
I always check the alignment of ganged windows, and between doors and flanking windows or sidelights. If these units are to be connected by casings, then the heads need to be perfectly aligned. If they are off by more than 1/8 inch, I’ll ask the contractor to reset them.
Walls
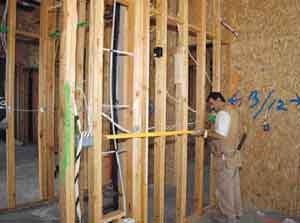
After that I check all the walls for flatness, using an 8-foot level as a straightedge and looking for gaps or bumps that exceed 1/8 inch. I examine the wall at several elevations and mark trouble spots with paint. The framers will plane the high spots and shim the low ones. It’s often easier just to replace any badly bowed studs. The goal is to make the wall as flat and straight as possible before covering it with drywall.
Certain walls are critical. For example, a bowed stud behind a vanity may prevent the wall mirror from lying flat. A bump in a wall behind a planned run of cabinets may also need to be addressed: While it may not show at the cabinets — which get shimmed straight — it will show up at the backsplash.
I also carefully check any wall that’s receiving wainscot paneling or horizontal trim like chair rail or crown. Dips and bumps that aren’t noticeable in a vast expanse of drywall will suddenly become visible when you cover them with trim.
For instance, I once installed a chair rail in a dining room where a 3-foot section of wall was badly bowed; I had told the builder he needed to fix it and he’d said, “It’s okay the way it is, just do the best you can.” Of course the bow looked even worse once the trim was on. The builder didn’t like what he saw, and he had to demo the drywall, plane the studs, repair the drywall, and install the trim a second time.
Backing. I also look for backing for fixtures like toilet-paper holders, towel bars, vanity sinks, handrails, and bar tops. And I make sure there’s proper backing for beamed ceilings.
On cabinet walls, I compare the framing with the layout from the cabinet shop. I want to make sure that all the electrical outlets and plumbing and gas stub-outs are where they’re supposed to be. I also check the heating vents to verify that they are blocked, secured, and not so high that they interfere with the crown.
Ceilings. Ceilings should be flat, and details like soffits and coffers should be straight, plumb, level, and aligned where they meet. We install a lot of crown around soffits and coffers, and it doesn’t look right if the vertical framing is out of plumb. I also check to see that any nailing blocks that have been installed are flush to the face of the joist or stud. If the blocking stands proud, I mark it so that the framer knows to plane it or beat it back.
Although checking an entire house may sound like a lot of trouble, the effort is worthwhile. It usually takes me most of a day to inspect a typical 5,000-square-foot home, and another couple of hours to inspect the repairs. And the builders don’t complain about paying me, because they know that the cost of repairing any problems after the drywall’s up would far exceed the price of my inspection.
For my part, I know that if the frame is right, I can produce the kind of topnotch finish work both the builder and I will be proud of.
Frank Caputo is a finish carpentry contractor in Cool, Calif., and a presenter at JLC Live.


