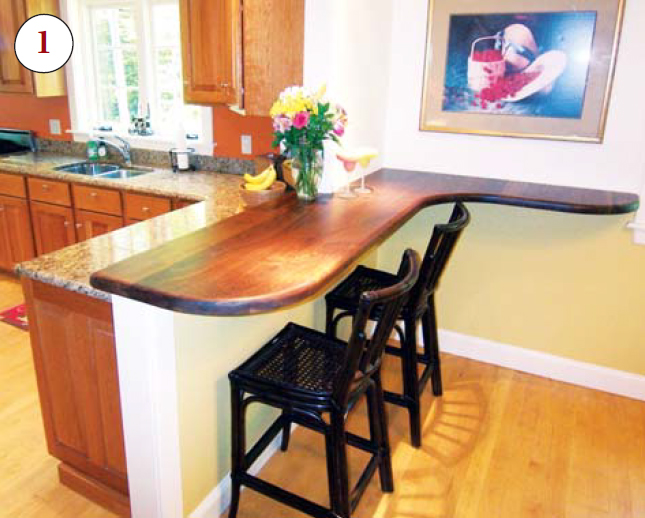
On the remodeling project shown here (1), the
clients wanted to create a gathering spot that would connect
their kitchen to the adjacent dining and living areas. They
came up with the idea of a dry bar in the corner, with a
surface that would complement the stone counter in the kitchen.
They found a maker of concrete and wood counters on the Web (J.
Aaron,
jaaroncaststone.com)
and, after seeing a photo of a top made of distressed black
walnut, declared, “This is it!”
We drew up a preliminary design and forwarded it to the company
to get pricing. Once we had the owners’ go-ahead, we
finalized the drawings, refining the edge radius and requesting
some handwork with rasps and files to give the piece a natural
feel.
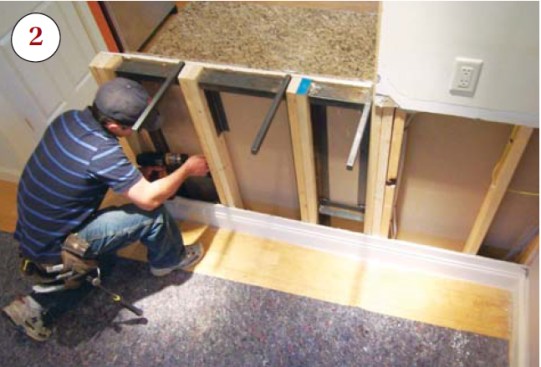
We decided to support the top with steel brackets
(2) secured to the half-wall framing below. We
ordered these from a local metalworker, who fabricated three
brackets that fit perfectly in the stud bays. We installed them
and tested them for strength, then waited for the counter to
arrive.
The day the walnut top was delivered was exciting. It came via
freight truck, packed in a 5-foot-by-7-foot wood box. Other
than the photo on the Web site, how the top would look had
remained a mystery. No one was disappointed.
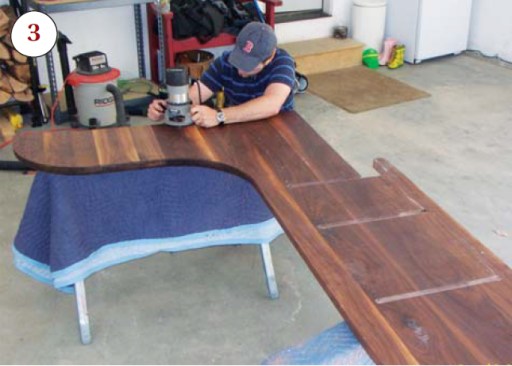
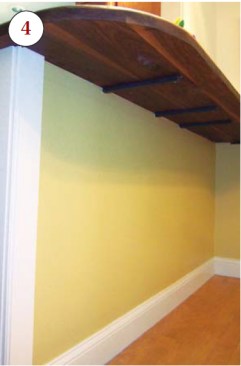
We scribed the counter to fit against the wall, set it in
place, and marked out the exact locations of the steel brackets
from underneath. We then routed slots in the bottom
(3) and installed the top, using silicone to
seal the connection between the wood and steel. A few coated
screws driven up through the steel hold it in place
(4), where it seems to float above the
floor.
Brandon Archibald owns Archibald Finish Carpentry in
Andover, N.H.
Quick Tray Ceiling
A tray ceiling can add style to a room, but the prep, framing,
and finishing can be complicated and costly. With vinyl EZ-Tray
angled corner bead (800/874-2333,
trim-tex.com), however,
drywall contractor Myron Ferguson quickly and inexpensively
converted this flat ceiling to one with eye-catching detail
(1). At a soffit depth of 2 inches, the change
in plane is modest but effective, making the system a good
choice for rooms of average ceiling height.
The installation begins with 2x2 furring strips screwed through
the drywall into the framing, outlining the soffit areas
(2). Intermittent blocking provides added
support for the soffit drywall. The job shown here is new
construction, but the method would be no different in a
remodeling situation. In fact, the border areas can conceal new
wiring runs for retrofit lighting fixtures.
Ferguson applies 1/2-inch drywall over the furring
(3) and then trims it flush with a zip tool
(4). Cleaning up raggedness and dangling paper
with a rasp provides a crisp edge (5). A block
of 2x4 added on the fly (6) backs up random
butt joints, preventing movement and cracking
(7) and allowing infill pieces to be quickly
fitted without reference to a framing layout
(8).


Once the drywall is installed, the exposed edge of the furring
is covered with the 3-inch-wide EZ-Tray corner bead
(9). Ferguson covers the long runs first,
butting square-cut ends into the corners (10).
Next — although the instructions don’t include this
step — he applies adhesive caulk behind the top of the
bead to help position and hold it against the ceiling drywall.
The vinyl bead cuts easily with snips or a utility knife, and
overlapping “mitered” corners are simple to make
with a proprietary angle marker. Using spray adhesive, he then
sticks the narrow installation flange to the drywall, staples
it at 10-inch intervals, and covers it with compound
(11). The angled face serves as a finished
surface and requires no compound.
1011
After taping, finishing, and priming the drywall, Ferguson uses
acrylic caulk to blend the miters and integrate the top edge
into the ceiling. The caulk readily takes texture and paint and
gets finished with the ceiling for a seamless appearance. He
prices the average soffit at about $10 per linear foot, based
on the room’s perimeter dimensions. — Dave
Holbrook
An Upside-Down Beam
by Yves Vetter
Here’s a technique we use on occasion to create an open
floor plan in an existing ranch-style home, where the ceiling
joists typically rest on a center bearing wall. Instead of
installing temporary ceiling support and demolishing the
bearing wall, we strip the wall of drywall and then move to the
attic.
First, we spike together all the overlapping ceiling joists
with plenty of 12-penny nails, then lay a 2x6 baseplate on the
flat across the top of the ceiling joists, directly above the
top plate of the bearing wall. We fasten the plate with #12
structural screws into the top of each joist, shimming as
needed to ensure good contact with each joist. This helps to
maintain the existing ceiling plane and prevent drywall screw
pops.
Next, we make an opening in the gable end, then slide an
engineered wood beam along the baseplate (1).
(The beam shown here is a 6x16-inch Parallam, though the size
changes depending on the spans involved.) By this time
we’ve already installed posts or other continuous
structural bearing for both ends of the beam, extending down to
the foundation or a new footing.
Once the beam’s in place, we lag-screw it to the
baseplate from below, then use conventional rafter ties and
perforated steel straps to secure the ceiling joists to the
beam (2). At this point we can tear out the
first-floor bearing wall; typically, all that’s left is
to patch the gap in the drywall left by the old plate.
The first time we used this method, we ran it by a structural
engineer to make sure we were on the right track. Now, as long
as we’re dealing with the ordinary attic loads found in
ranches, we size the engineered beam and metal connectors from
the manufacturers’ design guides.
Yves Vetter owns Evergreen Construction and Consulting in
Seattle.