It was the summer of 1977. I’d just received my education degree, but I wasn’t ready to begin my “professional” career. So I decided to take on a construction project.
With only a few summers’ worth of construction experience but a lot of youthful ambition, I planned to dismantle a large colonial home and rebuild it elsewhere for a customer. I enlisted a buddy — another recent college graduate — to help.
It was during this project that I discovered what I wanted to do with my life. When we started stripping plaster and pulling up floor coverings, we found beautiful hand-hewn timbers connected by tight interlocking joinery. During demolition I uncovered an 1826 Liberty Head penny left by a craftsman more than 150 years before. That penny would provide my future company with its name, Liberty Head Post and Beam.
Almost 30 years later, I’m still intrigued by the beauty and structural integrity of a tight-fitting timber frame, and regular phone calls from would-be apprentices indicate I’m not alone. Unlike many construction businesses, I have no trouble finding and keeping bright, ambitious employees; several of our eight crew members have been with the company 10 years or more.
At first I focused mostly on dismantling and reassembling historic buildings, but within a few years I started building my own timber frames. I learned a lot about joinery from old buildings; even in the early years it was clear to me that not all timber frames are created equal. The better frames were built with joints that resisted twisting of the members as they dried, and they were hewn from rot-resistant woods.
Wood Species
Timber frames can be constructed from just about any wood species, but most of our frames are made from Eastern hemlock or Douglas fir. Both of these softwoods are easy to work with yet very strong and dimensionally stable. Hemlock is a traditional choice in our area and the material comes from local suppliers, which appeals to some customers.
Douglas fir is popular because it’s a handsome reddish-brown color and has an interesting grain. I like it because it’s easy to get — I usually have a truck of timber a week after placing an order with the suppliers in my area — and we can get it grade-stamped for commercial projects. It costs about twice as much as hemlock, primarily because it has to be trucked from the West Coast. But since most of a frame’s cost is labor, the additional expense adds only about 10 percent to the overall job.
Another attribute of hemlock and fir is that they generally don’t twist or check badly as they dry. To further prevent checking, we coat any end grain with Anchorseal end sealer (U.C. Coatings, 888/363-2628, www.uccoatings.com). The waxy coating slows drying, which helps keep checks and splits to a minimum.
Oak and pine. While white oak has long been considered one of the best materials for timber framing, it has become so expensive we seldom use it anymore. It was never a common timber framing material in northern New England anyway; the climate is too cold to support large stands of white oak.
Over the last 20 years I’ve seen an increase in the use of white pine for timber framing. Timber framers who are using it may disagree, but I don’t think pine is the best timber-frame material. In my experience, pine won’t tolerate the additional stress caused by drawbore pegging (using a 1/8-inch offset between the holes on the tenon and the holes on the mortise so that the framing members are drawn together as the peg is driven through the joint). Pine tends to split as the peg is driven.
Also, in all my years of dismantling and rebuilding historic structures, we have never come across pine frames or components. I can only conclude that either the pine frames didn’t survive long enough to be salvaged, or the timber framers of the time didn’t think pine was an appropriate material. Certainly the reason isn’t that pine was in short supply: The sheathing, flooring, and millwork were almost always pine.
Joinery
The key to timber framing is the mortise-and-tenon joint. We use fully housed tenons; the housing is a recess about 1/2 inch to 3/4 inch deep that receives the framing member with the tenon. This joint takes longer to make, but it prevents the timbers from twisting as they dry and allows us to compensate for slight variations in the dimensions of timbers.
We also use scarf joints to join shorter timbers into tie beams and top plates, which are the longest members in a house frame. We use a compound cut at rafter ends, too, which provides greater uplift and thrust resistance than a typical birdsmouth. All joints are secured with tapered white oak pegs. As I mentioned earlier, we use drawbore pegging for mortises and tenons.
Tools of the Trade
Any carpenter would recognize our most commonly used hand tools. The only difference would be that our tools are a little bigger than those used by stick framers and seem to cost a lot more.
When raising a frame, we carry both conventional framing hammers and medium-sized mallets with replaceable rawhide faces. We keep large mallets called commanders within reach for more stubborn timbers.
We also use folding pruning saws for cutting pegs, and large framing chisels for fine-tuning the joinery. We have dozens of rigging straps of all lengths, which we use for lifting timbers with the crane or tugging them with come-alongs. We have at least 20 come-alongs on site for tightening joints, pulling bents, and moving anything that needs a little persuasion.
Power tools. We mainly use power tools when we’re building a frame in the shop. Pulling a power tool from our trailer on site usually means that we made a mistake at the shop. But problems do arise, so we always carry a chain mortiser, a large power plane, a router for easing edges, and a 14-inch circular saw. Most of our power tools are made by a German company, Mafell (888/736-3812, www.mafell.com), which specializes in the timber-frame trade.
Don’t forget the crane. We have our own truck-mounted crane for delivery and assembly. The truck has a 20-foot body, but we can move timbers longer than 30 feet if we need to.
The crane can lift as much as 5,000 pounds while extended 45 feet, or 1,000 pounds (roughly the weight of a large preassembled dormer) at its maximum extension of 80 feet.
Raising a Frame
We start by assembling the bent (a vertical section of the frame) farthest away from the truck. A bent commonly includes the first-floor posts, a tie beam that carries the second-floor joists, the second-floor posts, and the rafters.
We rarely assemble the whole thing at once, as it would be too big and unwieldy. More often, we start with the first-floor posts and the second-floor beams.
We pay close attention to how we load the truck so we can pull those components without moving a lot of other pieces. Tie beams, which are generally made in two sections, go together first. Then we install the posts and knee braces. Knee braces provide some racking resistance and cut the length of the span, but perhaps most important they give the frame its traditional look.
Most of our frames are built over a modern floor system made from sawn or engineered lumber. While it’s possible to attach the posts on top of the subfloor, we prefer to cut pockets through the subflooring and rest the post bases directly on the mudsill. This helps prevent the posts from twisting as they dry out. Twisting posts not only look bad, but they can crack tile and make finish carpentry difficult.
Using the pockets also provides a better structural connection, because the outer posts can be nailed or screwed through the band joist to resist uplift forces. The pockets make assembly faster, too, because they secure the bottoms of the posts during the frame raising.
We almost always have to enlarge at least one hole or trim a post bottom, but most of the GCs we work with do a good job of locating the pockets when they frame the floor, based on our drawings.
We lift and guide the bent into position with the crane, and then we brace it with dimensional lumber.
Once we have craned the second bent into position, we use come-alongs to spread the bents so we can drop the connecting beams — called girts — between them.
Second floor. When all the bents are raised, we bring in the second-floor joists in pairs so we can place them two at a time. Framers stationed at both ends of the joist guide them into place.
Top plates are next. Same as in stick framing, they form the top of the wall and receive the eaves ends of the rafters. Once the top plates are in place, the frame starts to feel sturdy.
Queen posts and queen-post ties follow. These assemblies rest on the tie beam and, along with the purlins, create midspan support for the rafters.
Rafters and Dormers
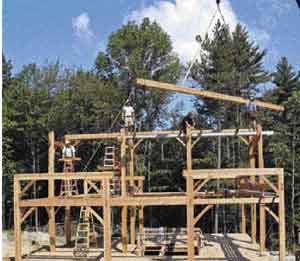
Using pairs of rigging straps, we lift up the rafters one at a time. Bringing each rafter in at the approximate roof angle makes installation easier. The rafters have a compound birdsmouth cut at the eaves end, and a mortise-and-tenon joint at the ridge. We fasten them midspan and at the eaves with long ring nails commonly used in pole-building construction.
The house shown in the photos had one shed dormer and one gable dormer. The GC chose to stick-frame the shed dormer, and we built the gable dormer. We preassembled much of the dormer on the ground and then lifted the assembly in one piece.
Once a few more rafters were installed over the dormer and a pine bough was placed at the ridge, the frame was complete.
Exterior Finishes
At this point my work is done and the GC takes over. Though stress-skin panels are often used for the rest of the project, I prefer stick framing for several reasons: First, it’s easier to run mechanicals and make changes and additions with studded walls.
Second, I’ve had customers tell me that the stress-skin panels don’t stop outside noise like traffic or barking dogs as well as an insulated stick-framed house does. And finally, carpenter ants seem to love nesting in stress-skin panels.
For the house shown, the GC used stress-skin panels for the roof and stick framed the walls with 2x6s. He insulated the walls with spray polyurethane foam. The timber frame was kept 6 inches from the building line to make room for stud walls around the bents.
Duncan Keir owns Liberty Head Post and Beam in Huntington, Vt.


