There are many ways to hang doors, but few guarantee a perfect fit on the first try. Through trial and error over the years, however, I’ve developed a technique that’s foolproof and fast, especially when hanging a new door in an old jamb.
Scribing the Door
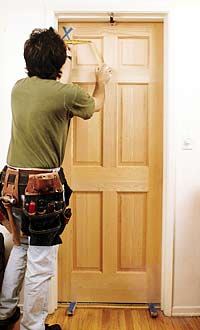
Since an existing jamb is almost always slightly out of square, the first step is to scribe the door to fit the opening. Before scribing a raised panel door, cut any excess height off the bottom so that the door can be held against the opening without projecting above the jamb. This ensures that only a small amount of wood will have to be removed from the top of a door, keeping the width of the stiles and rails about the same. Next, stand on the stop-side of the opening, and pull the door against the jamb, then secure it with a door hook (see ). Now adjust the door until it’s perfectly centered in the opening (see Figure 1).
Figure 1. After marking the door with an X for reference, use a door hook and shims to hold the door against the jamb, then make adjustments until the stiles are of equal width and parallel to the jambs (top). Use a set of scribes to mark cut lines on the door, making sure to allow for the thickness of the carpeting or saddle at the bottom (bottom). |
|
Start at the head of the door by measuring the width of the top rail at both sides of the door, then measure the width of both stiles at the top and bottom of the door. Unless the jamb is terribly out of square, you should be able to adjust the door in the opening until the stiles are the same width and parallel to the jamb. I use a small prybar to move the door left or right in small increments, and long tapered shims beneath the door to adjust the height. If the jambs are grossly undersized and a lot of wood has to be planed off the stiles, then make sure that the lock stile will be at least 3-7/8 inches wide. This is the minimum width necessary for some locksets, like Schlage deadbolts, which are 3-5/8 inches deep.
Scribe All Four Sides
Before scribing the door, I always mark a large “X” — in pencil or with two pieces of tape — on the hinge stile near the top of the door. This prevents dumb mistakes, like hinging the door backwards or upside down, or drilling for the lockset 36 inches from the top of the door instead the bottom. For scribing, I prefer to use a set of $2 scribes made by General Tool Co. Although any pencil fits them, I like to use a mechanical lead pencil, because a broken lead is easy to fix. Adjustable scribes are also handy at the bottom of the door, where they can be spread to accommodate the thickness of the floor covering, which varies from 1/4 inch for vinyl to 1-3/8 inches for carpet. For exterior doors, you’ll also need to know what type of door shoe and threshold will be used. I like to leave a gap around the door slightly smaller than 1/8 inch. To scribe the stiles, I spread my scribes 3/16 inch apart because I bevel both stiles so that they’ll never rub or bind on the jamb (called jamb bound), and the leaves of the hinges will never touch (called hinge bound). The 3/16-inch spread of my scribes works well for a typical 3-degree bevel, which grows almost 1/8 inch longer on the hinge side (long point of the bevel) than on the stop side (short point of bevel), where the scribe marks are made. Be careful to hold the scribes perpendicular to the jamb, and press just hard enough to leave a clean sharp line — pressing too hard might accidentally close the scribes. If the grain in one area interferes with the lead, scribe in the opposite direction. At the head jamb, squeeze the scribes completely closed, because the top of the door doesn’t get a bevel. If the top of the door doesn’t reach the head of the jamb, spread the scribes so that they just reach the top of the door where it’s farthest from the jamb. This ensures that you will remove a minimal amount of material from the top rail.


