When the call came to check out a leaking chimney, it didn’t take long to find the problem. Measuring nearly 7 feet wide, the chimney sat like a dam at the bottom of a steep roof, with no cricket to divert water around the sides. The existing flashing and counterflashing were poorly installed and had little chance of keeping out moisture.
To remedy a situation like this, I strip off the roofing around the chimney and tear out the old flashing. After repairing any damage to the sheathing, I install the cricket that should have been there in the first place, then flash everything with new copper. This project was no exception.
Prepping the Roof
Working from the top down, I began stripping shingles high enough to allow plenty of room for the cricket. I used a brick trowel to loosen the shingles and a small pry bar to pull out the nails.
When removing shingles for such jobs, I usually take out whole shingles rather than cutting individual tabs. This makes tear-out and reinstallation a lot faster. At the chimney, I removed the flashing and knocked off any globs of hardened tar that could get in the way.
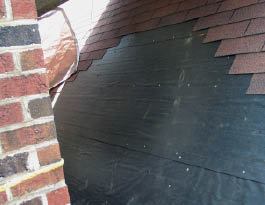
Installing the cricket. To make life easier, I generally build the cricket on the ground, then carry the assembly up to the roof and install it in one piece. I start layout with the “gable” — the triangle that butts against the back of the chimney — subtracting an inch from the total width to allow room for the shingles. I usually match the cricket’s pitch to the roof, to keep the framing as simple as possible. The cricket pictured here had a pitch shallower than the main roof’s because it had to clear the low shoulder on one side of the chimney.
After securing the cricket, I applied peel-and-stick underlayment and installed the new shingles, weaving the valleys between the cricket and the main roof.
Flashing the Cricket
Where shingles butt the chimney, I typically use 7-inch-by-7-inch L-shaped copper step flashing — one per shingle. To turn the vulnerable corners of the chimney, I cut and bend pairs of step flashings that fit tightly together. The first step flashing completes the section stepping up the main roof, while the second begins the smaller step up the cricket. When I bend these flashings into shape, I overbend slightly to ensure that the copper will lie tight against the chimney when it’s installed. I fill the corner where the two flashings intersect with sealant.
Step Flashing Around the CornerThe author turns the corner of the chimney with an upper and a lower step flashing, which he bends with hand-seamers. He fills the joint where the two flashings intersect with sealant. To scribe the lower corner flashing, the author lays it along the main roof. Once the copper has been cut and bent, the area to the right of the line will wrap around the back of the chimney. After making a straight cut roughly halfway between the scribe line and the bend … … the author folds the copper along the line using a hand seamer. Below the cut, he folds the copper down. A slight overbend helps hold the lower flashing snugly against the back of the chimney. The upper corner flashing is scribed in place with a felt-tipped pen; this piece is laid along the cricket. The line indicates the position of the corner of the chimney. After cutting a triangular notch … … the author bends the flashing at the line. The bent portion will wrap around the side of the chimney and overlap the lower piece. There’s also a bend in the lower leg, to correspond with the valley formed by the cricket and the main roof. |
When counterflashing a brick chimney, I ignore the vertical joints in the brickwork, because the bonding pattern rarely matches the pitch of the roof. Instead, I lay the pieces of counterflashing out so that they remain uniform in size and follow the roofline.
To do this on the 7/12-pitch cricket roof, I laid a 2×4 on the roof and scribed a line on the chimney 31/2 inches up from the roof deck. Starting from the corner, I went up one brick course from that line and marked horizontally along the mortar joint until I reached my scribe line. Here I marked a plumb line up to the next mortar joint; I repeated this process until I reached the top of the chimney. On the steeper 12/12 main roof, I skipped up two or three courses instead of a single course. I used an angle grinder equipped with a diamond blade to cut 1-inch-deep kerfs into these marked mortar joints.
When my local sheet-metal shop fabricates my counterflashings, they make them slightly oversized, so that I can trim them on-site to fit. I also have the shop bend a 1-inch-wide “L” at the top of the flashing, finished with a U-shaped hook. To anchor counterflashing into the kerfs in the mortar joints, I wrap strips of lead around the hook, then use a punch to pack the lead tight. As I proceed up the chimney, I lap the counterflashings by 2 inches and use stainless steel sheet-metal screws (which, like lead, are compatible with copper) to anchor each piece to the previous one.
Finishing the Joints
Either mortar or caulk can be used to help lock the counterflashing to the masonry and finish the joints. I’ve been back to redo roofs that I shingled nearly 30 years ago and haven’t noticed any significant difference in long-term durability between the two. On this project, I chose to use a grey silicone-based caulk because it has a slightly greater resistance to water intrusion.
For my final step, I coated the screw heads with clear silicon caulk.
John Carroll is a mason and builder in Durham, N.C.


