by Gary
Striegler
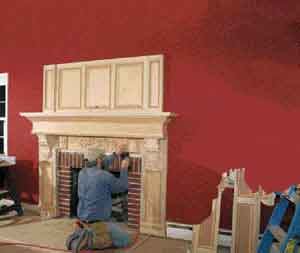
Building an elaborate mantelpiece can be an intimidating task.
That's why I like to think of it as a series of smaller
projects — the upper and lower pilasters, the undermantel
frieze, the mantelshelf, and the overmantel — that can be
built separately. The trick is to figure out how all the parts
fit together and then build them accurately and
efficiently.
With the materials already on hand, the mantel shown in this
article took me and a helper about a day and a half to build. I
used a story pole to work out its many details in full scale;
pocket-screw construction allowed me to assemble the parts on
site with a trim carpenter's basic repertoire of tools. The
expressive details that give the mantel its unique look come
from different combinations of stock moldings and carvings from
White River Hardwoods (800/558-0119,
www.mouldings.com)
Planning and Layout
Like scores of other mantels I've built over the years, this
one is based on frame-and-panel construction. By changing such
elements as the overmantel style, the undermantel frieze
detail, the upper pilaster detail, and the type of moldings
used for the mantelshelf, I can build the same general style of
mantel for a dozen different clients while making each an
original.
In this project, the basic mantel dimensions were dictated by
the existing brick fireplace, which my clients planned to
reface with stone. Inspired by other fireplaces I'd built that
the clients had seen, the new mantelpiece was designed to
complement the makeover of the entire room, which included a
new beam-and-coffered ceiling and new window, door, and
baseboard trim.
Basic dimensions. In my area, code
requires at least 8 inches of clearance between the side of the
firebox opening and the closest trim or cabinetry. Code also
requires at least 10 inches of noncombustible material directly
above the firebox (see illustration).
Proportion and layout are crucial to a nice-looking
fireplace surround. The author always starts by measuring the
width and height of the available wall space, then designs
accordingly. Shelf height falls at around 60 inches for an
8-foot ceiling, higher for taller rooms. Panels above the
mantel should be at least 4 inches taller than they are wide;
sometimes the center panel is wider than the flanking panels.
Upper pilasters are typically narrower than the lower
pilasters, though centered above them.
I keep these requirements in mind when I establish the height
of the mantelshelf, which I base mostly on room size and the
height of the firebox opening. In a smaller room with 8-foot
ceilings, the shelf may be as low as 60 inches above the floor;
in a larger space with tall ceilings, it may sit 68 inches or
more above the floor.
Had there been a raised hearth in this project, it could have
really limited the detailing above and below the mantelshelf.
Fortunately, there wasn't one.
Story Pole Is Crucial
No matter what site conditions I find, I use a story pole to
develop the layout (see Figure 1). For most fireplaces, I
actually do five layouts. Because I always end up making some
adjustments as I look at the proportions, I do my layouts in
pencil, labeling all the parts and marking their exact size on
the story pole.
Figure 1. The author starts by marking
existing conditions on the story pole, such as the width and
height of the firebox opening, the size of the noncombustible
material surrounding it, and the proposed height of the
mantelshelf (top). Horizontal layouts start in the middle and
work outward. Vertical layouts originate from the proposed
location of the mantelshelf, go down to the floor, and then
work from the shelf up to the ceiling (bottom).
Layout 1. Making the mantel work with
the width of wall available is usually the greatest challenge,
so I do the horizontal layout below the mantelshelf
first.
In addition to accounting for the span of the firebox and any
noncombustible material, I make sure to leave enough width for
the shelf to return to the wall. Determining the pilaster width
is the most important part of this layout.
Layout 2. Taken vertically through
the middle of the firebox, this layout shows how much room is
available for decorative elements under and above the
mantelshelf, the shelf height, and the vertical layout of the
paneled overmantel.
Layout 3. This layout is taken
vertically at the pilasters beside the firebox and shows all of
the moldings that will wrap around the pilasters, plus the
layout for the corbels that will support the mantelshelf. It
also indicates the height and layout of the upper
pilasters.
Layout 4. Taken horizontally above
the shelf, this layout indicates the width of the upper
pilasters and the layout of the paneled overmantel. If the
overmantel is a single panel, it should be about 30 percent
wider than it is tall. For a three-panel overmantel like the
one shown here, I make each panel at least 4 inches taller than
its width. Usually the middle panel is 3 or 4 inches wider than
the side panels, but all three can be the same width. Upper
pilasters are usually narrower than lower pilasters, but must
be centered over them.
Layout 5. This is a small layout that shows the
projection of the mantel from the wall. (Since there are only
four sides to a story pole, I usually fit Layouts 4 and 5 on
the same side.) The total mantel projection includes the
thickness of the lower pilaster, the projection of the corbel,
and the combined projection of the moldings used for the shelf.
My shelves typically project from the wall about 11 to 14
inches. For useable shelf space, remember to subtract the
thickness of the overmantel that will cover up part of the
shelf.
As I juggle the widths, heights, and depths of each part in the
layout to get all the components to fit together, I try to
offset joints by 3/4 inch (a purposeful step looks better than
a gap). I also make sure to allow room for trim that runs from
one piece onto the next. For example, the field behind a
pilaster must be wide enough to allow the base trim that wraps
the bottom of the pilaster to die into a flat space.
Finally, before starting to make sawdust I like to do a rough
drawing of each piece, on either graph paper, plywood, or a
board. The proportions and measurements come from the story
pole. The drawings make it easy to develop a cut list and build
each part.
Pocket-Screwed Panels Are the Building
Blocks
Pocket-screw joinery is the foundation for all my mantel
projects. Most of my mantel details are based on
frame-and-panel construction, which I assemble on site with
pocket screws (Figure 2).
Figure 2. Because pocket-screw joints go
together quickly and require little clamping or sanding, the
author uses them to build the frame-and-panel assemblies that
make up the mantel (A). To add depth to the pilasters, he glues
and pocket-screws 1-by rippings to the frames, pinning them
them in place first so that they are inset slightly from the
edges of the panel (B); later, he will trim the panel edges
flush with a router (C). Next, after fastening the plywood
panel to the frame (D), he fills in voids and dings with wood
glue mixed with sawdust, then cleans up the joinery with a few
passes of a belt sander (E).
For example, the lower pilasters on this project are basically
frames built with poplar stiles and rails glued and
pocket-screwed together. The panels are cut from 3/4-inch birch
plywood and are simply nailed to the back of the frames. In
cases where the panels are mounted directly on the wall, such
as this surround's three-panel overmantel, I cut the panels
from 1/4-inch plywood.
Because the pilasters project from the wall, I build out the
frames with 1-by rippings pocket-screwed along both outside
edges at right angles to the stiles. All of the dimensions for
these pieces are derived from my story pole.
I trim the insides of the frames with panel molding (Figure
3).
Figure 3. The pilaster panels are trimmed
out with an imprinted panel molding. To help size the panels so
that the pattern remains continuous as it turns the corners
(top), the author lays out the stiles and rails using a precut
section of molding as a spacing jig (middle). He back-cuts the
miters slightly with a block plane so they'll slip easily into
place during installation (bottom).
For these pilasters, I used a 2-inch-wide molding with a beaded
edge and an applied lamb's tongue overlay, a repeating pattern
that requires a little extra care in layout. I like the pattern
on this molding to run continuously around the miters rather
than meet haphazardly at the corners, which means I have to
fine-tune the panel size. Since this particular pattern
repeated about every 1 1/4 inches, the panel dimensions had to
be adjusted by 1 1/4-inch increments; otherwise, the pattern
would be interrupted as it turned the corners.
Once I've determined a panel's approximate dimensions, I can
cut its molding to the exact lengths required by the pattern.
When I assemble the stiles and rails, I lay the actual cut
pieces of molding in place along the stile or rail to indicate
each component's exact position.
The lower pilasters here are topped with carved corbels, while
the bases are built out with additional moldings (Figure 4). To
make sure the glued corbels wouldn't move after I positioned
them, I used my 23-gauge pinner to initially secure them to the
pilasters, then drove screws through the backs of the panels
and into the corbels.
Figure 4. After applying glue and
carefully positioning the corbels, the author pins each in
place to make sure it won't move, then screws into it through
the back of the panel for a strong connection (top). When
installing the pilaster bases, he is careful to place the
molding so that the repeating pattern turns the mitered corners
symmetrically (bottom).
My pinner is also handy for securing all of the various
moldings in this kind of project; it won't split some of the
more delicate pieces, and the holes left by the fasteners are
so small they may not even need filling.
Building the Boxed Mantel
The mantelshelf is really a simple plywood box with moldings
covering the joints (Figure 5). It's sized so that the plywood
bottom is 1/2 inch wider than the projection of the corbels it
sits on, while the length equals the outside-to-outside
measurement of the lower pilasters.
Figure 5. The mantelshelf begins as a
plywood box, butt-jointed along the bottom edge and with the
front and sides mitered together. A few cleats pocket-screwed
inside reinforce the box (above); the butt joint is covered
with molding (right).
Both measurements are taken from the story pole.
To make the top of the box shown, I used two layers of 3/4-inch
plywood, with a bullnose panel molding covering the end joint
(Figure 6). Because the crown molding that finishes the shelf
also has an applied architectural overlay with a repeating
pattern, I was careful to install it so that the pattern
remained continuous as it turned the corner.
Figure 6. The top of the box — the
actual shelf — consists of two layers of 3/4-inch
plywood. The bed molding that conceals the end joint is
securely fastened from behind with pocket screws through the
underside of the top layer of plywood (A). Glued into place,
the second layer of plywood adds mass to the shelf and conceals
the pocket screws (B). The cutouts will accommodate an
electrical box. The author fastens the top to the box (C), then
finishes the mantelshelf with crown molding
(D).
Of course, the size of the mantelshelf can't be as easily
tweaked to accommodate the molding as the size of the panels
can be, so I shifted the crown molding until it was exactly
centered along the shelf. Then I marked and cut the end miters,
and cut the returns to match.
Assembling the Pieces
After the upper and lower pilasters, the mantelshelf, and the
overmantel have been made, it's time to put the parts
together.
I like to start in the middle and work up and out. I also like
to keep my saw close at hand for minor adjustments so that the
pieces go together cleanly.
I begin by checking the floor for level. The pilaster on the
highest side should be set first; the second pilaster can be
brought up level with it (Figure 7).
Figure 7. To help ensure that the
assembly will be plumb and level, the author pins and then
pocket-screws the lower pilasters to the plywood frieze before
installing them (top). MDF cleats glued and nailed to the wall
provide secure fastening for the pilasters (bottom).
To provide nailing for the pilasters, I glue and nail plywood
rippings to the wall; they're sized to fit just inside the
pilaster returns. Although I try to hit the studs, I know that
I can always nail at least the bottom edge of the cleat to the
bottom plate of the wall; glue does a good job of holding the
rest.
The important thing is that the cleats are plumb and
positioned correctly so that the mantelshelf will sit level on
the pilasters.
Before installing the shelf on top of the pilasters and
frieze, I glue and nail another horizontal cleat to the wall
(Figure 8). I nail the mantelshelf to this cleat and to the
supporting pilasters and then fasten the three-panel overmantel
and the two upper pilasters directly to the wall (Figure
9).
Figure 8. A horizontal cleat (top)
provides nailing for the box mantelshelf, which is installed
after the lower pilasters (bottom).
Figure 9. After installing the paneled
overmantel (top), the author completes the basic surround by
installing cleats and the upper pilasters (middle). Then it's
time for the finishing details, such as the dentils and
moldings that hide the upper shelf joint (bottom).
With the main components installed, I cover all the joints
with moldings. Once I've dressed up the undermantel frieze with
various carvings and moldings — which I install with my
pinner — all that remains is to run the room's moldings
either over to or around the mantel; after that I can turn the
project over to the finisher.
Gary Striegleris a builder in
Springdale, Ark.