
Henry Ford’s concept of mass production revolutionized the manufacturing industry, and the notion of using standardized parts and division of labor has migrated onto construction sites as well. This is obvious to anyone who’s seen a West Coast framing crew in action, but it also applies to finish work. In this article, I’ll describe how the mass production techniques I use to measure, cut, and install door casings increase both quality and productivity.
Uniform Materials
Anyone who’s ever had to work with warped, knotty millwork knows how inefficient it makes the job. Trim of inconsistent quality forces a finish carpenter to scratch his head and think hard before each cut. He has to cull the pile, set aside the worst pieces for closets, and make sure he always cuts matching miters from the same piece of trim so the profiles will match. No wonder I see so many bald trim guys.
My way to prevent hair loss is to insist on high-quality millwork. I buy from a small-volume, local shop that mills all its own trim. The lumber has been carefully dried to a uniform 7% moisture content, and is fed slowly through a computer-controlled, four-sided molding machine, which produces a smooth finish and ensures that every piece of casing is identical. This gives me the confidence to join miters cut from different pieces of trim knowing that the profiles will meet precisely. The peace of mind alone is worth the extra 20% I have to pay for the material, not to mention what I save on labor.
Because it’s a small shop and quality is my most important consideration, I allow the mill to cut my trim from random length stock, as long as there are plenty of 16-footers. After it’s cut, the shop lays my trim face to face, stacks it in bundles that can be carried by one man, and wraps it with plastic. All the molding is delivered to the job site oriented in the same direction, carried into what will be the cutting room, and stacked facing the way I want it. I never have to spin a 16-foot piece of casing in a 14-foot-wide room before cutting it.
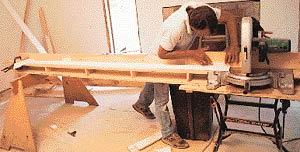
The author’s chop saw setup is designed to make cutting trim as easy and accurate as possible. The extension fences are offset behind the saw fence.
Setting Up Shop
When my crew and I arrive on a site, we’re like a wolf pack staking out our territory. We take over the largest room we can find to set up the cutting station and a large work table. The work table, which we use for biscuit joining and glue-up, is simple: a full sheet of 3/4-inch plywood fastened to sawhorses. Because the process is so messy, we cover the plywood with a layer of cheap plastic laminate for easy cleanup.
The cutting station consists of an off-the-shelf Workmate, which supports my 15-inch Hitachi chop saw. The extension wing setup is my own unusual, but effective, creation. Permanently mounted to the face of the chop saw’s metal fence is a 1/2-inch plywood “auxiliary” fence that extends 4 inches past the ends of the saw, allowing me to quickly and solidly fasten the extension wing fences on the back side.
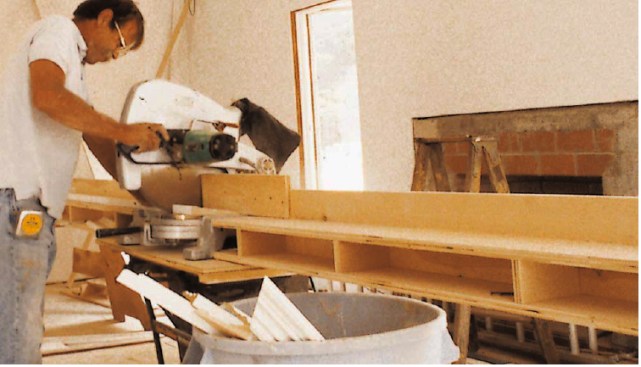
The extension tables run slightly uphill from the saw, making it easier to securely hold bowed trim in place. An 1/8-inch rabbet cut into the bottom front edge of the chop saw fence gives sawdust an outlet, reducing the need to constantly blow dust away.
Cut First, Measure Later
Once we’re set up, I’ll assign one or two experienced carpenters to hang the doors, but an apprentice can miter and rough-cut the casings. After checking the saw with a square to make sure it’s cutting an exact 45-degree angle, we’ll start by cutting a left-side miter on a 16-foot length of casing. To get the rough length, we leave the saw at the same angle, slide the casing down the table to a point where the short end of the cut will be an inch or so longer than necessary, and whack it off. To help us gauge the various rough lengths of heads and side casings, we apply strips of blue masking tape to the extension table surface. We cut all the left-side miters first, then cut the same angle for the head casings before moving on to the right-side miters. The casings will all be trimmed to finished length later.
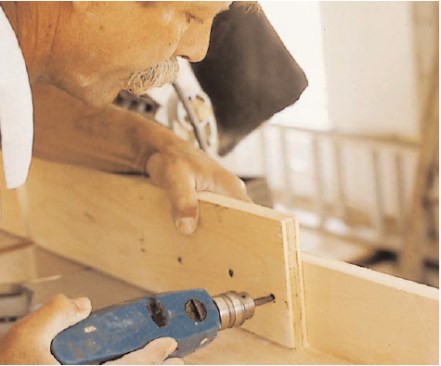
Biscuit joining. Once all of these miters are cut (the right-hand head-casing miters are cut later), and while the doors are still being hung, we slot the miters for biscuits. Biscuits make for quick alignment of the miters, and they hold the joints tight permanently, not just until the next heating season. Rather than waste time marking centerlines on each piece, we simply align the inside edge of the miter with the outside face of the plate joiner, then plunge. This works perfectly with the 31/2- and 41/2-inch casings we normally use. For narrower stock, we use tape to put a guide mark on the face of the joiner. One way to cut the biscuit joint is to clamp the casing face up on a table and use the table surface as a depth gauge. This is fine as long as the table and casing are both perfectly flat, but I think it’s more accurate to cut the biscuit joint holding the tool’s fence against the backside of the casing.
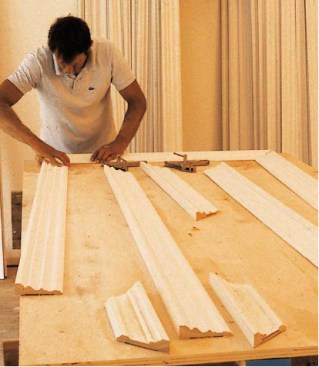
Biscuit joints and miters are cut before any measurements are taken. Here the author uses a plastic jig to support the biscuit joiner when working with narrow trim stock.
This technique can be tricky if the casing is narrow with a relieved backside, because there won’t be much surface for the fence to rest on. In that case, I hold a mitered scrap of plastic — or two scraps of plastic laminate glued back to back — on top of the casing to support the biscuit joiner fence.

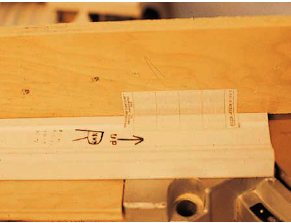
To measure without a tape rule, the author devised the “Quick Rule” (inset) a self-adhesive 1/16-inch scale that is mounted equidistant from each end of a story pole. Shorthand notes are written directly on the story pole describing the number of hash marks between the bottom of the head jamb and the centerline of the Quick Rule.
Measuring With a Story Pole
By the time all this cutting is done, a bunch of doors are hung, so I or an apprentice can start measuring the casings. The doors are all numbered, one number per side — 1, 1H, 2, 2H, and so on, with the “H” signifying the “hinge” side of the opening. Rather than measure casing lengths with a tape rule, I make up a story pole using a straight length of casing. If the average height from the floor to the bottom of the head jamb is 81 inches, I cut the pole a little longer, say, 84 inches, making sure both ends are perfectly square. Then — and this is the only time in the entire process when I use a tape measure — I make a pencil mark on the inside edge of the casing 81 inches from each end. On each one of those marks, I center a miniature ruler of my own design, which I call a “Quick Rule”.
To measure without a tape rule, the author devised the “Quick Rule” (inset) a self-adhesive 1/16-inch scale that is mounted equidistant from each end of a story pole. Shorthand notes are written directly on the story pole describing the number of hash marks between the bottom of the head jamb and the centerline of the Quick Rule. It’s a 1×4-inch sticker that I’ve had made up by a local print shop with marks at 1/16-inch increments and a prominent centerline. You could print your own using address labels and a computer, or you can buy self-stick tape rules from Woodcraft (P.O. Box 1686, Parkersburg, WV 26102; 800/225-1153) and cut them into strips.
To measure for casing, I hold the story pole first against the left jamb, sight where the bottom of the head jamb meets the Quick Rule, and make a notation. For example, if the head of door #1H intersects the story pole three 1/16-inch hash marks above the center line of the Quick Rule, I’d write: “lH + 3” on the face of the story pole. I write directly on the story pole because I’m less likely to misplace a 7-foot piece of casing than a scrap of drywall or a cocktail napkin with numbers scribbled all over it.
For the right side, I flip the pole end for end and follow the same procedure; this keeps all right and left casing measurements separated. If the head jamb on the right side is 1 1/2 marks lower than the centerline of the Quick Rule, I’d write “1H – 1 1/2.” It’s easy to eyeball half a hash mark, so this system is accurate to within 1/32 inch. If the work has to be any finer than that, we’d better be building a church, or at least a brewery.
Before cutting the trim to length, the short-point markings are converted to longpoint cut lines by placing a scrap of casing and a 1/4-inch spacer between the far end of the story pole and a layout stop clamped to the extension table.
At the other end of the pole, a separate Quick Rule is aligned with the one on the story pole.
Then it is glued to the saw fence.
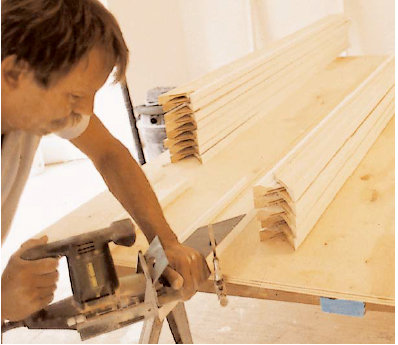
Cutting to Length
After I’ve measured all the doors, I return to the chop saw to cut the casings to length. The measurements on the story pole represent the short point of the miter (less the 1/4-inch reveal). Before I can make any cuts, I need to find the long point — in other words, I need to add the width of the head casing plus the 1/4-inch reveal. I also do this without measuring, using the story pole and a couple of spacers. First, I lay the story pole on the left extension table so that the right end falls about 3 inches short of the saw blade. Against the far end of the pole, I place a scrap of casing laid flat, then a 1/4-inch spacer. Next, I bump a stop against the spacers and clamp it to the surface of the extension table using a Vise-Grip welder’s clamp (American Tool Co., 701 Woodlands Pkwy., Vernon Hills, IL 60061; 800/866-5740). For the stop I use a scrap of hardwood cut perfectly square, with a piece of peel-and-stick sandpaper applied to the bottom to keep it from wiggling while it’s being clamped.
Leaving the spacers temporarily in place, I return to the blade end of the story pole and stick a Quick Rule on the chop saw fence so that it lines up with the one on the story pole. I can now remove the spacers and start marking and cutting casings.
Returning to my example of door #1H: To cut the left casing (lH + 3), I’d place one of the left-mitered casings on the extension table with the mitered end against the stop, mark the casing three hash marks longer than the centerline of the Quick Rule on the fence, slide the casing over to the saw blade, and hack it off square. For the right side of door #1H, I’d mark a right casing 1 1/2 hash marks short of the centerline on the Quick Rule. If I’d made a notation to scribe the cut to fit the floor, this is when I’d make that adjustment. To avoid that queasy feeling that hits when you discover you’ve just cut a whole house worth of trim too short, I always stop and dry fit the first two pieces before going further.
Cutting head casings. The Quick Rule setup is rarely necessary for head casings, so they can be cut at any time during this process. If we’re trimming high quality doors and windows in standard sizes, we usually find that the widths are consistent enough to set a stop and mass-cut all the heads. If a few doors are off, it’s fastest to dust off the tape rule and measure them. For custom head casing lengths, however, like you might find in an older house, follow the marking procedure just described. Use a shorter story pole setup, and position the layout stop with two scraps of casing and a 1/2-inch spacer (to account for reveals on both sides). When taking measurements, place the story pole under the head jamb and against the left side jamb. If you’ve pre-cut the leftside miters, you’ll only need to mark from one side.
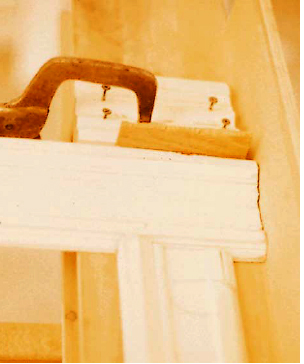
To create strong, tight miters, casing units are assembled flat on a work table using biscuits, glue, and clamps. The miter clamps were designed by the author and can be left in place while the casing is nailed up.
Preassembled Casing
To create perfect miters that stay together, I assemble the casings on the work table with glue, biscuits, and clamps before installing them as a complete unit. There are a lot of miter clamps on the market, but not many that are strong enough for casings and that have a low enough profile to allow the casings to be installed without removing the clamps. I used to use #62 Miter Clamps (Hartford Clamp Co., P.O. Box 280131, East Hartford, CT 06128; 860/528-1708), but they were rust-prone and difficult to operate on a table top. Instead, I came up with my own design, which I call Clam Clamps. These miter clamps have a row of four sharp pins on each jaw, which bite into the outside edges of the casings and draw the joint together when the clamp handle is turned.
For glue, I use Titebond Original “red cap” wood glue, because it’s less runny and cleans up easier than the weatherproof variety. To clean up any glue that squeezes out — the slowest part of the gluing process — I keep an old toothbrush in a pot of hot water on a shelf beneath the table, alongside a sponge, a dry rag, and an air hose, which I use to quickly dry everything out .
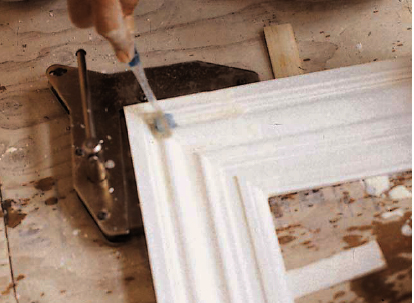
Thin shims bring slightly twisted joints into plane before clamping. Excess glue is cleaned up with a toothbrush and hot water, then blown dry with an air hose.
Once a complete casing unit has been clamped and scrubbed, I’ll lean it against a wall with the clamps still in place, and glue up another assembly . I usually make up four units, then start over again, removing the clamps as I go in order of assembly. The clamps may be removed and reused in as little as five minutes, although we leave the unclamped casings leaning against the wall undisturbed for at least an hour.
The second set of four casing units I glue up can be carried to their respective doors and nailed to the jambs with the clamps still attached. This saves time because the joints can dry in place. After the clamped casing assemblies are nailed to the jambs, I remove the clamps and start over again. If I have enough wall space to lean casing assemblies against, I’ll keep gluing up sets of four, installing every other set with the clamps still attached; then I’ll go back and install the rest.
Before nailing any casings, however, I routinely apply a thin line of glue to the outside edge of the jamb, at least in the corners. Wherever the drywall stands proud of the jamb, I usually just mash it with a big hammer, then use a Quick Grip clamp to draw the inside edge of the casing down tight before nailing. I use a Paslode cordless finish nailer rather than a pneumatic gun because it’s more maneuverable and it lets me close doors to check reveals without worrying about a hose getting in the way. The outside edges of the casings are left unfastened. They’ll be nailed off later by the carpenter who runs the baseboard, because his gun will be loaded with longer nails. The delay will also give the glue more time to set up before it’s subjected to stress.
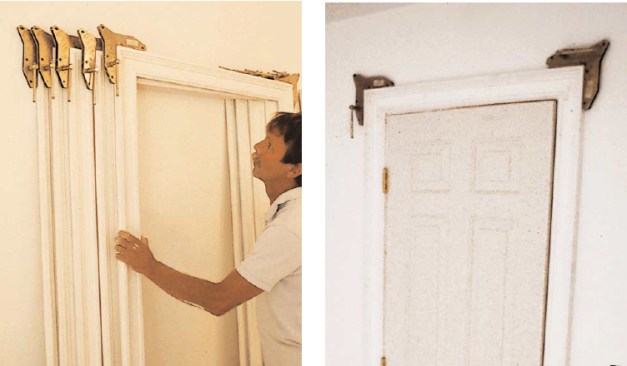
Clamped assemblies are leaned against the wall till dry, although the clamps can be removed within five minutes (left). If the glue has not had time to cure, the casing units are installed with their clamps still attached (right).
This story-pole method is much less complicated than it sounds. I once hired a young Russian immigrant who had little English and even less construction experience. In less than one day he learned how to run the casings for a $2 million house. That freed up the experienced craftsmen to build the kitchen, built-ins, entertainment centers, bar, and butler’s pantry, take long coffee breaks, sneak out early, and still save the builder a lot of money.


