There’s usually more than one way to do a job, and installing prehung interior doors is no exception. I’ve developed a systematic approach that ensures an efficient, durable, topnotch installation. It takes me about 30 minutes on average to install a prehung door and another 20 minutes to trim it out — handy information when giving a quote.
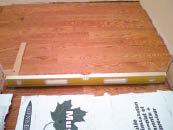
First, I prep the opening by trimming drywall edges back to the studs and hammering any high-riding fasteners flush. To make sure the jack and trimmer studs don’t move as they dry, I supplement the framing nails with 3-inch screws. I check the floor for level across the opening (1) and along the door’s swing arc (2), noting any deviation in relation to the hinge side. I apply this difference when cutting the jambs to finished length.
1
2
3
4
5
Next, I check the hinge side of the rough opening for plumb. If the top leans in, I start by tacking a pair of tapered, opposing shims there, 3 inches from the top. If it’s the bottom that’s strong, shimming begins there. I apply a thickness of at least 1/8 inch to make sure the shim doesn’t disintegrate when nailed. Then I insert a second pair of opposing shims at the opposite end of a 4-foot level until plumb (3). From that location, I shift the level to the other end of the opening and shim it plumb (4).
To finish, I add a fourth set of shims at the end of the level, midjamb (5). The middle shims will neatly bracket the center hinge of any standard prehung unit. When cutting the jambs to length, I like to leave a clearance of about 1/4 inch between the floor and the bottom of the door. I establish the clearance at the highest floor point and add the difference to the opposite jamb accordingly, ensuring that the head jamb will be level.
I place the unit in the opening with the door swung open and align the hinge jamb with the wall surface. Then I nail it at each shim location (6). (If the wall’s seriously out of plumb, I have to apply extension jambs and plane them flush with the wall, which slows the installation considerably.) I shoot three 15-gauge 21/2-inch finish nails at opposing angles to resist pullout. If the door is a solid unit — rather than a lightweight hollow-core one — I replace the middle screw of the top hinge with a 21/2-inch screw, fastened through the jamb into the framing. This prevents the door from sagging over time. (The technique can also be used to remedy an existing sagging door.)
Next, I set the latch jamb using opposing shims in approximately the same locations as on the hinge jamb. With the door closed and the immovable gap at the top of the latch jamb serving as my reference, I work down, setting the space between the door and the latch jamb (7). There’s no measuring here; I work by eye. To finish up, I shim and nail the center of the head jamb (8), making sure the gap remains even.
6
7
8
9
When installing a houseful of doors, I typically set up a cut station, take casing measurements throughout the house, and do all the cutting at once. I then preassemble the casings on the floor in front of the door, using Titebond glue and Collins spring clamps (888/838-8988, collinstool .com) to ensure tight miters (9). I use at least two pins on each side of the miter, allow the glue to dry for about 15 minutes, and position the casing assembly on the door jamb with the spring clamps still in place. When nailing the casing, I keep the 2-inch trim nails back from the miters so they won’t compete with the glue and brads as the framing dries and shrinks.
10
I’ll often apply painter’s tape to already-painted walls before installing the door trim (10). That way, the trim can be painted quickly, and the tape cut away when the paint dries.
Ray Fritzsche runs Accurate Construction Services in Wallkill, N.Y.


