Nothing finishes off an old house like shutters. Not the cheesy
plastic versions found on suburban split-levels, but real wood
ones that open and close. Unfortunately, wood shutters are
often neglected and allowed to deteriorate, so your first
inclination might be to replace them. But in fact, new shutters
— real ones, that is — typically cost more than the
time and materials it takes to restore the originals.
Removing Hardware
I begin a shutter job by assessing the units’ general
condition from the ground. Then I take the shutters down and
inspect them to get the true scope of the damage.
Assuming restoration makes sense, I remove the hardware. In New
Orleans, where I work, this generally includes two Acme hinges
per shutter, or three hinges for shutters taller than 7 feet
(see Figure 1). These two-piece hinges allow
the shutter to be lifted off for maintenance and also hold it
securely in open position without the use of a shutter dog, an
S-shaped restraint hook common on shutters hung with strap
hinges.
Figure 1. Replacement shutter hardware —
including the cast hinges and catches and black slide bolt
shown here (left) — is available from Van Dyke’s
Restorers. The two-part Acme hinges make it easy to remove
shutters for maintenance. The author has new hardware
powder-coated, then backs it with pieces of Vycor before
installing it to prevent water from following the screw holes
into the wood (right).
Acme hinges come in seven sizes, but I mostly see #2s;
they’re 2 13/16 inches high and throw the shutter about
23/4 inches from the face of the casing. I also see larger #1
1/2s, which work better with very tall shutters.
Most shutters also have a bottom catch with a strike plate and
an escutcheon, and some also have slide bolts — typically
6 inches long — for latching the two panels together when
they’re closed.
Many shutters have some kind of pull — D-rings are common
— but I rarely replace it unless the shutter gets a lot
of use; it’s just something else to rust and foster
rot.
I reuse the hardware as long as it still works. Usually I have
it sandblasted or chemically stripped, and then I paint it with
Rustoleum. If the client wants something more durable,
I’ll have it powder-coated at a local shop. When needed,
I buy replacement hardware from Van Dyke’s Restorers
(800/787-3355, vandykes.com). I always reinstall hardware
with stainless steel screws.
Stripping the Shutters
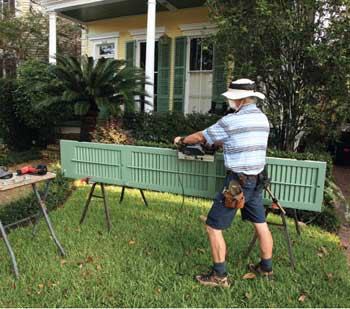
After dealing with the hardware, I usually have the shutters
chemically stripped; at $25 to $30 per panel, it’s well
worth it. When I get the shutters back, I use a garden sprayer
to apply a 10-to-1 solution of muriatic acid (or vinegar) and
water to neutralize the stripper. Standing the shutters on
simple racks made from 4x4 posts and 3/8-inch steel pins makes
this and the eventual repainting process a lot easier
(Figure 2).
Figure 2. After using a template to space the holes,
the author drills holes (left) to accept the 3/8-inch steel
pins on his simple site-made finishing rack (right).
After giving the wood a good soaking with the neutralizer, I
let it dry to 14 percent — the equilibrium moisture
content for cypress in my climate — then start digging
out the rot with my “dental picks” and 5-in-1
painter’s tool.
For larger areas, I use either a rotary rasp chucked into a die
grinder or a drill with a 3/8-inch bit (Figure
3).
Figure 3. After using a rotary rasp and a variety of
hand picks to remove rotted wood (top left), the author fills
the depression with epoxy-based products, starting with
LiquidWood consolidant (top right) and following with WoodEpox
compound (middle left). Abatron’s Woodcast, applied
against the plywood form, helps shape the new corner (middle
right). West Systems epoxy, thickened with chopped fiberglass,
provides bulk (bottom left), and is followed by another light
coat of WoodEpox to make final sanding easier (bottom
right).
Rot Repair
I try to get back to fairly sound wood before making rot
repairs, then soak the damaged areas with Wood Care
Systems’ Bora-Care (800/827-3480,
ewoodcare.com) mixed 1-to-1 with water and
applied with a brush or syringe.
Once that solution dries, I treat any remaining spongy areas
with LiquidWood epoxy from Abatron (800/445-1754,
abatron.com). With the LiquidWood still
wet, I fill the rot cavities with WoodEpox putty, another
Abatron product.
For large holes, I use West System epoxy (866/937-8797,
westsystem.com), adding one of the
company’s fillers or even sawdust to the mix when needed.
(An excellent online user’s manual explains the system.)
West is so hard when it dries it can be a bear to sand, so I
cap off repairs with one of the Abatron epoxies before the West
System is fully cured.
Repairing Slats
I replace broken or missing slats with new ones that I make
from Spanish cedar, a species known for rot resistance. Getting
them into place can be tricky. Sometimes I can use a bar clamp
to spread the stiles far enough to get the pins into the holes.
Or I may trim one or both pins and use a hammer and flat-head
screwdriver to persuade the slat into place.
Another trick, when all else fails, is to replace the pin with
a #8 stainless steel pan-head screw, which I screw in just
enough to get the slat in the hole, then back out with
needle-nose pliers once the slat is lined up (Figure
4).
Figure 4. When the author is unable to reinstall a
broken slat because the fit is too tight, he replaces the wood
pin with a stainless steel sheet-metal screw. He drills a pilot
hole in the end of the slat (left), engages the screw far
enough so that the slat can slip into the frame, then backs the
screw into the pin hole with needle-nose pliers. A piece of
vacuum hose disguises the shiny threads (right).
Control Rods
I put off working on control rods until last (Figure
5), so that any staples that are going to break or
come out while I’m handling the shutter will have done
so. If a control rod is fractured, I’ll fix it with
epoxy.
Figure 5. A broken slat staple is removed with
needle-nose pliers (top left), then replaced with a new one
pushed in with channel locks (top right). A U-shaped block of
wood supports the control rod as the staple is driven into
place with a steel punch (bottom).
I’ll sometimes even fix a rod that is broken in two,
inserting a 3-inch stainless steel trim-head screw in one
broken end and drilling a hole in the other end large enough to
accept the screw head. I fill the hole with epoxy and slowly
insert the screw, catching the squeeze-out as I go. I stop just
short of “home,” mix some filler into the excess
epoxy to thicken it, then push the pieces together and
reinforce the repair with splints and tape while the epoxy
dries.
When I have to, I make new rods from Spanish cedar, clamping
the blank into a bench vise so I can mark and drill 1/16-inch
pilot holes for the staples. I use galvanized staples —
because I haven’t been able to find any stainless ones
— and glue them into place with epoxy (Figure
6).
Figure 6. Occasionally it’s necessary to make a
new control rod. After drilling holes for the staples, the
author puts a dab of glue in the holes (top left), then drives
each staple home (top right). He repeats the process when
linking the rod staples to the slat staples (bottom).
Fitting to the
Opening
After the shutters are again structurally sound, I test-fit
them in the openings, then cut a 5-degree bevel on the tops and
bottoms to shed water and a 2- or 3-degree bevel on the inside
stiles to eliminate binding.
When everything fits well, I put a 3/16-inch radius on all the
perimeter edges with a laminate trimmer.
Paint Prep
Before priming, I wipe the wood with a nonoily solvent like
DuPont Prep-Sol 3919S. For new shutters, I use Mill Glaze Away
(Napier Environmental Technologies, 800/663-9274,
biowash.com).
Paint stripping raises the grain, so I hit the worst of the
resulting “fuzz” with an orbital sander — but
I don’t go too crazy because the first coat of primer
makes sanding much more effective.
If I ever do a set of shutters for my own home, I’ll do a
full schedule of high-performance two-part coatings. Until that
day, I have to deal with compromises, which I have distilled
down to two options.
The first is to spray Abatron’s Primkote 8006-1 epoxy, a
thin-viscosity, clear sealer-primer that soaks deeply into wood
and dries almost instantly. Primkote is so thin it leaves
plenty of mechanical “keying” for an alkyd primer
to follow. I like Pratt & Lambert Suprime S1008
(800/289-7728, prattandlambert.com).
The other option is a lot trickier, but provides better
protection: spraying DuPont’s two-part Corlar 2.8 HG
epoxy (800/ 438-3876,
performancecoatings.dupont .com), then
spraying alkyd primer over it before it’s completely
cured. The trick is getting the alkyd on at just the right
time: If the Corlar has not dried enough, the alkyd will react
to the solvents and ripple. But if the Corlar has completely
cured, the alkyd won’t stick as well.
Doing this correctly takes practice and experience — and
cool weather. Do it wrong and you’ll have a big
mess.
Spraying
I use a Binks HVLP sprayer to apply the Corlar and alkyd primer
(Figure 7). It applies a fine finish with
little overspray, and the 2-gallon pressure pot and 25 feet of
hose give me plenty of reach and capacity.
Figure 7. With a 25-foot hose and a
remote pressure pot, the author’s spray rig allows him
plenty of mobility to get in between the shutters on the spray
rack. After all the coats have been applied, he fills the holes
in the bottoms of the shutters and coats tops and bottoms with
a brush.
If the shutters haven’t been completely stripped of
paint, I hit them with a deglosser right before spraying the
Corlar.
I spray the slats first. I open them all the way so I can get
the end grain, and then I do the rest of them, working up and
down and spraying from both sides until I have full coverage.
Next I do the frame, saving the top and bottom until the
shutters are off the rack. I check for runs after every shutter
is complete. Once the primer has had two days to dry, I go over
everything lightly with 80-grit sandpaper to remove any
remaining fuzz.
Before hanging, I use a paintbrush to apply two coats of the
Corlar epoxy to the shutter tops and bottoms. After the
shutters are fit to their openings, they’re removed once
again and sprayed with a second coat of Corlar and a second
coat of alkyd primer. I usually let a painter handle the top
coats. I tell clients to insist on an oil-based paint because
it holds up better than latex in our climate.
Despite the considerable expenditure of time and money,
it’s often hard to tell the difference between a real
shutter restoration and the lick and a promise I generally see.
But when the next hurricane or wind storm is approaching and
your customers can effortlessly close and secure their sturdy
shutters, they’ll appreciate your effort and
they’ll feel good about spending the money.
Michael Davis is a restoration carpenter
in New Orleans.