As a remodeling contractor, I go through 100 to 150 gallons of paint per year. My early efforts at painting with consistency and efficiency were frustrating, and my first attempts to use a paint sprayer only made things worse. Dealing with thick clouds of overspray, runs, clogged sprayers, and impossible cleaning chores nearly convinced me that spraying was better left to the full-time experts.
It wasn’t until I actually watched a real pro carefully spray around windows with almost no overspray that I realized how much more there was to choosing and using the equipment than I’d thought, and how powerful a tool this could be for a remodeler.
Contractors who do multiple medium-size renovations or their own painting — or who want to add painting to their arsenal — should look into purchasing and learning how to use an airless sprayer.
The Benefits of Spraying
Spraying is two to four times faster than brushing or rolling, and multiple coats can be applied in the same day with the right materials. Once you’ve gained experience, getting into corners, cutting in around borders, coating complex surfaces, and providing consistent, high-quality results become second nature.
Properly applied spray finishes are higher in quality than roll or brush finishes, without the lap and stroke marks common to other application methods. Spraying doesn’t have to be limited to coating wide expanses like house exteriors or blank walls, either; all the trim for a house can be laid out and sprayed at once, or all the balusters on a porch or deck can be finished in far less time than by brush. Overall, spraying can be a profitable addition to your standard painting offerings.
Selecting a Paint Sprayer
Walk into any professional paint store or home-improvement warehouse and you will be faced with a bewildering array of sprayers. Many promise the ability to spray “thick liquids” or show smiling homeowners flawlessly one-coating their homes. “Thick,” of course, is in the eye of beholder. What we’re really after is the ability to apply the correct amount of the correct material.
Airless sprayers operate with a constant amount of paint in the hose and gun, held under high pressure. When you pull the trigger, the pump pushes against the paint, atomizing it and forcing it through the tip. Application rate in gallons per minute (gpm) is one of the most important criteria when selecting a sprayer, because it directly influences the tip size and the materials you can spray. Although stores or manufacturers might tout pressure or unit hp, what matters is being able to properly atomize materials without thinning or having to use maximum pressure. Proper atomization helps reduce problems like overspray.
The easiest way to determine how large a unit you need is by finding the heaviest coating you might apply — generally a professional latex or even a masonry waterproofing paint — and looking at the instructions on the back of the paint or stain container. Manufacturers typically provide a tip range for spraying the material; for instance, Sherwin-Williams A-100 calls for a .017-inch-diameter tip.
Once you know the tip size, you can determine what flow rate the sprayer will need in order to successfully atomize the paint; in this case, you’d need a unit with an effective flow rate of .31 gpm. Where did I get that number? From the back of the tip package. So you’d want a unit that supports that size tip at a minimum.
I also recommend that you buy a unit that will support a tip at least one or two sizes larger than what’s required to move the type of paint you normally use. The unit will have a larger pump, which means that you can more effectively fine-tune the rate of flow.
Pump types. There are two types of pumps used for airless sprayers: piston pumps and diaphragm pumps. In general, lower-end models use a diaphragm pump, in which an impeller revolves, pushing the paint along. Piston pumps are found on higher-end models, like the pro-duty sprayers from Graco (www.graco.com), SprayTech (www.spraytecsys.com), and Titan (www.titantool.com). These brands typically have better, longer-lasting motors, require less service, and outperform less-expensive brands.
Price and Selection
I recommend that anyone considering buying an airless spray unit visit a professional paint store that supports a large selection. In addition to having more to choose from, you’ll get professional advice. Models sold by professional suppliers tend to cost more than those bought from a catalog or Web site, but a good paint store should be able to help you select the right equipment for your intended applications, as well as provide service work when needed. And, as with any professional tool, buying job-specific equipment will generally deliver more consistent results with less aggravation.
Also, don’t forget that there is a host of accessories for airless units: extensions, rollers, special tips, mobility carts, and additional-length hoses. Before buying, check with the sales department to ensure your unit will support a longer hose; more length means more paint to keep under pressure, placing greater demand on the motor. Once you learn the basics of your system, items can be added to make the job easier, such as extensions and roller handles.
Selecting the Right Tip
The first step before actually painting is selecting the proper tip size; the tip determines the overall quality of the paint job. It controls how the paint is applied, providing optimal professional results. Proper tip selection is what changes an airless sprayer from a crude instrument into a precision tool; the trick is to carefully match the tip size to the application, whether it’s trim or wide-open areas.
Tip sizes are always given as a reflection of the orifice in fractional inches: .015, .017, and .019 are examples of common tip orifices. To select a size, begin by considering the type of material you’re using. In general, thinner materials need smaller tips, and heavier materials need larger tips.
4 x 2 = 8-inch fan width 17 = .017-inch orifice diameter
Next, select the fan size, or the area of spray coverage when holding the gun 12 inches from the surface being painted. Most American equipment manufacturers, such as Graco, employ a numbering system in which the first digit indicates one-half the fan width, and the second and third digits indicate orifice size. Thus, a Graco 517 tip would have a fan width of 10 inches and a .017-inch orifice size.
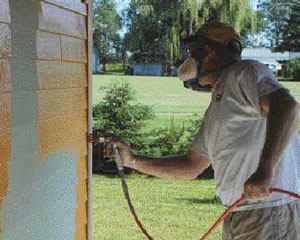
Choosing a tip doesn’t have to be complicated. Spraying huge, blank wall expanses can call for wide spray patterns and quick work. More delicate tasks, like painting around windows or other contrasting objects, might require a smaller fan width for better control. Select the tip that best meets the needs of both the job overall and the objects you’re painting.
A final note about tips: Although manufacturers offer long-lasting tips, even they eventually wear out. Excess flow rate, smaller fan sizes, and runs can result. When the fan width suddenly decreases by more than 20 to 25 percent of its original size, it’s time for a replacement.
Safe Use
Always observe safety precautions when using airless sprayers. Because of the high pressure — up to 4,000 psi — involved in spraying, an air-entrainment injury, in which paint is injected underneath the skin, requires immediate medical attention even if the injury appears to be small. Sprayers can inject paint deep into the tissues of the body with little outward sign, causing necrosis (tissue death). Without immediate medical help, this condition could eventually lead to amputation.
The second medical concern — which also cannot be understated — is the possible long-term health consequences associated with breathing the vapors of the materials you’re using. While the hazards of breathing fumes from oil- or alkyd-based products are well-known, most people don’t realize that long-term exposure to water-based finishes can also cause lung problems.
At a minimum, appropriate paint respirators and safety glasses must be worn, and great caution should be exercised when using an airless system. Just as with a nail gun, one slip could cause permanent damage.
Always remove pressure from the system before moving it around, cleaning the tip, or making other adjustments.
Spray Technique
On home-improvement shows, the act of spraying tends to be oversimplified. Spraying is both a technique and an art; you must take into account the different surfaces, paint types, and items to be sprayed around.
In almost all cases, the gun should be held straight up and down, parallel to and 12 inches away from the surface. Move your whole body along the surface, not just your wrist and gun; they should stay in the same fixed attitude while spraying.
When spraying, activate the trigger before moving over the receiving surface, then continue moving beyond it before releasing the trigger. Application speed must be consistent; moving too fast or pulling the gun away leaves too little paint on the surface; moving too slow or angling the attack so that the gun is not parallel to the wall can lead to overapplication and drips. This is the art of spraying; getting the right results is a matter of knowledgeably gauging various factors — speed, material, surface.
We typically spray big areas first, then move to the smaller parts, using different tips to cut into corners and around windows and protrusions. We always make generous use of paint shields and drop cloths.
Overspray. I hear a lot of complaints about overspray. The problem could be caused by a number of different factors: The material is too thin or has been thinned for spraying with a smaller sprayer; the wrong tip or gun is being used; the pressure is set too high.
If you’re getting a lot of overspray, go to a larger tip and increase your application speed while decreasing the sprayer’s pressure. If the tip isn’t specifically supported by the sprayer used, it’s probably too small to obtain good results with the material you’re using.
Most common spraying problems can be remedied by making adjustments in technique or equipment. Tailing, for instance — small, parallel paint marks above and below the main spray pattern — occurs when the gun is held too far from the surface, the pressure is too high, or the tip is clogged.
Spattering results when there’s insufficient pressure or a problem with the tip — it’s either worn or too big for the unit. Orange-peeling happens when material is sprayed on a too-hot surface like aluminum siding.
To Back-Roll or Not?
Among professionals, this is the big question — and there’s no uniform agreement on the answer. Both methods have advocates.
Many believe back-rolling is necessary to force the paint product into the surface. But at delivery pressures of 2,000 psi or greater, the material should adequately embed in the work surface.
Others argue that rolling is necessary to achieve a smooth, consistent paint application. But the beauty of a sprayer is its ability to provide fast, consistent quality — a result that comes from practice, not from back-rolling everything. In my experience, once you get the right sprayer and know how to use it, back-rolling is not necessary.
Cleaning and Maintenance
Cleaning seems to be a major problem, especially for users of older or poorly designed units, which can be a pain to take apart and clean correctly. Make sure to ask about cleaning and maintenance before purchasing an airless spraying outfit.
Nowadays, some units can be connected directly to a garden hose for fast cleaning. With others, you have to disassemble several components, remove the paint from the system, and then run an appropriate cleaner through the system.
To clean my unit, I generally start by removing the paint pick-up tube from the paint and cleaning it; I immerse it in a 5-gallon bucket of clean, warm water. I then remove the tip holder and pump the remaining paint in the hose back into the paint container. As soon as the paint flow lessens, I switch to rinsing. Generally, 1 or 2 gallons of clean water pumped through the hose and gun provides complete cleaning.
While still pumping, I take apart and clean the gun, handle, tip, and filters. Last of all, I oil the unit, particularly the piston, in preparation for the next time I use it. Total cleanup time? Usually 10 minutes or less.
After choosing a good solid airless spraying unit and learning how to use it, contractors who handle their own painting can expect to improve both their time line and their bottom line.
Jason Seltin is a remodeling contractor in Saint Johns, Mich.


