Several months ago, I took on a job installing frame-and-panel wainscoting in a client’s new home office. Unfortunately, the walls in this room were among the waviest I’d ever seen. Rather than pull out my hair trying to make the joints between the stiles and rails look good on an undulating surface, I decided to make the “frames” by cutting out sheets of 3/4-inch MDF, and use 1/4-inch MDF for the panels. Each panel would be trimmed with a rabbeted panel molding to finish cut edges and hide any small gaps.
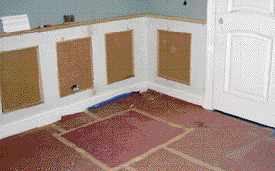
I began by moving the wall-mounted registers to the floor. Once that was done, I did the panel layout right on the walls with masking tape and a pencil; I had to balance aesthetics with the need to accommodate existing electrical outlets. I would have preferred to have moved the electrical boxes so that the outlets would be centered in the panels, but in the Chicago area even residential wiring is run in conduit — and opening the walls and relocating the boxes was not in the budget.
Next I ripped the 3/4-inch MDF panels to 36 inches and did my layout on the front side with a drywall square. I made the cuts with a wormdrive circular saw, then finished up the corners with a jigsaw. I attached the panels to the walls with 18-gauge brads and construction adhesive.
I installed the 1/4-inch panels the same way, making sure to cut them snug so that the rabbeted molding would lap over them, hiding gaps. Using a stop on my miter saw, I cut all the molding pieces and preassembled them into picture frames with yellow glue and a micropinner.
At the room’s one outside corner, I ran the overlapping panel about 1/8 inch long and trimmed it in place with my router and a flush trimming bit. Then I eased the corner with a 1/4-inch roundover bit to protect it from damage. I finished off the top of the wainscot with scribed pieces of 1×3 poplar above a narrow band molding.
The whole job took me two full days. Once the seams were filled with Bondo and everything was painted, it looked great.
Robert Kubsik is a finish carpenter with Danaka Custom Carpentry & Renovation in Mt. Prospect, Ill.
Homemade Dispensers
Unless you store it in a reel, a roll of rebar tie wire can get pretty banged up and tangled over time. One carpenter who didn’t have a reel used duct tape to craft a handy “dispenser” that feeds from the center (left).
Another carpenter ran into trouble when rain destroyed the cardboard box in which he stored framing strap; to keep the coil from unwinding he made a dispenser for it out of scrap lumber (right). — David Frane


