Here in Northern California, three-coat stucco is the dominant exterior finish material. It’s been this way for years, so there’s a lot of available work remodeling and repairing older stucco homes.
Many of our jobs involve repairing existing damage, adding cementitious window casings, and applying a new layer of color coat to all or part of the building. A lot of the stucco houses I work on were built in the ’60s, when finned aluminum windows were the norm. Typically, there are no exterior door and window casings, and the stucco runs right up to the edge of the opening. These old single-glazed aluminum windows are not energy efficient, and after 30 or 40 years they’re pretty worn out, so window replacement jobs are common in this area. Sometimes the contractor will tear out and replace the entire window, and sometimes he’ll install a replacement unit inside the existing jamb. Replacing the entire unit always involves a certain amount of stucco repair, which my company is often called in to do (see Replacing Windows in Stucco Walls, 6/04).
When the replacement unit fits inside the existing jamb, no stucco is removed, so there’s no need to patch around the opening. However, I may still land some work because the house looks dated without casings. If the existing stucco is in good shape, I can install new “stucco” casings right on top of the existing stucco.
Color Without Paint
Many older homes in this area have two-coat stucco, which consists of a scratch coat and a smooth float-finished brown coat. More often than not, these houses have been painted. The new owners may not like the color and texture, and the walls may have developed cracks. They could repaint, but that won’t fix the texture or cracks. My company gets called in to repair the cracks and to change the color and texture by applying a layer of color coat.
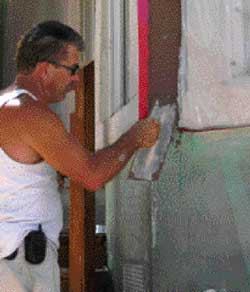
Color coat is common in three-coat stucco jobs. It’s what you get when you add pigment to the top coat of plaster. The color coat is about 1/8 inch thick and will last 20 to 40 years if properly applied.
Other homes in this area have three-coat stucco that has never been painted. There is a scratch coat, brown coat, and some kind of finish coat. The finish coat could be plain white or a color coat. We’re called in to repair cracks or because the owner wants to update the house by changing the color or texture of the walls. It’s a simple job to apply a second layer of color coat to an existing stucco building.
Even if the owner likes the existing texture and there are no cracks, adding a color coat is better than painting. Painted surfaces need to be maintained, and most paint jobs do not last as long as color coat. Because stucco is porous, some moisture may get past the stucco, hitting the building paper and draining to the weep screed at the bottom of the wall. Any moisture, whether it comes from inside or outside the building, will eventually evaporate through the surface. But when you paint stucco, it seals the surface — probably not well enough to keep any moisture from getting in, but certainly well enough to keep some of it from getting out. Sometimes the building may not retain enough moisture to cause problems. In other cases, though, it can be enough to pop the paint, rot the frame, or support mold growth.
Trim Material
Before the advent of aluminum windows, wooden doors and windows were installed fully cased, directly over the building paper and wire lath, and the plasterer stuccoed right up to them. Wooden casings were also popular in the 1970s, when they were often installed over the fin but on top of the paper and lath.
Wood casings are no longer common on stucco buildings. I work on a lot of projects in which wood casings have been removed because they had deteriorated or because water was leaking in between the stucco and trim. It’s our job to patch in around the windows and install new casings that won’t leak or rot.
EPS foam. Standard procedure on new construction is to install trim and moldings on top of the brown coat but before the finish coat is applied. There are a number of ways to fabricate casing, but the most common method involves the use of an expanded polystyrene (EPS) foam planton. The foam is glued to the surface of the brown coat with a material that’s similar to thinset mortar, then reinforced with a layer of fiberglass mesh tape and given some kind of cementitious top coat.
The trim can be finished to match the walls, or we can give it a different color and texture. In some cases we’ll put a smooth finish on the walls and finish the casings to look like stone. Similar methods can be used to refurbish existing buildings. The biggest difference is the substrate: On new work you’re going over the brown coat; on old work, you could be going over painted stucco, new brown-coat patches, or an existing finish coat.
Some people hear the word “foam” and immediately think about EIFS (exterior insulating and finishing systems). Foam-based trim is different because it’s not part of the wall structure. There’s at least 3/4 inch of stucco behind it, so the planton is a purely decorative piece. It’s the building paper and flashings behind the stucco that keep water out of the building.
We use foam as the basis for casings, quoins, pilasters, columns, wall caps, and other decorative elements. The foam manufacturers use lasers to cut a wide variety of stock profiles, and it doesn’t cost much more to get a custom shape.
The foam comes either raw or precoated. The raw material looks like plain white Styrofoam, while the precoated material is covered with a layer of fiberglass mesh and a coat of polymer-modified portland cement. The coating is about 1/8 inch thick, just enough to fill the mesh. Whenever possible, we buy precoated material because it saves us from having to apply the mesh and the first coat of cement.
Faux stone. On some high-end jobs, we take the raw foam profile to our shop and coat it several times with a mixture of ground limestone, portland cement, pigment, and liquid polymer additives. The coating is about 1/4 inch thick, and the finished pieces look like cut limestone.
We use a miter saw with a dry-cut blade to cut our “stone” trim in the field. After the pieces are glued to the wall, we fill the joints with mortar the same way we would if we were tuck-pointing standard masonry. The finished casing looks like cut, mortared stone. We can also apply a version of our “stone” coating in the field. It goes over foam and can be finished in a variety of colors and textures.
Installing Casings
The foam casing material, even the precoated stuff, is soft enough to cut with a handsaw. The cuts do not have to be perfect because the joints will be taped and the surface will be coated a couple of times before the trim is done.
We glue the foam on with Foam Tite (Carson’s Coatings, 209/745-2387), a polymer-modified portland cement. It’s mixed and applied like a stiff batch of thinset mortar. We cut the trim, butter the back with Foam Tite, and glue it onto the wall. If it’s new construction, we put the trim on the brown coat. If it’s old work, we apply the trim to the existing finish coat. Trim should be installed only on clean, sound surfaces. You can put trim on a painted stucco wall, but you should apply a bonding agent first.


