While weighing the options for replacing a small, low-slope, porch hip roof, I quickly rejected half-lap, mineral-surfaced roll roofing. It would have to be redone or coated in eight to ten years, if not sooner. A bituminous underlayment, such as Grace Ice & Water Shield, under standard three-tab asphalt shingles would work, but only on slopes 2:12 and steeper. There’s always torch-down, but I don’t do a lot of it, and I don’t own a torch. I didn’t want the rental expense, not to mention the risk of using an open flame on a combustible roof surface. I was tempted to go with a top-of-the-line flat roof product and sub the job out to a certified EPDM rubber membrane installer. But I didn’t need the scheduling hassles, and there probably wouldn’t be much money left in the end for my trouble and headache. What I needed was a durable, easy-to-install membrane that I could handle myself, preferably one that didn’t involve buckets of the tenacious black stuff that has a way of getting on everything, including your tools, hands, and the finished roof surface.
Advantages of EPDM
A little research turned up WeatherBond 110 (WeatherBond Pro, P.O. Box 2022, Mechanicsburg, PA 17055; 800/575-4406), a 45-mil, black EPDM rubber roofing membrane backed with 20-mil butyl adhesive. Designed for smaller roofing jobs, it comes in 4×25-foot rolls that cover one square each. It has a peel-and-stick release liner, slit lengthwise at 4 and 24 inches from one edge to facilitate installation. Single-ply EPDM rubber roofing has many advantages over other roofing options. It remains flexible at extreme temperatures, can be installed quickly, and resists deterioration from exposure to ultraviolet radiation — a protective coating, like natural stone, is not required as with some torch-down products.
Expensive option. The rubber membrane is expensive. The cost, including the EPDM roll, cover strip, primer glue, and sealant is about $160 per square. And you need to figure in some extra for corner covers and pipe boots. But the installation cost fares pretty well compared to a torch-down product, considering the labor and expense of installing a UV coating over the torch-down. The WeatherBond 110 membrane is also available in solid white rubber, but it costs about 16 percent more than the black rubber. White reflects most of the sun’s infrared rays, which helps to keep the roof and the space below cool in warmer climates. Currently, the same black cover strips must be used with the white rubber membrane. It’s possible to paint the black cover strips, using acrylic latex or oil-based paint but successive coats of paint may be necessary to prevent bleed-through. However, the company plans to have a white cover strip available this fall.
Warranty. The 12-year WeatherBond warranty is, to date, the best I’ve found in the category of residential low-slope roofing products. And, if the performance of single-ply EPDM roofing on commercial installations is any measure, WeatherBond 110 can certainly last much longer than 12 years, if it’s properly installed. Granted, the product was a little hard to find for this job. It was available at only one roofing supplier in my area. WeatherBond’s area rep assured me that the company is encouraging lumber retailers to stock their product, so its availability may improve.
Temperature range. WeatherBond 110 is best installed at temperatures ranging between 40F and 80F. However, there is some latitude. If it’s 35F, but it’s sunny on the deck, the material may be workable enough. The same holds true if it’s 85F but cloudy. The glue on the product gets very aggressive in high temperatures, and special techniques must be used to install it (see “Helpful Hints,” below). The manufacturer provides an installation video and instruction booklet, on request, that clearly illustrate these and other procedures.
Helpful Hints
Hot-Weather Considerations
|
WeatherBond membranes are not compatible with uncured petroleum-based materials, such as fibered aluminum roof coatings. However, WeatherBond can be installed over cured petroleum products, such as a fibered-aluminum-coated trailer roof. If I were doing a roof that was any larger than this one — which was 12×26 feet — I would seriously consider using another product, WeatherBond 101, to eliminate a couple of the time-consuming aspects of the job. WeatherBond 101 is a 60-mil EPDM material that comes in 10×20-foot sheets. The sheets are shipped folded in a box, rather than in rolls. The 101 is a standard glue-down rubber membrane and has no self-adhesive backing.
Roof Prep
WeatherBond 110 will adhere to a variety of surfaces, including wood, metal, plastic, glass, fiberglass, rubber, masonry, smooth-surfaced built-up roofs, and nongranular roll roofing. For this reroof, I wanted to start with a good, clean substrate, so I stripped the old asphalt roofing down to the roof boards — being careful to clean and preserve the existing wall and chimney flashing — and installed a layer of 1/2-inch OSB, which I had coated with a good latex paint primer the day before installation. The primer is recommended for better adhesion of the WeatherBond butyl-adhesive backing to the wood. I primed the sheets ahead of time so that I could strip and protect the roof the same day. After checking the surface for any protruding fasteners, I cut 6-inch strips of the roofing material from the 4-foot roll and installed them over the rough edges of the plywood hip to cushion the membrane against premature wear (see Figure 1). I figured this might be one of the first areas to develop a problem.
| Figure 1. Weatherbond 110 self-adhering EPDM must be installed over a clean, paint-primed substrate. The author paints OSB sheathing prior to installation in order to speed the membrane installation. To protect the membrane from wear over sharp corners, he installs a 6-inch-wide strip of the membrane over the transitions first. |
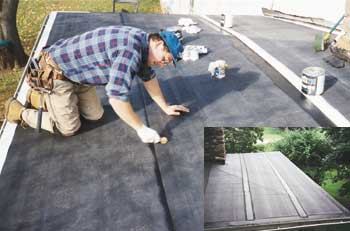
The starter course is partially rolled out for alignment, overhanging the edge of the roof by about 1 1/2 inches. I made a pencil mark on the deck where the center slit in the release liner falls, marked that same measurement up from the edge at the opposite end of the roof, and snapped a guideline for the rollout. Aligning the center slit with the guideline, we rolled out the roofing, simultaneously peeling back the 20-inch-wide liner strip, leaving the 4-inch liner temporarily in place at the bottom edge. After securing the lower half of the roll to the roof, we slid the upper release liner out from the top and smoothed the wrinkles out of the membrane with a push broom (Figure 2).
Figure 2. The starter course overhangs the roof edge by about 1 1/2 inches. A push broom is the ideal tool to embed and smooth the membrane into place as the protective paper facing is peeled away. |
At the overhang, we pulled off the 4-inch release strip and wrapped the membrane over the edge, nailing it to the fascia every 6 inches. I folded the outside corners over and nailed them.


