If you’ve spent your life in the building trades, you may have done a job or two that you look back on with regret. I still remember one from about 30 years ago. A contractor I worked for had us tear off a 20-square Vermont slate roof because there were a few leaks. We replaced the slate with asphalt shingles.
Some of those slates were almost too heavy to lift — more than an inch thick, in various shades of green, gray, purple, and red. The roof was laid out in the old “graduated” style, with the large, heavy slates applied in wide courses near the eaves, and the reveal getting smaller with each course so that the lightest slates would be used in narrow courses near the ridge. Some of the heavy slates we took from the lower courses were reused afterward as paving stones — they were that big and rugged.
That roof wasn’t worn out; it just had some corroded flashings and fasteners. The leaks would have been simple to fix, and those existing slates were good for another hundred years or more. The asphalt shingles we replaced them with are most likely shot by now.
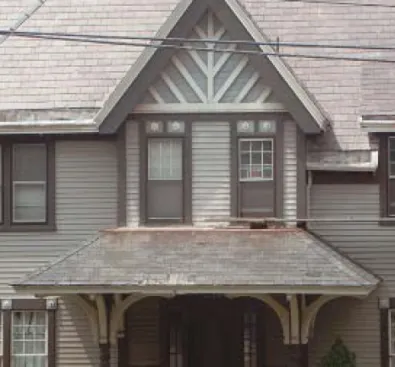
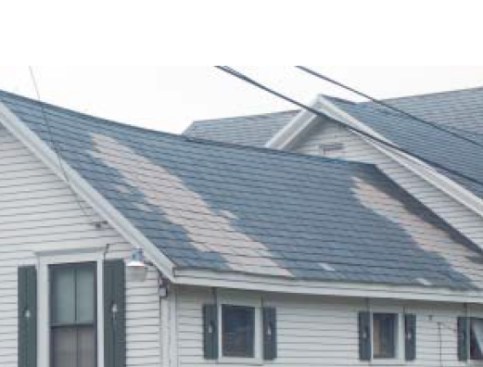
The main roof of this turn-of-the-century Victorian still has most of its original slates, while the asphalt shingles installed on the building’s lower porch roof in mid-century are at the end of their service life.
Since that time I’ve replaced and repaired more slate roofs than I can remember, but I’ve never removed a slate roof that didn’t need replacing. Even the lowest grades of slate have a service life of 75 years, and many kinds can last 200 years or more. Odds are that any slate roof you encounter is still going strong.
There are plenty of reasons a slate roof might need work. Tree limbs, snow, and ice can damage slates, for example. Leaks occur when flashings corrode, and slates can come loose because fasteners rust through. Or maybe the roof is affected by a remodel or addition, or just needs a small opening for a plumbing vent. Looking at some of the patches that have been done to slate roofs by people who don’t have the basic skills, I can understand why someone might think the only solution is a whole new roof. Poor workmanship, unfortunately, is common in slate repair. But with good technique and matching materials, repairs can be long-lasting and undetectable. And the techniques are no harder than any other roofing skills.
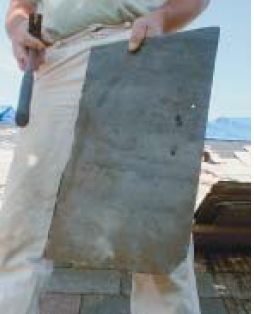
Sound slates make a crisp ringing sound when struck with a hammer. This piece, salvaged from an old Vermont barn, could provide another hundred years of service on a roof.
Inspection: Repair or Replace
A slate roof is worth fixing only if the existing slates are going to last. You can determine this with a visual inspection: Slate with life left in it will show no signs of delamination or flaking. If the edges or the field of the individual slates are beginning to look like the flaky edge of a dinner roll, they’re terminal.
Like ripe watermelons, serviceable slates have a distinctive sound. Hold a piece of the slate in your hand and tap it with the rubber grip of your hammer, or lightly with the business end. If the slate emits a crisp, sharp ring, it has serviceable life left. If you hear a clunky, dull sort of thud, you’ve got an old slate that is almost gone. Too many of those and it’s time to think about replacing the roof.
Choosing and Matching Slate
When you work on an existing roof, it’s always worth the effort to match color, size, and texture as closely as possible. Slate is a natural material — it’s just stone that is quarried from the ground and split into sheets. Slate from different regions and different quarries varies in color, hardness, and durability.
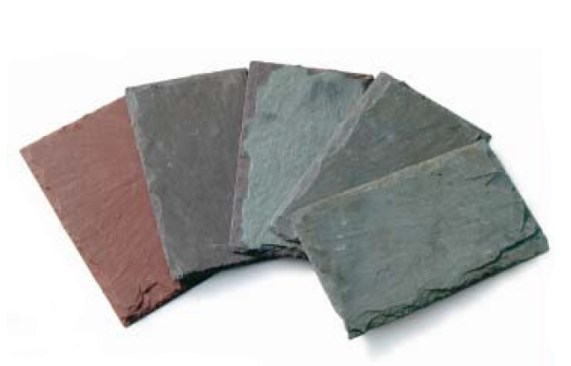
Slate’s natural color varies from a subtle range of blacks and bluegrays to striking shades of green, purple, and red. Quarries still in operation can often supply a close or exact match, while some colors are available only as salvage from old buildings.
Experienced slaters come to recognize many slate types. Pennsylvania slate from the quarries north of Allentown and Bethlehem is grayish black in color; you still see it on thousands of homes and buildings in that area. Another Pennsylvania slate comes from York County; these black slates are more durable than the more common Pennsylvania gray slate. Slate from New York and Vermont comes in various shades of green, red, purple, and gray. Slate from Virginia is bluish gray and very durable. The quarry that produced the hundred-year-old slate you’re trying to match may not still be operating, but finding at least a visual match from a different quarry should be possible. There may also be second-hand slate available that matches.
This repair with mismatched slates stands out like a sore thumb. If matching shingles were not available, the roofer could have repositioned existing slates while installing the new ones in a decorative pattern or band.
Finding slate. There are plenty of good slate suppliers who can help you get the right material. Some of the bigger slate roofing outfits keep a large inventory on hand, much of it recovered as salvage from old barns, churches, and industrial buildings that have been re-roofed or torn down. Salvaged slate is available in today’s market for around $300 a square. New slate prices depend on the type; red Vermont or New York slate may run $1,000 and up per square, while unfading green or black from the same region could go for $350, or even $250 in small sizes. Thickness and size will also affect price. You can expect to pay more for 24-inch slate 12 to 16 inches wide than for 10-inch pieces 6 to 10 inches wide.
If you can’t find a close enough match for a highly visible repair, it’s easy to shift slates around. Remove slates from a less obvious area of the roof, do the repair, and replace the removed slate with new material. Even slates that are a totally different color can be made to work if you use some imagination — instead of laying the slate in haphazard patches, create a pattern. You can make up your own shape, or imitate one of the classic patterns woven into roofs by the old-time slaters. Many of those old roofs are still around to provide examples.
Slates come in many sizes and thicknesses. To estimate the size needed for a match, measure the exposed course height, double it, and add 3 inches for a standard headlap, 4 inches for pitches from 4/12 to 8/12.
Size
Slate comes in various sizes and thicknesses. Typical roofing slate is about 3/16 inch thick and ranges from 6 to 14 inches in width and 12 to 24 inches in length. To match what’s on the roof, try to measure an existing slate on a gable end (or on the ground if one has slid loose). If you have to guess, measure the exposed course height, double it and add 3 inches for headlap. If the pitch is less than 4 in 12, use a 4-inch headlap; very steep roofs such as mansards, or sidewalls, may use just a 2-inch headlap.
If you repair a graduated roof, you may need several different sizes and weights. The larger and heavier pieces are placed along the eaves, and succeeding courses get smaller as they get closer to the ridge. Be careful to match both the height and the thickness of the slate.
Flashing, Nails, and Sealants
Flashing and fastener failure account for a large percentage of slate roof leaks. It’s important to use materials that will last as long as the slate, but that isn’t always done. Iron nails rust away, enabling wind and weather to slide slate out of place. Valleys and metal flashings rust through and have to be replaced. When repairing a slate roof, you’ll seldom go wrong if you use copper nails and copper, stainless, or lead flashings. It’s often necessary to fabricate and solder flashings for durable jobs. If you don’t have the skills for that, bring in a sheet metal mechanic.
But for economic reasons, those top-of-the-line materials aren’t always appropriate. On some jobs, budget is a higher priority than aesthetics, and some repairs are done just to extend the life of the roof for a few more years. If you judge that the roof will probably get replaced within 25 years, aluminum siding nails and .024 or heavier aluminum flashing are sensible choices. You don’t want to install 100-year nails and flashings on a roof that won’t be around for three decades, any more than you would appreciate it if your mechanic put lifetime parts on a work truck that’s on its last legs.
Tools and Techniques
For most slate repairs, only two specialty tools are required: a slate ripper and a slate cutter. A regular hammer will do, but a slate hammer, which has a sharpened upper edge on the handle for cutting slate and a punch for making nail holes (instead of the usual claw), is a worthwhile investment if you’re doing slate work on more than an occasional basis.
There are two ways to cut slate. Some experienced slaters use a slate stake and hammer. But if you don’t make your living doing slate work, you won’t appreciate the cost in time and broken slate it takes to develop this cutting skill — especially when a slate cutter is much easier to master and produces great results.
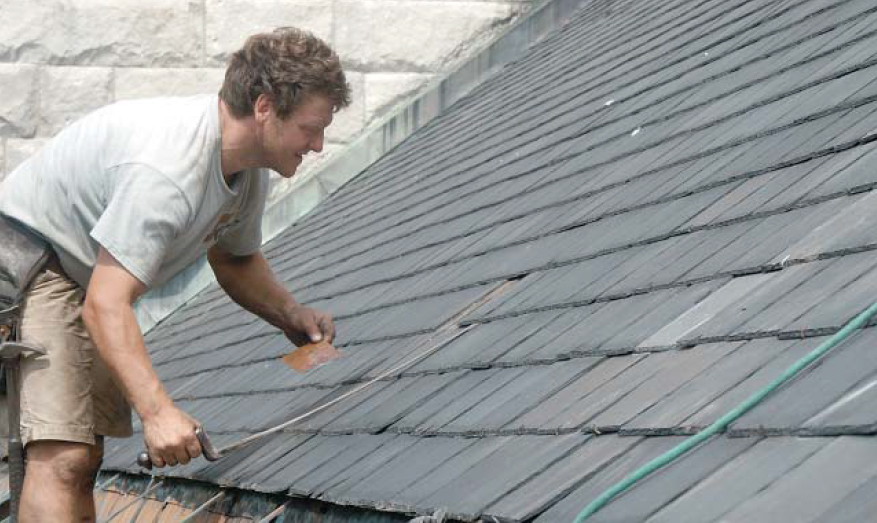
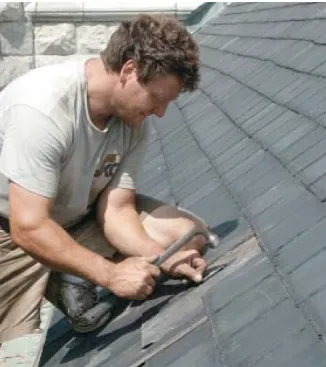
A slate cutter’s lever arm is powerful enough to readily shear through slate but allows fine control for careful cutting. Here, slate roofing contractor John Kuhn uses the tool to nibble out a half circle for a vent pipe penetration.
The slate cutter’s lever blade shears through slate, much like a paper cutter (Figure 6). You can quickly learn to get nice, accurate cuts by feeding the piece into the cutter’s blade, exposed face down, and nibbling through the slate with short, ratcheting pumps of the lever. As it bites through the slate, the blade breaks out the edge on the underside of the cut, producing a scalloped bevel. Cutters retail for about $80.
Slate rippers are invaluable in most kinds of slate repair. They’re used to remove the nails holding the damaged slate, pull out damaged slate, and reinstall slate and flashing. About 30 inches long, slate rippers are forged from round steel. The flattened blade at the end has a hooked notch on each side for snagging and pulling out nails and broken slate. The center of the flat tip also has a sharp notch you can use to shear off nails that resist removal. Rippers retail for about $65.
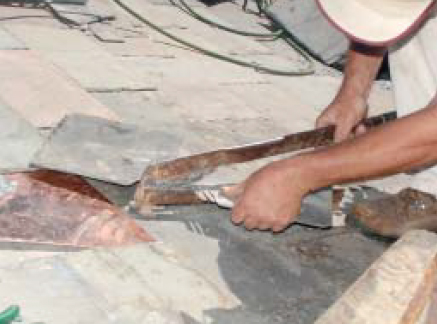
Pulling slates. Most slates are fastened with two nails. To remove a damaged slate, slide the flat end of the ripper under the slate and push it up until the hooked end is above the nail. Pull it sideways and down to hook the nail in the notch of the ripper. A few taps downward on the perpendicular section of the ripper handle will usually loosen the nail. Repeat the procedure for the other nail. With both nails removed, slide the ripper back under the slate and press down on the top of the slate with your free hand, sandwiching the slate between your hand and the tool, and pull down on the ripper to slide the slate out.
If the whole slate doesn’t come out, reinsert the ripper and pull out any pieces. (If you’ve ever had to use a “Slim Jim” to unlock your car through a closed window, you’ve got the principle.)
Removing a cracked slate is quick and simple with a slate ripper.
The roofer slides the tool under the slate and hooks the nails out with a combined pulling and levering action.
Sometimes the installer needs to punch and grind a pilot hole for the hook into the crack between the two slates in the course below.
A slate hook driven into the roof will hold the bottom of the replacement slate.
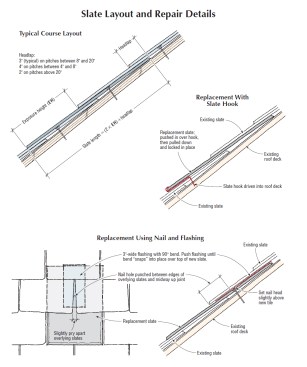
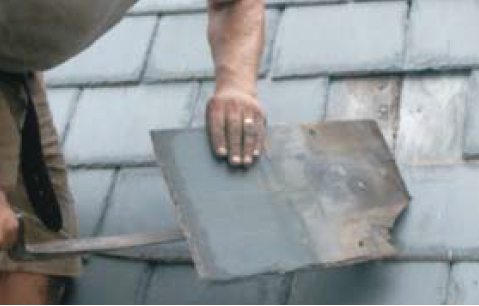
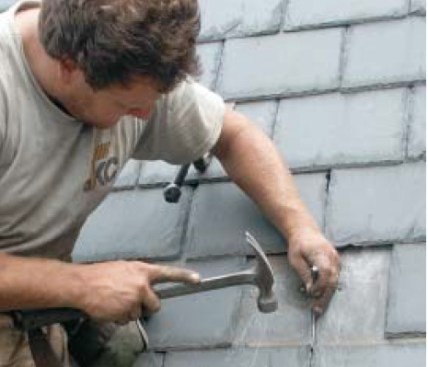
To install the new slate, simply slide it into place. There are two ways to fasten the replacement slate. One way is just to punch a nail hole in the new slate between the edges of the slates above, midway up the joint. Slightly pry apart the overlaying slates above, just enough to drive the new nail between them.
Unlike other materials, slate has to be nailed loosely: It is important to leave the head of the nail slightly above the face of the slate, so that the slate “hangs” on the nail. Driving the nail tight against the slate prevents the slate from moving as it expands and contracts with changes in temperature, which overstresses the brittle slate and can cause it to crack.
The nail in the seam is exposed and has to be weatherproofed. Cut a 3-inch-wide piece of flashing long enough to reach the top of the new slate and cover the nail by approximately 2 inches. Bend a 90-degree flange at the top of the flashing slightly shorter than the thickness of the slate. Using your slate ripper as a push stick, push the flashing in place until the bend “snaps” into place over the top of the new slate. Now reorient the two slates above, and you have an invisible repair (see details in illustration above).
Slate hooks are another way to hold the new slate in place. With the damaged slate completely removed, drive the pointed end of the hook into the roof deck, leaving the crook of the hook in line with the bottom of the replacement slate. Push the new slate into place over the hook and pull it down to lock it in. The exposed portion of the hook is usually invisible from the ground. If the roof is visible from a dormer window, however, I like to use the nail-and-flashing method because it is much less apparent.
If you need to replace multiple slates in a small area, go ahead and pull off a whole pyramid-shaped section and re-cover the area from the bottom up. This minimizes the number of slates you have to install with hooks or face nails and flashing.
Slate pieces usually come from the quarry with prepunched holes, but when you cut slate to size, you may need to make new holes. With practice, you can learn to do it quickly with the slate hammer. But a slate hammer is not essential: You can do the same thing with your usual hammer and 3/16-inch nail set. Lay the slate face down on a uniformly supported surface, place the punch tip where you want the hole, and strike a quick, hard tap. This will make a neat round hole on the underside, but it blows a tapered hole on the face side for the nail head to seat into. It looks just like the round hole a BB gun makes in plate glass.
Roof Access
Slaters are kind of like pilots: “There are old ones and there are bold ones, but there are no old, bold ones.” Slate roofs tend to be steep and slippery. Accessing the work area safely, without damaging the good slate, is one of the difficulties of slate repair. It takes patience — rushing things is dangerous for both you and the roof.
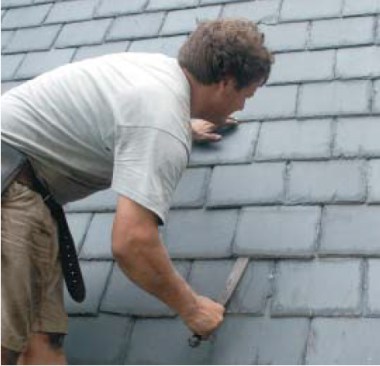
Slates are very hard, but they are also brittle and crack easily. A soft-soled shoe is a must. Avoid walking directly on slate if possible; if you must step on the roof, walk only on the bottom of the exposed course where it’s not spanning the courses beneath.
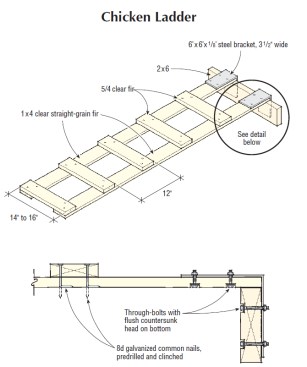
The author likes to build his own “chicken ladders” to allow access to the areas that need work. The ladder spreads his weight across a section of roof to prevent the cracking that foot traffic can cause. The ladder is made with straight-grain, clear 5/4 or 1×4 stock, with steel brackets and a 2×6 bolted onto the top end for a ridge hook.
For More Information
National Slate Association
866/256-2111
www.slateassociation.org
Jenkins Slate Roofing Services
866/641-7141
www.jenkinsslate.com
Publisher of the Slate Roof Bible; online tool store
Vermont Slate and Copper Services, Inc.
Publisher of The Slate Book and Slate Roof Quarterly; source for slate tools and accessories
If the repair area is within arm’s length of an eaves or gable edge, a ladder will provide decent access. But more often, you have to cross a sect ion of existing roof to get to the work area. The idea is to spread your weight over several slates — similar in concept to using kneeling boards to work on fresh concrete. My preference on a slate roof is to work off chicken ladders. I like to make my own, for the same reason you pack your own parachute.
I use clear straight-grain fir for the rails and rungs and space the rungs 12 inches apart. At the top of the ladder, you can bolt heavy, 6-inch, 90-degree flat metal brackets to the top ends of the rungs with the bracket leg facing down, then bolt a 2×6 to the bracket legs that will lay over the ridge to keep the ladder from sliding.
Chicken ladders work efficiently on gable roofs, but hip roofs offer a different challenge. The farther down you are from the ridge intersection, the farther in you are from the hip. Sometimes it works well to use a chicken ladder to get to the right elevation, then you can install a roof jack close to the hip and plank across.
Whenever you climb a roof, a rope and harness are a good idea; in many cases, OSHA will expect it. The meaningful word when you approach a slate repair is “forethought.” No one method will work in every situation, so plan each job the way a good climber plans a cliff ascent. It often takes more time to set up the job for safety and efficiency, and to demobilize afterward, than it takes to do the work on the roof — but the risks involved are just too great otherwise.
Thanks to John Kuhn and Tom Netzer of John Kuhn Copper for assistance with photography for this story.


