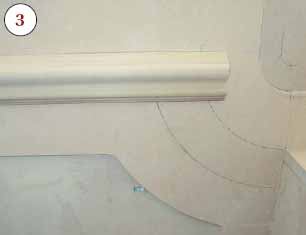
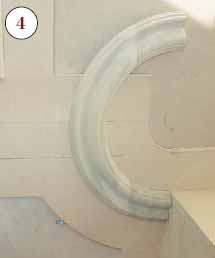
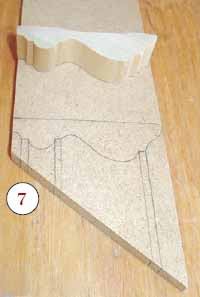
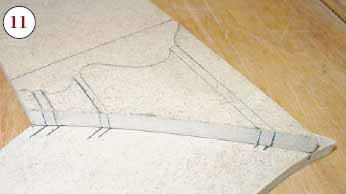
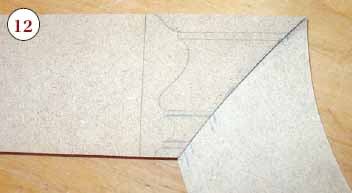
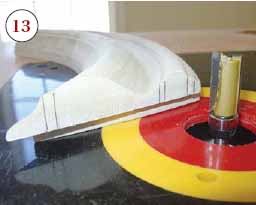
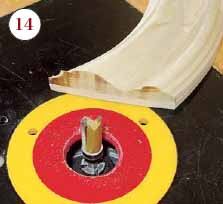
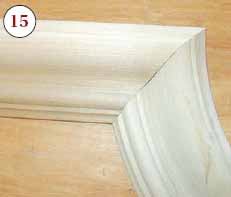
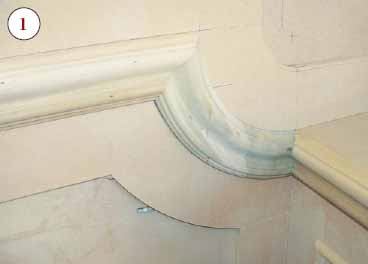
The first time I encountered this joint (1) — which
I’ve since seen referred to as a “hunting
miter” — I attempted to treat it like any other
miter. But it was immediately obvious that something was wrong:
The mitered moldings met at the corners, but the profiles
wouldn’t align. This problem becomes very noticeable on a
wide, detailed molding. In order for the profiles to line up
properly, the miter must be curved (2). Here are the steps I
follow to produce the joint.
I first trace the outlines of the two pieces on the wall and
mark the intersection points on both (3, 4). I make the cuts
slightly long, using a clamping fixture (5, 6).
Next I make templates out of 1/4-inch MDF for cutting the
curved joint. I start with two pieces of MDF the exact width of
each piece of molding. The straight template is easy: I trace
the profile, then project its flat sections to the edge of the
miter as reference points (7).
The template for the curved profile is trickier. Because each
of the reference points is at a different radius, I shift the
piece along the template blank and make a series of dots;
connecting the dots gives me reference lines in the area where
the joint will fall (8). Placing the two templates together
shows how the profiles would meet if cut as a standard straight
miter (9). With a bit of guessing, I plot the curved joint,
using a flexible protractor as a guide (10). Cutting this curve
aligns the profiles (11, 12).
I screw the templates to the backs of the moldings (13) and
use a top bearing bit to cut the curves (14). With some
fine-tuning, this joint will be perfect (15).
Jesper Cook is a finish carpenter in Los
Angeles.
Giant Jig for Big Ellipses
Most carpenters know how to draw an ellipse using string, a
pencil, and a couple of nails. But once it’s drawn,
cutting and sanding a perfectly smooth elliptical curve takes
some time.
Stew Junge of Landmark Finish in Boxford, Mass., had a lot of
elliptical head casings to make, so he built this large router
jig. It’s a temporary setup: strips of wood nailed to the
floor in a “T” configuration, spaced apart so that
blocks of wood can slide between them (1, 2). The router
trammel is attached with a single screw to each block so that
the screws can pivot and the blocks can slide in the channels
created by the wood strips. The shape of the ellipse is
determined by the distance between the edge of the router bit
and each of the pivot points (3).
Using a spiral cutter, Junge cuts the ellipse in multiple
passes, lowering the bit gradually into the stock — in
this case a sheet of MDF. A block of wood screwed to the end of
the trammel supports the router above the work (4). Changing
the size and shape of the ellipse is simply a matter of moving
the pivot points. — David Frane
Tree Huggers at Work
by Dave West
We were building a new home on a site where a previous house
had stood for years, and the client was adamant that we protect
three irreplaceable ornamental trees during construction. After
talking with the crew, we decided that surrounding the trees
with snow fencing wouldn’t cut it. Instead, we came up
with our own wooden armor, which resembles giant snow
fencing.
To make it, we laid 2x6s side-by-side — separated by
gaps of roughly 2 inches — across a pair of sawhorses,
and attached them to each other with galvanized plumber’s
strapping and 1 1/4-inch screws. Then we simply rolled the
assembly up, stood it against the tree, and unrolled it around
the trunk, securing it with the loose strapping at each
end.
The entire process took a couple of hours and cost about $200
in materials — a lot less than I would have paid had any
harm come to those trees. At the end of the job, the owner
asked us to leave the armor on while the landscaping took
place.
Dave West owns Meadowview Construction in
Topsfield, Mass.