Last month, in Part One, the author explained how he installs the landing newel and assembles the rake rail and starting volute at its permanent, working height by using temporary rail stands. This month, in Part Two, he shows how he makes a customized gooseneck for the landing newel, anchors the volute newel in the bullnose tread and riser, and installs the balusters. Residential codes now call for the rake rail to be 34 inches above a line projected vertically from the tread nose, and for the landing rail to be at least 36 inches above the finish floor. If you project these two heights to their point of intersection, it will occur somewhere behind the landing newel.
In post-to-post rail systems, an elongated top square on the newel catches both rails at their different heights, but with an over-the-post system a gooseneck fitting must be used to make the transition. The pitch of a manufactured gooseneck can be adjusted to tangent, but every stair is different in regard to the height of the rail, the location of the newel, and the pitch of the rake rail.
These factors all affect the rise of the gooseneck, and consequently no stock-standard gooseneck can be used in all cases.
Custom gooseneck. In the case of our demonstration stair, the straight, vertical stem of the gooseneck cannot be cut short enough to fit the mandatory 34-inch rake-rail height. What I do in this situation is site-build a “custom” gooseneck using an up-easing and a level newel cap.
First, I place the cap on the landing newel. I then temporarily attach the up-easing to a short piece of straight rail and place it on the rail stand, off to one side so that I can slide it up past the cap to find the common mitered angle. Because we have a straight rail intersecting a curved easing, the miters won’t necessarily be 45 degrees, or even the same angle piece for piece. I clamp the easing tight to the stand and carefully mark the long and short points of the miter cuts on both fittings. I make the cuts on the miter saw and check the fit.
Epoxy dowel. To assemble the two pieces, I use what I call an “epoxy dowel.” I drill matching 1/2-inch-diameter holes in both ends, then flood the holes and coat the joint with two-part five-minute epoxy — the kind that comes in a double syringe — and insert a 3/8-inch-diameter dowel. The undersize dowel allows some fine adjustment, and the epoxy fills the spaces to make a very strong joint. I use a spring clamp to hold the pieces firmly together until the epoxy sets.
With my newly crafted fitting set on the newel post, I mark its endpoint on the handrail platform. Now I can align the volute assembly back on the stand and transfer the gooseneck mark to the straight rail for cutting. Then I bolt all the parts together, but still don’t glue anything until I’ve checked the final fit from newel to newel. I’ll install the volute newel next.
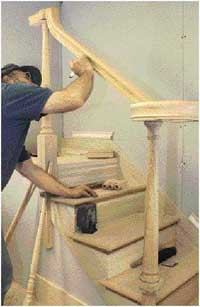
The Volute Newel
Although we used a good-quality manufactured bullnose tread and riser on this staircase, the hollow, rounded riser end needed some remedial reinforcement before installation. Codes require that guardrails be able to withstand a sideways force of at least 200 pounds, and the newel takes up most of this load. Therefore, the point of attachment must be extremely solid.


