Having rebuilt a number of rotten bathroom walls, I’ve come to believe that windows should not be placed inside the shower enclosure. But there are times when there’s no other option.
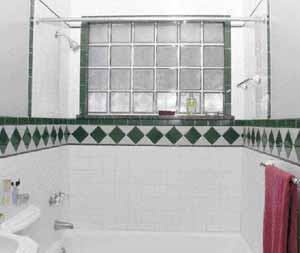
When I expanded and remodeled the 5-foot-by-12-foot bathroom shown here, for example, there was only one logical place to put the tub: along the end wall. Since that was the sole exterior wall, it was the only possible place for a window.
If I can’t avoid placing a window above a tub, I use glass block, so that the window and all the trimmings can be made with rotproof materials. In this particular project, I used concrete and granite for the sill, ceramic tile for the window surround, and glass block laid in mortar for the window panel.
Glass block offers privacy without vinyl curtains or blinds, which tend to harbor mold; also, the construction of a glass-block window is seamless, which means that keeping water out of the wall is much easier than it would be with an operable window.
Framing a Waterproof Rough Opening
Stone, concrete, tile, glass, and mortar are great finishes to use in bathrooms because they’re unaffected by moisture. The underlying wooden framing, however, is a different story. Untreated wood rots and attracts termites and carpenter ants when it gets wet. And any wood — treated or not — absorbs water and swells, then shrinks as it dries, causing all sorts of mischief. In addition, wet wood promotes the growth of mold.
So my goal in this project was twofold: to keep water from getting into the framing in the first place, and to provide a way for the framing to dry out if moisture still manages to penetrate.
For starters, I used treated framing lumber, inexpensive insurance against termites, carpenter ants, fungi, and mold. Built with 2x6s, the wall had plenty of depth for insulation and for supporting the window’s wide granite sill and 4-inch-thick blocks.
Also, I sheathed the inner face of the framing with 3/4-inch Structurwood Edge Gold sheathing (Weyerhaeuser, 800/525-5440, www.structurwood.com). Designed for floors, these T&G OSB panels hold up extremely well in the presence of water; they would provide solid backing for the tile backerboard and for future grab bars.
Although the sheathing did add 3/4 inch to the total thickness of the wall, it also allowed the final, finished depth of the sill inside the bathroom to be 4 inches, a perfect shelf width for soap dishes, shampoo bottles, and other showering necessities.
In addition to placing polyethylene between the OSB and backerboard, I covered the bottom of the window opening with a peel-and-stick elastomeric membrane, carefully detailing the corners of the opening where the sides and bottom meet.
I wrapped the membrane up the first 5 inches of the rough-opening sides and folded it down a few inches over both sides of the wall. The membrane separates the concrete sill from the wood framing and serves as a waterproofing membrane if the concrete gets damp.
On the outside, I sheathed the wall in fiberboard, a vapor-permeable sheathing with a proven track record here in North Carolina’s hot and humid climate. The fiberboard should allow any water that makes it into the wall cavity to dry to the outside.
Thermal Performance of Glass Block
|
|---|
Cast Concrete Sill Is Key
To manage water flowing down the vertical glass-block panel onto the horizontal sill, I designed a 41/2-inch-thick cast-in-place concrete sill.
On the exterior, the sill extends 3 inches beyond the existing siding, providing a generous overhang that will project over the new rain-screen detail and fiber-cement siding planned for the house.
From the point where the outside face of the glass block meets the sill, the sill slopes a steep 20 degrees to direct rainwater flowing down the glass panel to the outer edge of the sill.
On the underside, a mild 5-degree slope with a drip groove keeps water flowing off the sill rather than moving back toward the house through surface tension, which can cause water to cling to the underside of horizontal (or nearly horizontal) surfaces.
The concrete sill is 6 inches wider than the glass-block panel, allowing it to extend to the outside of the 4-inch-wide exterior window trim. Because the wood casing terminates over the sill instead of running past it on either side, water running down the casing will flow over the top of the sill and drop onto the ground rather than toward the building envelope.
Forming the sill. To make the sill, I assembled L-shaped brackets out of some scrap 2-by material and attached them to the exterior of the wall. I then carefully built the formwork, making sure that the sill’s dimensions would be accurate and that concrete did not leak out during the pour.
I formed the drip channel with a strip of wood ripped to about 1/2 inch square. Beveling the two sides slightly so that the wood strip was trapezoidal in shape and applying paraffin to the surface before tacking it in the form made it easier to remove the strip without damaging the new concrete.
On top of the form, toward the inside, I used a piece of 2×6 ripped to 4 1/2 inches wide to form a 1 1/2-inch-deep rabbet in the concrete sill. This rabbet accommodates the finished granite sill.
Placing and finishing the concrete. Before pouring the concrete, I placed a piece of fiberboard at each end of the form to allow vapor diffusion at the ends of the cast-in-place concrete near the outside wall.
I made the concrete for the sill out of a 3-to-1 mixture of white concrete sand and white portland cement. After allowing the concrete to cure for a couple of days, I carefully removed the forms and finished the surface of the sill with a rubstone, using a slurry made of equal parts white portland cement and white sand mixed with water to the consistency of grits.
I brushed the slurry on, then rubbed the surface with the stone, a process that grinds off high spots and fills in surface voids at the same time.
After finishing the surface of the concrete sill, I installed the 6-inch by 52 3/4-inch by 1 1/4-inch-thick granite slab, which had been cut and polished by a local fabricator.
The vertical joint between the granite sill and the concrete is centered within the 4-inch thickness of the glass-block panel. With the panel straddling this joint, and the interior and exterior sills sloped away, water running down both faces of the panel will flow away from the joint.
My final step was to install two treated trimmer studs on each side of the window frame, thus decreasing the width of the framed opening by 3 inches on each side. I left half-inch gaps under these trimmers, which are wrapped with peel-and-stick membrane, and filled each gap with sealant.
Later, after installing the backerboard and tile, I gave each gap another half inch of sealant.
Glass Block Finishes The Opening
Glass block is unforgiving, so it’s important to start on as straight and level a surface as you can possibly create.
On this job, I checked and rechecked my form to make sure that the concrete sill was straight and level. And during installation I aligned and spaced the blocks in the first course very carefully, because my work there would affect all of the courses above.
When building a glass-block window, the general idea is to build a panel that is supported by — but not built hard against — the opening. (For more information on building with glass block, visit Pittsburgh Corning’s informative Web site, www.pittsburghcorning.com; or see the JLC articles “Glass Block in the Bathroom,” 11/92, and “Glass Block Tips & Tricks,” 11/00.)
I built this glass-block panel with a 1/2-inch clearance between the top and sides of the panel and the opening.
To hold the panel in position, I used Pittsburgh Corning’s panel anchors, screwing them into the sides of the opening and setting them in the mortar joints.
During installation, polyethylene expansion strips placed between the panel and the rough opening helped hold the blocks in place. Later, these expansion strips would serve as a backer for the caulk I’d use to seal the interior and exterior perimeters of the window.
Because glass doesn’t absorb water from mortar, glass block tends to slide all over the place if you make the mortar too wet or work with a heavy hand. I made things easier by using Pittsburgh Corning’s specially formulated glass-block mortar with a stiff mix, which helped reduce the tendency of the glass units to “float” on the surface of the wet mortar.
I also used the company’s VeriTru plastic spacers, which are designed to hold the blocks in place as the mortar dries.
Along with the panel anchors, the finishing materials — backerboard and tile on the inside, wood window casings on the outside — help hold the finished panel in place. Instead of installing these materials tight against the panel, I maintained a small joint, which I later filled with caulk.
Besides accommodating differential movement between the glass-block panel and the framing, this caulked sealant joint prevents air and water from moving through the window.
John Carroll is a mason and builder in Durham, N.C., and the author of Measuring, Marking & Layout.


