When I was in commercial construction, I used formal scheduling procedures on all of my projects. With formal scheduling, each task or activity in the job is written down, placed in sequence, and assigned a certain amount of time. Years later, when I switched to residential construction, I felt that houses were so simple a formal schedule wasn’t needed. I decided I could get by with a daily to-do list and a list of future tasks. At first, things went smoothly with this approach, but before long I found that materials were not arriving on time, specialty contractors were not being given enough notice, and in general the house was not being built in the most efficient manner. All of this translated into more headaches and frustration and less profit for me.
The question was what to do about it. And the obvious answer was to formally schedule the house.
A False Start
Naturally, I had to do it the hard way first. I made a list of the major activities required to build a house and purchased a copy of Microsoft Project. But I ran into problems when I started entering the activities into the computer. Sequencing tasks was difficult because they wouldn’t all fit on the screen at the same time. Unable to see the big picture, I made mistakes and ended up with a schedule that had flooring going in after the closing date — not the best approach.
So I decided to go back to the way I’d originally scheduled jobs, prior to scheduling software: I wrote each activity on a 3×5 note card and then taped the cards in order on the wall. This allowed me to see the entire project at once and understand how tasks related. It’s the foundation for the procedure I use today.
Begin With a List
Using my estimate as a starting point, I now make a list of the activities — or tasks — needed to build a house and write each one on a Post-it note. I use Post-its because they’re easy to move around on the wall.
Although I like to think in terms of building from the ground up, I don’t write the notes in any particular order. That comes later.
Each note contains the name of an activity and the number of working days it will take to complete.
I base the number on my own experience, conversations with subcontractors, or records from past jobs. If I think roughing in the plumbing fixtures will take eight days, the note will read “Rough In Plumbing Fixtures 8D.” At this point, I don’t care about the exact date the work will happen — only how long it will take.
Build a Sequence
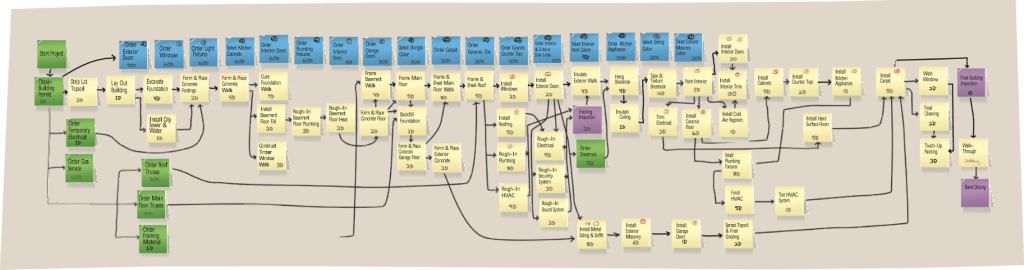
Once all the activities are written on Post-its, I tape a large strip of paper (brown parcel paper works well) onto the wall and begin to stick notes to it. The paper is there because later on I will draw lines between the notes. My goal during this phase is to put the tasks into a logical sequence. The end result is a flow chart of basic activities: frame the walls, frame the roof, install roofing, install siding, and so on.
Plan Ordering Tasks
After I’ve determined the basic sequence, I look at each activity and ask myself what I need to have on site to complete it. If the activity is “Install Kitchen Cabinets,” for instance, the cabinets will need to be ordered far enough in advance that they are there when we need them. If the lead time for cabinets is 60 working days, I take a Post-it and write “Select Kitchen Cabinets 60D” on it. This note goes up on the wall with all the others. Later on, I’ll attach a specific date to this ordering task — 60 working days before the date that we plan to install cabinets.
Scheduling exact dates for ordering material may seem picky, but in my experience, the main reason construction jobs run late is that materials don’t arrive on time. When they do finally show up, the person who is supposed to install them may be on another job. This is especially true of special-order items and ones with long lead times.
To make the ordering activities stand out, I write them on a particular color of Post-it. The ordering activities that involve client decisions go on blue Post-its; when I look at the flow chart and see blue, it reminds me that I need to get the client to decide something a certain number of days before some other activity can happen. The ordering activities that don’t involve client decisions — ordering roof trusses, for example — go on green Post-its. Each ordering activity is linked by number to a corresponding work activity. For example, the 14th ordering activity I wrote down was “Select Interior Paint Colors,” so I wrote the number 14 on that blue Post-it and on the yellow Post-it for the task “Paint Interior.” Tasks that involve the building inspector or the bank are written on purple Post-its.
Break Down Big Jobs
The next step is to look at each activity and determine whether it should be divided into smaller tasks. For example, on a simple project, framing could be a single activity. But on a bigger, more complicated job, framing may be broken down into tasks like floor framing, wall framing, roof framing, and installing exterior doors and windows. That makes it easier to determine when to order particular groups of material, because you probably wouldn’t want all the framing, doors, and windows to show up at the same time.
Once the project is broken down into sufficient detail, I try to find activities that can happen concurrently. For instance, I could schedule roofing at the same time as plumbing and hvac rough-in. When activities are scheduled concurrently, the Post-it notes split into parallel lines of tasks.
To avoid confusion, I draw lines between the notes to indicate where they belong in the sequence of activities. There’s nothing unusual about scheduling tasks concurrently — we all do it. The difference in my method is that I plan for it consciously, which allows me to squeeze the maximum amount of time out of the schedule.
If I don’t like the way the schedule is shaping up, I can rearrange the notes until I’m satisfied that the activities are laid out in a logical way. Then it’s time to calculate the duration of the project by adding up the durations in the longest line of notes.
Benefits for All
Once I know how long the job will take and have decided on a starting date, I can attach specific dates to specific activities. That allows me to give the client definite cutoff dates for choosing things like fixtures, flooring, and colors. And if the client is late in making selections, it’s relatively easy to document that extra time will be needed to complete the house.
Also, with a realistic schedule I can give specialty subs two or three months’ notice about when they’ll be needed on the job. If something changes beforehand, I can keep them informed. At first when I started scheduling this way, the specialty contractors didn’t take me seriously; now they appreciate the long notice. They know they’ll be needed within a few days of the original date and that the house will be ready for their work.
Putting together my first Post-it note schedule took a fair amount of time, but after that I was able to schedule similar projects more quickly. The greatest benefits? I’ve reduced the total time it takes my company to build a house, and I can give the client a reasonable completion date instead of just a guess.
A Role for the Computer
You can run this kind of scheduling system completely on paper, which is how I did it for many years. Recently, though, I began using a computerized scheduling program — not as a substitute for the process I’ve described, but in addition to it.
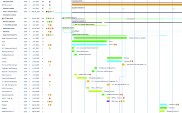
I still list the activities, decide their duration, and arrange them in order on paper. Only then do I turn to the computer. Entering the flow-chart information into a scheduling program (I use Microsoft Project) is no big deal. I let the computer do what computers are good at — crunch the numbers. The program adds up durations based on the sequences in the Post-it flow chart. Then, after I enter a starting date, it calculates and assigns dates to each activity.
Using the computer also makes updating the schedule easier because the program can calculate total duration and change activity dates much faster than I can.
Kenneth W. Andersen and Norma Jean Andersen own KWA Constructors Inc. in West Fargo, N.D.