I’m constantly amazed at the reluctance shown by professional builders and remodelers to discuss real numbers with their clients. Hiding or obscuring a project’s actual costs in an attempt to make bids and estimates more acceptable is way too common.
The reality is that most clients don’t understand the concepts of markup and margin, overhead, and direct job costs. Why would they? It’s our responsibility to teach them these terms, just as we explain the process and schedule involved in designing and building their project.
The best policy is to tell the truth. If everyone in our industry did so, perhaps many of the negative misconceptions that work against us in the marketplace would finally begin to disappear.
Questions, Questions
Clients will always have questions about our pricing; it’s a natural and practical business concern. But questions aren’t threats or accusations, or even based in suspicion. Homeowners just want to understand the process and costs.
When clients ask me about my prices, I’m happy to discuss our pricing structure and how our company’s business strategies fit into the industry nationwide. Typically, it’s the overall concepts that they don’t get, but when presented with a confident explanation of how the business works, they move right along.
This, of course, assumes that you are confident speaking about the financial concepts, so don’t forget to learn them.
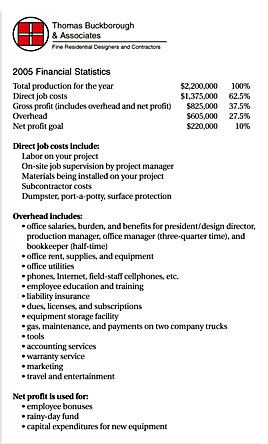
Open Books
I use several sources of information. For instance, I have a typed sheet (shown at left) that explains our particular financial formula for the year, including expected job-cost, overhead, and profit percentages. I’ve listed the types of expenses in each category and how they are related to the job.
I explain to the clients how a strong company culture directly benefits their project and how training and staff meetings fit into this picture. By revealing the background structure of our business in this manner, I let clients see that the overall formula is arrived at in the same way that all legitimate businesses set their prices. We calculate the expected expenses and revenue and then do the math to come up with the necessary markup amount.
Next I demonstrate how we estimate a project. I show them the blank Excel spreadsheet we use as the foundation for our estimates. I describe how the various cells in the spreadsheet relate to what I previously told them about our financial formula.
Finally, I have a variety of articles and charts copied from books and magazines that I use to show how our finances relate to industry averages. The item I use most is a graph showing high, low, and average gross profit produced by companies at various volume levels (shown above). Our target of 37.5 percent happens to be slightly above the average at our volume level on the graph.
I have other pages available from professional remodeling books showing typical markup ranges and how to come up with markup, as well as copied articles on competitive bidding and other topics. I don’t usually need these other support materials, but I keep them for those rare clients who want further details.
No Excuses
If we want to encounter less price resistance from our clients, then we have to deal with our own resistance first, and make sure that our numbers accurately reflect the selling price of the job. Otherwise, we’re deceiving ourselves — perhaps to the extent that we can’t afford to remain in business.
This simple chart — which tracks average gross profits in the building industry — allows the author’s clients to see how his company’s finances relate to industry averages.
Time-worn excuses like “I can’t charge that in my market” are no good. The truth is the best and most solid ground to stand on.
Knowing your numbers, committing yourself to truthfulness, and being prepared and confident are the only tools you’ll need to talk about money with your clients.
If we all take this approach, we’ll elevate the professional stature of the entire industry.
Thomas Buckborough owns Thomas Buckborough & Associates, a design/build remodeling company in Concord, Mass.
Selling Remodeling Jobs
by Steve Klitsch Some people have a natural talent for sales. That’s great for them, but most of us aren’t quite so lucky — we have to work at selling. Like any small contracting company, my remodeling firm needs to bring in a steady stream of new jobs to stay afloat, and this depends on my efforts as owner. After reading numerous books and articles on sales techniques and attending seminars presented by some of the nation’s best salespeople, I’ve boiled everything I’ve learned down to a simple systematic approach that’s improved my chances of closing a sale.
The First Phone Call
Most sales opportunities begin with a phone call to your office. Any callers interested in your business should be greeted sincerely and enthusiastically. The goal is to make them feel as if they are your only clients — but you should also take this opportunity to learn why they are considering building or remodeling. Ask them how they learned about your company, too. The more you know about each of your prospects, the greater the chances of closing the deal when you meet face-to-face.
Once you know the general scope of a project, take some time to set an agenda. Explain to your prospects what is involved with the sales appointment — approximately how long it will last and what will take place. For example, you can mention that you may have product samples to show them. If your meeting will be at their home, ask if there will be table space available to spread out papers, do some sketches, and display your portfolio.
Have an Agenda
Typically, I present my agenda like this: “Mr. Smith, when I arrive I’d like to take a few minutes to tell you about myself and my company. Then I’d like you and your wife to tell me about your project and discuss any concerns you have. Next we’ll talk about the major milestones in getting from the design phase to completion, and then talk a little about financing.
“Finally, I’ll explain our warranty and what steps are required to get your project under way. Does that sound okay to you, Mr. Smith?”
Make sure to get an affirmation from the prospect. With your agenda established, you’ll have much greater control of the sales process. Sometimes a client will disagree with your agenda and want to set his own. When that happens, you might ask yourself if you want to work with this person; I probably wouldn’t.
Be Prepared
When it comes time for that first client meeting, mentally prepare yourself ahead of time. Are you focused? Are you dressed like a professional?
Jumping in the truck at the end of the day and rushing to a potential client’s home covered in sawdust may not send the right message. You need all of your attention devoted to this sales call, so do what you can to rid your mind of distractions — and definitely turn off the cellphone or pager.
Also, make sure you’ve prepared your materials so that your clients can be engaged in the buying process. Prospects love to see and touch what you’re selling. Auto dealers let shoppers test-drive new cars because they know that once prospective buyers are surrounded by the smell and feel of a new car, they imagine themselves owning it.
The same can be true with building products. If you’re using a laptop, let the client control your virtual project tour or PowerPoint presentation.
Be Punctual
Arriving on time for the appointment shows that you have respect for your clients and their busy schedules. Once at the door, I introduce myself with a firm handshake, which shows enthusiasm and confidence. Selling is an emotional experience; you can transfer some of that emotion with a genuine handshake.
I don’t assume the person who greets me at the door is the prospect; it’s better to say, “I have an appointment to meet Mr. and Mrs. So-and-so.”
Tell Your Story
Take some time to tell the prospects about you and your work history in the community. Mention awards and community-service programs or associations you belong to. Your prospects are interested in learning more about the person who just walked into their home.
I also describe my company and the kinds of subcontractors and people that work for me. I’ll try to find something I have in common with the homeowners: Maybe I or one of my staff lives nearby, or I’ve done another job down the street.
Be a Good Listener
Many novice salespeople think they need to do all the talking, but in a sales appointment, listening can be more important. You’ll gather useful information by asking probing questions — questions that require more than a simple “yes” or “no” for an answer.
The prospects will tell you what they’re looking for — a bigger family room, an extra bath, a finished basement for play space. After you’ve learned what it is that they envision, ask a variety of “why” questions to get more details.
Qualify the Project
Once I have enough information, I’ll take the time to restate the project and explain the construction process. This will help the potential clients see whether our company is a good fit for the job. I call this “qualifying” the project.
For instance, I might say something like this: “If I understand you, Mr. Prospect, you want to build a small addition to your dining room. So what we will do is have our designer draw up the plans, and then we’ll submit them to the local zoning office to obtain a building permit.
“About a week after the permit is issued, we’ll start work with excavation, concrete, and foundation work. Then our framing crew will arrive and assemble the floor, walls, and roof structure.
“Next, we’ll have the siding and roofing installed while the electrician is connecting the wires and lighting on the interior. After the building inspector checks our work, we’ll insulate and hang the drywall. After the drywall is taped, sanded, and primed, the finish carpenter will come in and trim out the room with moldings and baseboards.
“Our painter comes next; he’ll apply two coats of the finish color you select, then the flooring contractor will install the finished flooring. While that is going on, our cleanup crew will remove the last of the job-site trash and rake the work area, then use a magnet to pick up any stray nails or other small metal objects. That will complete your project.”
I then ask for an affirmation: “Is that along the lines of what you were thinking?” Wait for their answer. If it’s no, I’ll go back to requalify the project. If it’s yes, it means you’ve listened well and are closer to asking for the “order.”
This may sound like a lot to say, but if done correctly and sincerely, you will build value and trust. Don’t assume that the prospects understand the building process. They’ll appreciate the details you give them. And if you forget something, don’t worry: They’ll tell you, with no harm done.
Customize your approach for the various types of projects you build. Rehearse it — develop a comfortable routine for this important step in your sales efforts. It will pay off.
Get Affirmations
Getting affirmations from the prospects during the sales appointment will help you close the sale. It’s okay to ask questions that will give you the response you’re looking for.
Think of this not as manipulation but as steering the process. As long as you are honest and ethical about your sales process and can provide the services that you’re selling, steering the decision process is part of being a great salesperson.
For example, I might ask, “If we can agree on the price, could we get started on your project in about six to seven weeks? We have an opening then.”
Get an affirmation and move on to another question: “If I can build the project within the budget we’ve discussed, can I bring a proposal back to you on Thursday so that we can do business together?”
This is a way to encourage the prospects to make a decision to hire me; getting affirmations along the way helps guide the decision-making process.
Ask for the Order
Research has established that as many as two-thirds of salespeople do not ask for the order — that is, they don’t ask for the sale.
Ask closing questions in a way that encourages your prospects to make a decision; nobody makes money on a “maybe.” I ask and encourage people to do business with me. If they don’t want to, that’s okay, too: At least they’ve made a decision.
However, my motto is that for every “no” I get, I move closer to a “yes.”
If I get a no, I’ll close the file and wish the prospect good luck. Then, a few months later, I’ll call them back just to check in. You’d be surprised at how many contracts eventually get signed that way.
Steve Klitsch, CAPS, owns Creative Concepts Remodeling in Germantown, Md.
The Color-Coded Office
by Melanie Hodgdon
I admit it. I carry a wad of colored markers the way Wyatt Earp carried his six-shooters, and I feel just as helpless without them.
Colors (unless you’re color-blind, obviously) provide an easy way to discriminate visually among things — 25 sheets of paper in a client’s folder, say, or six three-ring binders piled on your desk.
Any time not spent looking at something irrelevant can be devoted to something more productive, and color can help you go straight to what you want.
The primary reason to use color is for identification. I use colored forms, colored file folders, colored labels and dots, and colored notations on paperwork.
Colored Forms
After creating timecards for a contractor, I instructed that they always be photocopied onto green paper. Eight years later, the crew still refers to them not as time cards but as “green sheets.”
A cabinetmaking company uses a form to log items that are purchased in bulk but later incorporated into specific customer projects; the company copies these forms onto blue paper. Nobody calls the sheets “in-house inventory forms”; when the supply runs low, employees request more “blue sheets.”
It’s an approach that makes office procedures so much easier for everyone: If you’re requesting that employees hand in paperwork, it’s clearer to have a box called “Blue Sheets” (and be sure to make the sign blue, as well) than one called “In-house Inventory Forms.”
When forms have similar names or purposes, color-coding reduces confusion. A form on colored paper inside a folder is easy to spot. My lead sheets are on goldenrod; whenever I open a customer folder I can instantly pick out the address or any other information I need on that sheet.
Colored forms stand out in the clutter of paperwork that periodically burdens any desk, too.
Folders, Labels, Dots
Colored file folders make filing faster and more reliable.
When you’re training a new employee or creating procedural manuals, color can reflect general systems (customers have green folders for “money in” and vendors have red folders for “money out”). If a file is left out, it can be identified instantly and refiled with more confidence.
You can also use colored files, labels, or dots to distinguish among related files stored within a single hanging file.
In my office, for example, I generally have several files for each client: One includes all invoicing information (red dot); the second contains hardware information, passwords, serial numbers, and registration information on software (green dot); and the third holds organizational charts, samples of forms I’ve designed for them, and general notes (blue dot).
Thanks to this approach, I never have to wade through irrelevant pieces of paper.
Highlighters
When I enter a bill into my computer, I always put a checkmark on it, using a big pink highlighter. If I drop a stack of bills on the floor, I want to see at a glance which have been entered into the computer and which haven’t.
When I’m reconciling my bank statement, I use a green highlighter to check off the deposits and credits and a pink one to check off the checks and debits. This helps me keep my place, and on bank statements where the debits and credits aren’t displayed in separate columns, the color separation can save time.
Try it. You might even have fun with it.
Melanie Hodgdon is a business systems consultant for builders. She lives in Bristol, Maine.