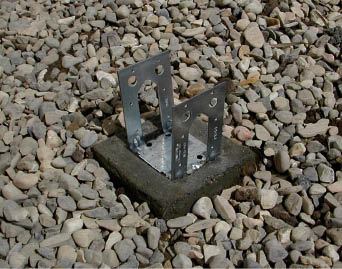
Elegant is not a word I would use to describe the round concrete footings that most decks are built on. The tops of these footings are much larger than is required for load bearing, so for the past eight years I’ve been shaping the tops of my footings into a sort of truncated pyramid to decrease their visible footprint (see photo, above).
To do this, I use homemade reusable forms. They’re wider at the bottom, which makes them simple to lift right off the set concrete. They’re also easy to level, and since I place the forms after the footing holes are dug, aligning them under where the beams will go is a snap.
Each form is made from just four pieces of 1×4: two 24-inch-long pieces and two 7-inch-long cross members (Figure 1). I use Douglas fir because it can withstand being repeatedly screwed to the stakes that hold the form in place. I’ve made forms from composite decking, but they haven’t held up as well to repeated use.
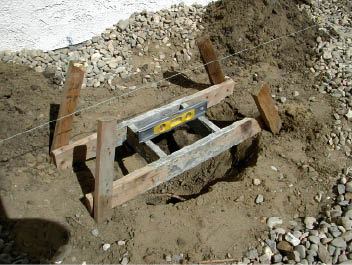
Figure 1. The form for the top of the footing is made from 1x4s fastened together at a slight angle. Four stakes support it and keep it level above the footing hole.
Before cutting the 1×4 into four pieces, I rip one face at a 5-degree bevel. When the form is assembled, the bevel will face inward to create the pyramidal shape of the pier. I cut the ends of the two cross members at 5 degrees to fit to the bevel on the long pieces; then I fasten the cross pieces to the long members 7 inches apart.
I use a string line as a guide to dig the footing holes and then to locate the centers of my homemade forms. I drive four stakes into the ground to suspend each form so that the top of the concrete will end up above finished grade to protect the posts from moisture damage. Once I make sure the form is level, I drive screws through the stakes into the form itself to hold it in position.
Typically, a builder would place a cardboard form in each footing hole, fill the form with concrete, and backfill the hole with loose soil. The problem with this approach, however, is the backfill can take years to settle, during which time the concrete footing can easily shift in the loose soil. Instead, I shovel the concrete directly into the hole, without the cardboard tube. That way, the concrete conforms exactly to the shape of the hole. Because undisturbed soil supports the footing on all sides, it will be stable as soon as the concrete has set.
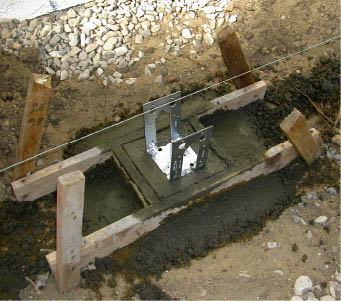
Figure 2. A string aligns the placement of a post base in wet concrete. Once the concrete has set, it will be easy to remove the form.
I tamp the concrete thoroughly and screed it flat at the top of the form. Before the concrete begins to set up, I insert the appropriate post or column base connector or hot-dipped galvanized J-bolt, again using the string as a guide (Figure 2). The next day, I’ll remove the fasteners holding the form to the stakes and lift the form straight off the concrete, ready for reuse.
William Bolton is a deck builder in Santa Barbara, Calif.


