Along the coast where wind-blown rain is a regular weather feature, it’s no surprise to builders that the exterior of a home must be carefully detailed to manage water. Properly installed housewrap and flashing are the key elements of an effective water-resistive barrier, which is essential to protecting walls (see “Common Callbacks,” January/February 2007; www.coastalcontractor.net). But rainwater is not the only moisture source. The air itself, particularly the humid air associated with coastal regions, carries a significant moisture load. This means that sealing up air leaks, not just water leaks, is a vital step to managing moisture, especially for homes in hot, humid climates.
Pressure at Work
Understanding the dynamics of moisture and air movement is the first step for proper moisture management. In hot, humid climates the outdoor air is obviously warmer, but it also typically contains much more moisture than the indoor air. When this hot, humid outdoor air gets pulled inside by an AC system’s huge blower and it hits the cold indoor surfaces, there is a very high potential for that moisture to condense.
A difference in air pressure between the inside and outside is the primary reason the outdoor air gets pulled inside. A leaky air conditioning system tends to put a home under negative pressure. The culprit is leaky ductwork, particularly in the supply ducts running through an attic or crawlspace, which lie outside the building enclosure. Since most AC systems tend to have more linear feet of supply ducts than return ducts, there are many more opportunities for leaks. And all those leaks are pushing conditioned air out of the system, where it is lost into the attic or crawlspace. An AC system is designed for the return side to pull the same volume of air as the supply side is supposed to deliver. When the supply side doesn’t deliver that air into the rooms, but the return side is still pulling that much air from the rooms, the indoor volume of the home is put under a negative pressure, and this will forcefully pull air — hot, humid air — through all the cracks and gaps in the building enclosure.
As soon as all that hot, humid air is pulled through the cracks and gaps, it hits the cool indoor surfaces of the conditioned interior and has tremendous potential to condense. Even by itself, humid air isn’t great. Dust mites thrive at high humidity levels, and people don’t. Our comfort zone is somewhere between 30% and 50% RH. But once moisture vapor has an opportunity to condense, turning to liquid water, it causes even more problems: it soaks into building materials and becomes a prime resource for mold and rot.
Now, let’s put all this in the context of a coastal home in a hot, humid climate. Frequent rain and high humidity mean exterior building materials get wet often and tend to dry slowly. Plus, the humid air is pulled into the home, where it can wet the interiors of building assemblies too. A leaky building that is put under a huge pressure differential by a leaky HVAC system becomes a superhighway for moisture to infiltrate on the back of the incoming air.
In this unforgiving climate, mold, rot, and decay will run rampant if we don’t address all of these issues during design and construction. We need to create a forgiving enclosure by defending the home on two fronts: (1) we must manage bulk moisture with a good water-resistive barrier (WRB), flashing, site drainage, and a sensible roof design; and (2) we need to manage air leaks — those through the enclosure, which bring humid air inside, as well as those in the HVAC system, which create conditions that forcefully drive air through the enclosure.
Simple Solutions
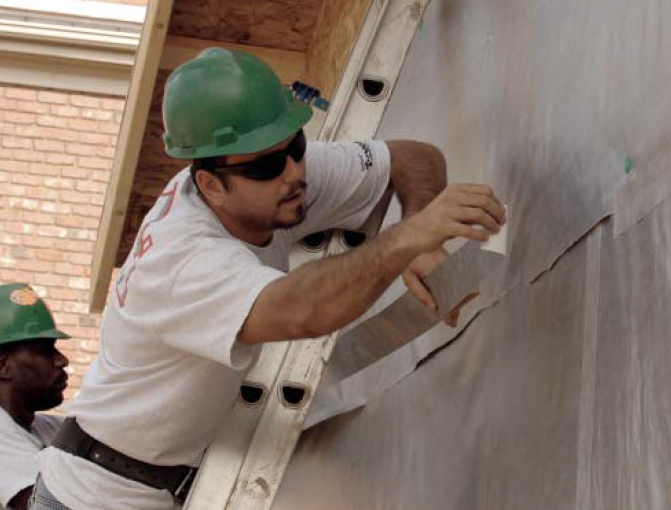
There is no magic bullet for reducing air leaks. A high-quality housewrap on the walls, properly lapped, taped at seams, and sealed around wall penetrations, can reduce air leakage in a typical home by 15% to 35%, on average. This can go a long way toward improving a home’s energy efficiency and reducing the chance of moisture problems.
But the housewrap is just one component. To be effective, it should be used in conjunction with other air-sealing techniques to advance the total performance of the home. We want a “belt and suspenders” approach to stopping air infiltration that addresses air leaks in walls, attics, crawlspaces, ductwork, window and door openings, and all penetrations through the enclosure. Viewed this way, an effective air barrier on a home means not only housewrap but also tape, spray foam, sill seal, and even sheathing and blocking that is strategically placed to limit airflow through building assemblies.
Here are some of the most important places to focus on air sealing:
Rim joist. The rim joist is a common area for air leakage. It’s nearly impossible to get a continuous seal from the inside, which is one of the best reasons for using a well-detailed housewrap on the exterior. In addition to being vulnerable to air leaks, the framing is a strong thermal bridge. Best practice calls for filling this cavity with a closed-cell spray foam. Be sure to check local fire code requirements for any exposed insulation.
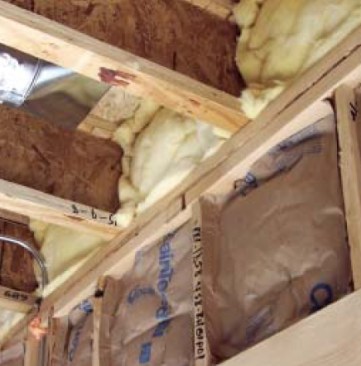
Fiberglass is not an air stop and cannot be relied upon to seal the rim joist.
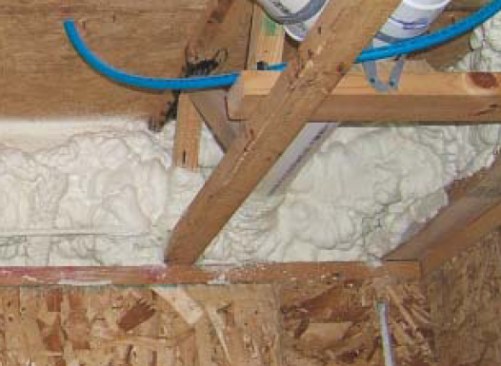
In most cases, best practice calls for sealing this area with closed-cell spray foam.
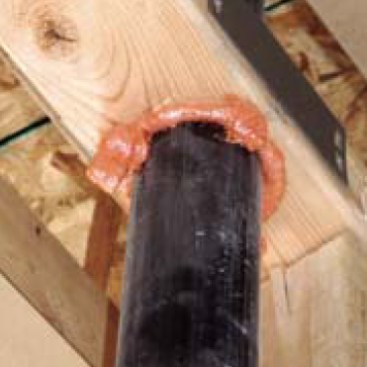
Wall penetrations. Where pipes run through exterior walls, seal them to the WRB with contractor’s tape to keep water out, and foam around the pipe from the inside to further stop air leaks. The same goes for AC line sets, light fixtures, and vent terminations that pass through a wall.
Attic bypasses. Plumbing vents, ducts, wires, and can lights routed through the attic end up riddling the top wall plates of partition walls with holes that allow air to leak into the attic. The best solution is to use a foam sealant to seal wiring and pipes through the top and bottom wall plates. If you must use recessed lighting, be sure to use airtight cans.
Every pipe and wire that passes through the top plate is an air leak that siphons conditioned air away from the living space. And because of the tendency of warm air to rise (called the “stack effect”), the air leaking out of all these wiring holes is driven by positive pressure, causing conditioned air to escape from the home even faster.

The solution is to seal each penetration with a spray-foam sealant.
Combustion appliance flues. Water heater and fireplace vents are typically installed in chases that open directly into the attic when the fire blocking is left out. The result is a wide-open conduit for air leakage though the ceiling. The solution is to block the top of the chase with a sheathing material, then cut a hole for the vent, maintaining the code-required distance from the heat vent and combustible. This gap can then be sealed with a metal collar.
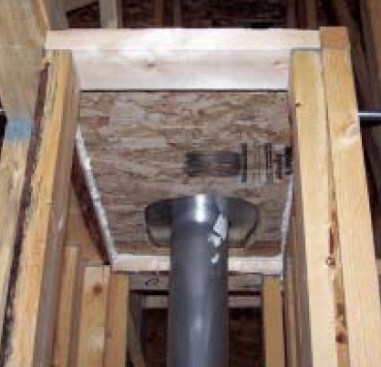
The top of a vent chase can dump a lot of conditioned air into an attic. Prior to installing the vent, cap the chase with OSB. Seal the edges of the OSB with a foam sealant, then seal the vent to the OSB with a metal collar. As you can tell, cutting the opening for the vent isn't something that requires a lot of precision. If it's a heating vent, the most important thing is to keep the OSB at least 2 inches from the metal vent.
Tubs and shower units are often installed right over open framing without any insulation or air barrier. Combined with the oversized cutout in the floor sheathing for the tub drain, you often end up with a huge raceway for air that is uninterrupted from the rim joist, through the floor system, and into the walls. The solution is to insulate the wall cavity and sheathe it before the tub gets installed.
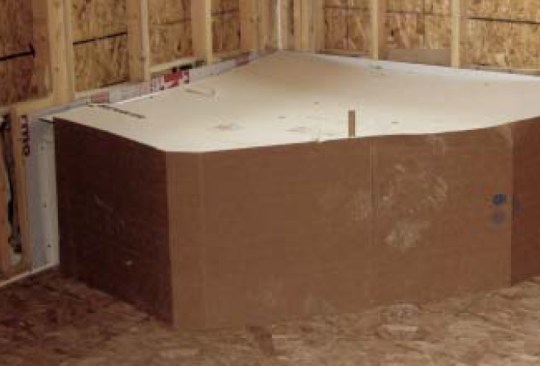
Before installing a tub unit, the wall cavity must be insulated and sheathed to stop the free transfer of air and energy. Thermo-ply or a similar type of sheathing is a good choice for this application because it doesn’t pack the wall out too far.
Window and door openings. Use a low-expansion foam to fill the gap between window or door units and the rough openings. Many builders stuff this gap with fiberglass insulation, but such an approach won’t work. Fiberglass will not stop air. Caulk may not be the best option, either. The ASTM 2112 window flashing standard recommends the sill flange along the bottom of the window be left open to allow water that leaks through the window unit to drain outside. When this is done, the caulk will never provide a perfect air seal.
HVAC ducts. It’s not uncommon to find homes with duct leaks amounting to 300 to 400 cfm. If this amount of air is escaping the system and putting the home under a negative pressure that draws the same amount of outdoor air inside, it can amount to almost half a cup of water per hour being deposited inside the walls on a 90°F day at 90% RH.
The best product for sealing the seams in metal register boots is a water-based mastic accompanied by a fiberglass mesh on seams and larger holes. These mastics have the consistency of mashed potatoes and can be easily spread over joints in the ductwork with a paintbrush or gloved hand. The seams in all register boots should be sealed with this mastic, applied thick enough to prevent the mastic from cracking when it cures.
Flex duct that is joined to the register boots should be secured with both duct tape and drawbands. But if you want a duct tape that actually stays on ducts over time, look for the UL 181 designation. UL 181 duct tapes usually have an acrylic- or butyl-based adhesive, which is less likely than rubber adhesive to dry out over time.
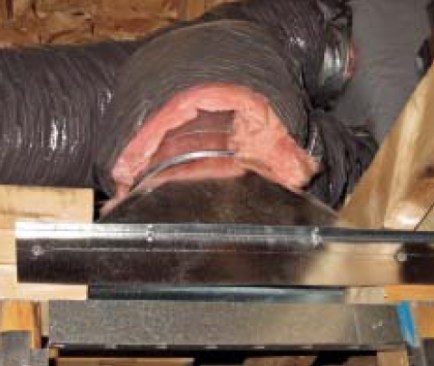
A poor (but unfortunately, common) duct connection to a boot
It should be executed as shown in this photo: Peel back the cover and fix the liner to the boot with acrylic tape and a draw band, as shown. To complete the connection, pull the cover back down. Tape and secure this with a drawband as well.
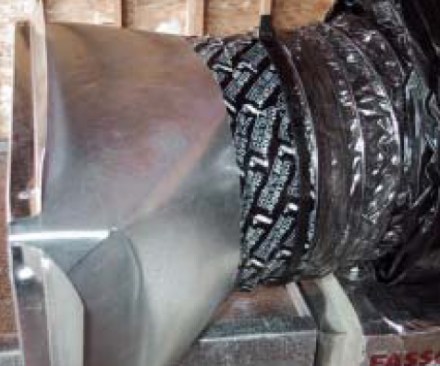
HVAC ducts also get routed poorly, which can intensify air leaks. Crushed and mangled supply runs will restrict airflow and increase the pressure inside the ducts, causing air to be forced out any leaks that do exist at a higher rate (Figure 6). To avoid problems, all ductwork should be supported well and runs kept as straight as possible. Sweeping curves are better than sharp bends. Do not kink, crush, or otherwise restrict the size of the duct when running it through framing or around plumbing and wiring connections. In addition, it’s important to caulk around the register boot where it meets the framing.
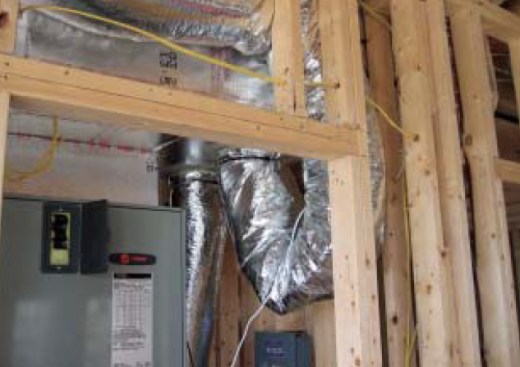
The kink in this duct will severely restrict airflow. Like a kink in a hose, the reduced size increases the pressure in the duct, causing any leaks to shoot air at a higher velocity.
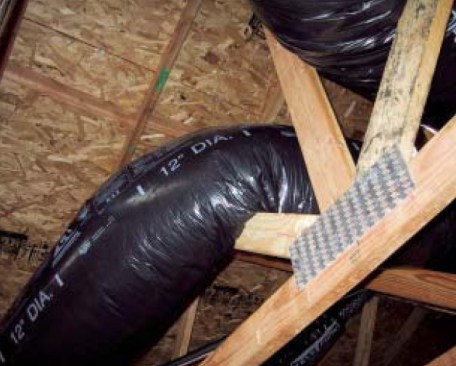
Fortunately, the HVAC installer didn’t cut out the truss members to make room for the ductwork. However, this sharp bend could have been easily avoided by rerouting the duct from the start. Codes require that duct be installed fully extended, not compressed.
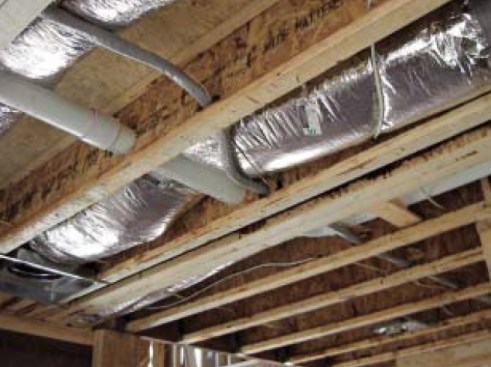
Coordinate the mechanical trades: This conflict between the HVAC duct and a plumbing drain could have been avoided by both trades meeting and reviewing the plans prior to the crews’ arrival on site.
Putting Diffusion in Perspective
So far, I have focused only on water and air leaks — the two biggest moisture movers. But there is a third way moisture can move through homes: by diffusion. Diffusion is the absorption of water vapor into a material, followed by the release of that moisture vapor to a drier side. Vapor retarders — materials designed to reduce moisture flow by diffusion — were originally developed for use in colder climates. There they are placed on the warm interior to prevent moist indoor air from diffusing outward. But vapor retarders should not be used on the warm side of walls in hot, humid climates.
When building materials get wet, we want them to dry out as fast as possible. The only way wet building materials can dry is by diffusion or evaporation. Therefore, we want to avoid the use of low-perm products on the exterior, where they can inhibit drying. I also think it’s important to avoid low-perm wall coverings, such as vinyl wallpaper, in wet areas, such as bathrooms. Instead, opt for a breathable latex paint over a glass-mat wallboard, which eliminates the paper face that provides a perfect food for mold.
All photos by the author.


