Q: I am putting a deck on a home with a water table trim. Can I attach the deck ledger directly to the water table or does it need to be removed?
A: Mike Guertin, a builder and remodeler in East Greenwich, R.I., and a presenter at JLC Live, responds: The answer to your question depends on whether the specific details of the house where you are building the deck can satisfy the prescriptive code conditions, or alternatively, whether your local code official would accept another ledger-fastening system. But even if you do need to remove the water table to mount the ledger, you can use a detail in the code that actually makes the flashing simpler.
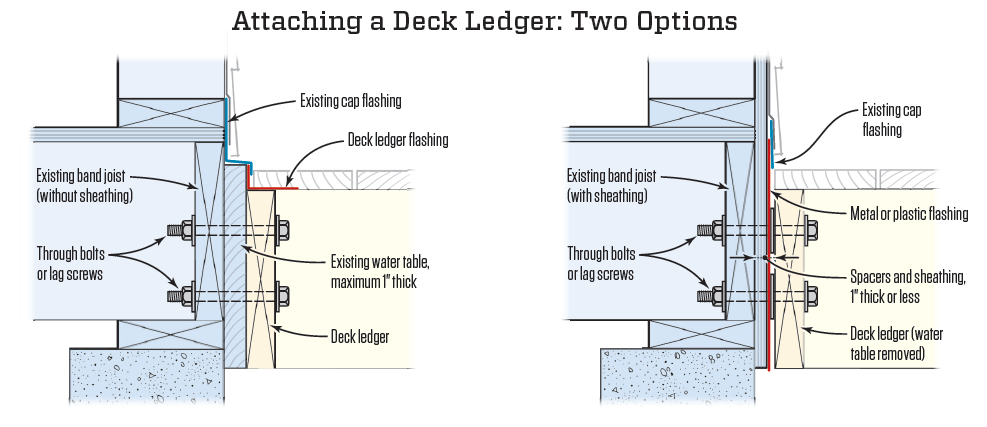
The 2015 IRC Table R507.2 () covers lag-screw and through-bolt fastening and is similar to the deck-ledger tables in the 2009 and 2012 IRC. Unlike those, however, the 2015 version provides a schedule for fastening a ledger with 1-inch-maximum sheathing thickness between the back side of the ledger and the face of the band joist. So if the water table trim on your client’s home is 1 inch thick and attached directly to the band joist without any other wall sheathing (housewrap is OK), then you can follow the bolt-spacing schedule and mount your ledger right over the water table trim.
If the wall does have sheathing on it, then you must remove the water table trim where the ledger will be installed in order to satisfy the prescriptive fastening table in the code. With the water table removed, you can either mount the ledger in direct contact with the wall sheathing using lag screws or bolts, or space it off the wall using stacks of washers at each bolt or another device, like Deck-2-Wall spacers, provided that the total thickness of the sheathing and the spacers is 1 inch or less.
One advantage of removing the water table to install the ledger is that the flashing is simpler. After you remove the water table, leave the cap flashing in place. Then slip a sheet of flashing (metal or plastic) under the water table drip-cap flashing and let it extend over the foundation. The flashing sheet covers the complete area that the water table covered, and it sheds water so you don’t need to install a separate flashing over the ledger. The existing cap can extend over the decking or it can be cut back and left behind the ledger. With this method you’ll need to flash the butt joint where you cut the water table for the ledger. Just tuck a couple of inches of flashing behind the cut in the water table to back up the butt joint.
There is an alternative ledger-fastening system that permits you to install the ledger without removing the water table, but you will need to run the system by your building official for approval. Attach-A-Deck is made for installing ledgers over existing siding without removing the siding, so it would work for the water table as well. First you bore 2-inch holes through the siding (or in your case, the water table), and bore pilot or clearance holes through the wall for the lag screws or through bolts that you’ll use to fasten the ledger. The Attach-A-Deck devices are filled with a good-quality sealant, and when the ledger tightens to the wall, the devices inject the sealant behind the siding. Attach-A-Deck doesn’t have an International Code Council Evaluation Services Report, but the manufacturer has independent testing data and a fastener guide for fastener spacing.


