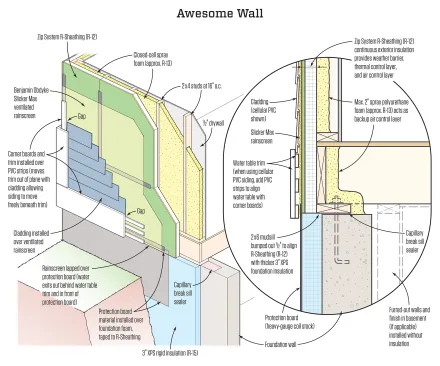
JLC readers may be aware of the “Perfect Wall”—a wall design by building-scientist Dr. Joe Lstiburek of Building Science Corporation that, in a phrase, “keeps the outside out and the inside in.” All the control layers for water, air, vapor, and thermal energy are placed outside the structure. That means there is no insulation in the stud cavities; all insulation is continuous on the exterior. This helps protect the structure from the destructive forces of water (the most important in Joe’s hierarchy of control layers) and keeps the dew point outside of the wall cavity so there’s no risk of condensation.
Tim Healey
“Awesome Wall” is design-builder Michael Anschel’s take on the “Perfect Wall.” The primary design goal was to create a wall system that performs as close as possible to the Perfect Wall, but is optimized for simplicity of installation so there are as few places as possible to introduce potential failures.
The idea that the insulation could be in the wrong place for both thermal performance and moisture management pushed me to rethink how I was building in my region. I’m in Minneapolis, and while I like the idea of driving the dew point completely outside the structure, in climate zone 6 we would need at least 4 inches of polyisocyanurate (polyiso) or 5 inches of extruded polystyrene (XPS) continuous insulation. That can be done, but not easily.
My company has installed a number of two-layer foam build-ups on roofs. Taking 2x4s and screwing them through layers of foam is expensive, and getting it to plane out flat is challenging and time consuming to do well. Plus there aren’t a lot of skilled carpenters entering the workforce, so we have to rely on available labor. Perfect Wall may be “perfect” from a performance standpoint, but it’s not practical to build in a cold climate, and it remains inaccessible for most builders and remodelers. The engineer part of my brain began searching for a simpler solution.
Continuous exterior insulation protects against thermal bridging at studs.
Redefining Performance
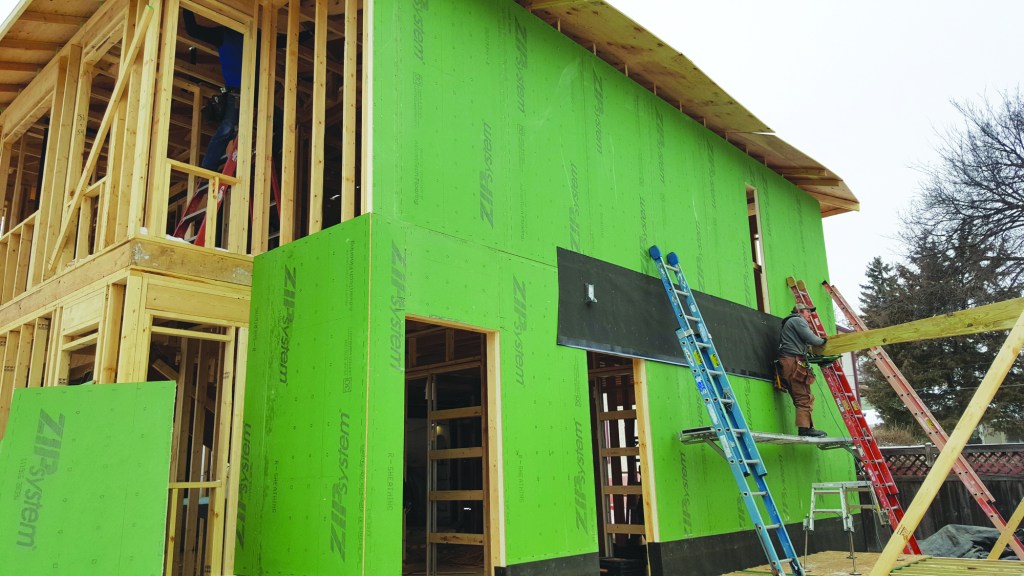
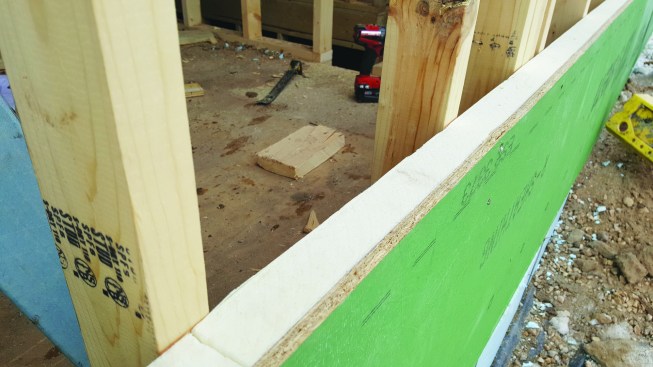
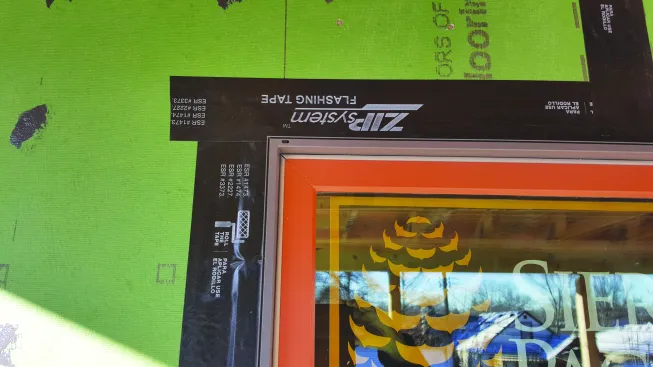
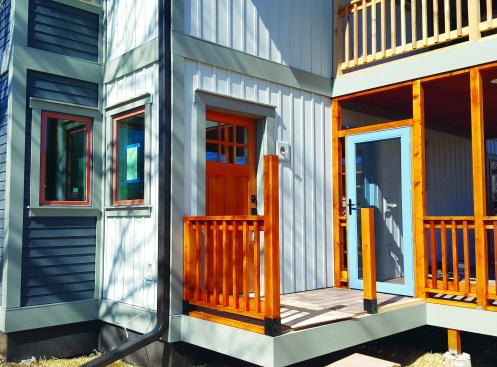
The advent of Zip System R-sheathing—structural OSB with an integral weather barrier married to polyiso foam—provided a path towards a simpler high-performance wall. The R-12 panel provides enough continuous exterior insulation to eliminate the interior vapor retarder, which would otherwise be required in climate zone 6. It doesn’t restrict our ability to design cool shapes and doesn’t require retraining crews to build in a substantially different fashion. Carpenters still sheet their framing with a nail gun (granted, it needs to be a large one that can shoot 5-inch nails), which means the wall goes together nearly as fast as uninsulated Zip System sheathing. When we extend our sill plates out 1/2 inch, the surface of the drainage plane aligns perfectly with 3 inches of exterior foundation insulation. (Yes, below-grade walls also want the insulation on the exterior.) It gets better: Windows are installed just like they would be in a normal wall. No bucks, no “innie vs. outie” debate, no complex multi-step tape and liquid flashing details. It accomplishes much of what the Perfect Wall sets out to do with regard to aligning control layers, which is what we’re really chasing when it comes to both thermal performance and general resilience.
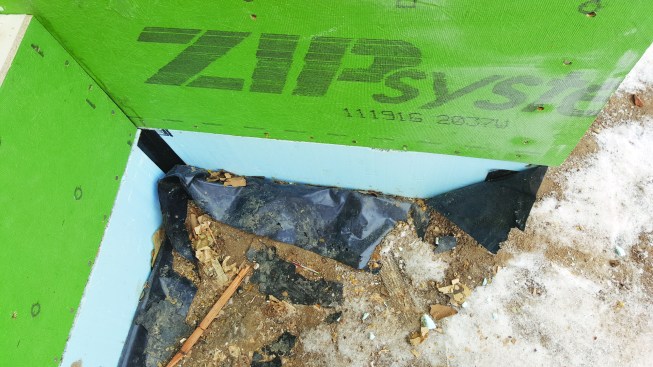
Bumping the sill plate out allows thick foundation insulation to align with the wall’s face, simplifying drainage, air-sealing, and exterior finishes.
No Material (and no Worker) Is Perfect
Zip R-12 sheathing certainly qualifies as simple from an installation standpoint, but it’s not perfect: The geometry of the material is complex, which means you cannot rely solely on taping the outside face to ensure a continuous air barrier. The corners require cutting back the foam so none is exposed, then aligning it with another panel, which is definitely not a perfect connection. When fastening the panels to framing, you get a little compression of the insulation, particularly at edges, and field-cut panels don’t match up perfectly. We can address everything on the surface, using tape and liquid flashing, but it’s a 2D solution that doesn’t address all edge-to-edge connections, particularly those at the top and the bottom of the wall.
These clad vinyl-frame windows have an integral flange.
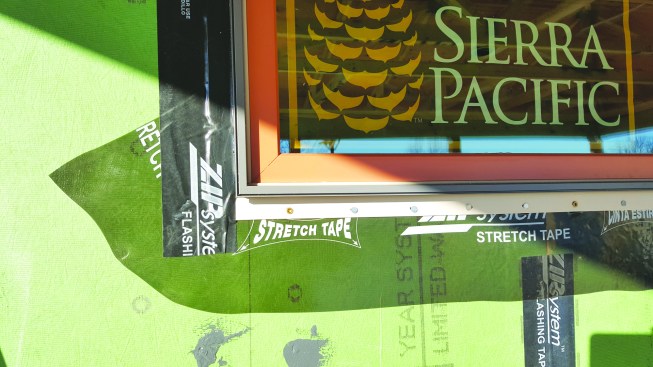
This allows for standard installation: no need for window bucks or elaborate flashing.
Every product has its limitations. Knowing what they are is crucial. We need to be building things that are hard to screw up. If someone proposes a wall system or home design that relies on near-perfect detailing or requires angelic occupants who pay attention to RH sensors, I’m not interested. It is simply not realistic.
We hire great carpenters and work with good subs, but everyone has bad days, myself included. We’re in Minnesota where it’s cold a lot of the time. By 3 p.m., we’re tired and worn down by the cold, and while we can have the best intentions to do it “perfect,” there are times when “good enough, let’s button it up and get out of here” is the reality. We must have systems that allow for imperfections and mistakes. If we pitch a solution to our industry and say, “But don’t screw it up,” then I have to ask myself as a builder, “Who is going to take a chance with that?” We’re a risk-averse industry; failure is costly, and convincing consumers to pay for high-quality construction is already a challenge.
Wall performance has to account for installation. Yes, we want high thermal performance, but we need walls to be super durable. If an efficient, durable wall doesn’t require a significant change in process, is not overly complicated, uses readily available materials, is hard to screw up, and is unlikely to fail, then we’re onto something awesome.

To avoid the risk of condensation in a cold-climate wall assembly, the R-value of cavity insulation ideally should match the R-value of continuous exterior insulation.
Fail-Safe Systems
R-12 exterior insulation by itself didn’t cut it, and I needed to add cavity insulation. But taking a note from Perfect Wall, I had to be careful that I didn’t pull the dew point back inside the house too far, where condensation could form at the framing. What is the magic number for cavity-wall R-value? Joe Lstiburek advised me to “split the difference, but stay under R-14.” Code allows more R-value in the cavity, but the consensus in the building-science community is that code allows for risky walls in climate zones 6 and above (see “Avoiding Wet Walls,” Apr/17). Ideally, Joe wanted me to match the value of the foam on the outside of the framing with the insulation in the cavity, so we went with 2 inches of closed-cell spray foam. The spray foam gave us the additional R-value we need (R-13) and gave us our complete air seal. This solved two problems with one move.
The author achieved this balance using Zip System R-12 sheathing with 2 inches of spray polyurethane foam in wall cavities. Adding the rest of the assembly components yields a total effective wall value of around R-28.
It turns out, we also solved a third: When you install R-12 panels, you need to hit the studs, but occasionally you miss; you get a “shiner.” The problem with shiners is that you now have a piece of metal that’s super conductive, and in winter, condensation can form on these exposed nails. If you use air-permeable cavity insulation, you need to remove shiners and seal over the resulting hole. With spray foam, there’s no need to remove them.
Continuous rainscreen. For a ventilated rainscreen, we used Benjamin Obdyke’s Slicker. By installing it over the entire wall, wrapping around corners, and lapping over the foundation insulation, we get omni-directional drying and drainage with an infinitely lower chance of failure than with a rainscreen created with strapping. It installs quickly and provides a consistent nailing base. Strapping is time consuming, requires skill, and confines the drying and drainage to vertical sections.
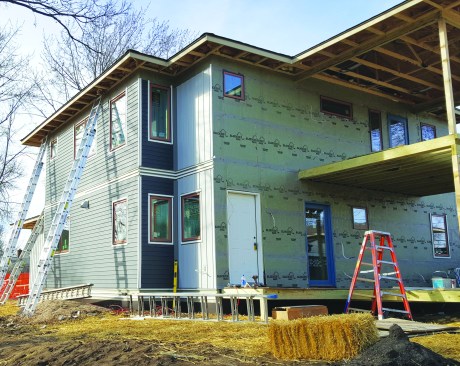
On this project, Celect cellular PVC cladding is installed over Slicker, which provides omni-directional drainage and drying over the entire wall.
Cladding is an aesthetic choice. On the project shown in the photos in this article, we used Celect cellular PVC siding, but the wall system works for most siding types. Code dictates the length and spacing of fasteners for siding that weighs less than three psf (this includes most fiber-cement lap siding) nailed into 7/16-inch structural sheathing “where no stud penetration is required” (2015 IRC, Table R703.3.2). Siding can hang off the Zip-R; no need for strapping nailed to studs. To accommodate lateral movement of the PVC cladding, we padded-out the trim to allow the siding to move freely beneath it. The result is a crisp look that promotes ventilation. Caulking, which causes more problems than it solves, is not part of the system.
The trim is packed out so the cladding can move freely under the trim, and the cladding doesn’t butt up tight to the trim at any point. This provides superior air movement without restrictions though the Slicker and eliminates all caulk joints.
High-performance windows. The challenge we have in cold climates with windows is the massive daily swings in relative humidity (RH) that make it difficult to avoid condensation on the glass in winter. It is unrealistic to expect occupants to keep the RH under 40 in winter; an RH of 60 is commonplace. To avoid water beading around the edge of the glass and a biological dance party around the sash, we need to choose the right windows. For the project shown here, we went with Sierra Pacific’s H3—an aluminum-clad window on the outside with solid wood inside snapped onto a vinyl frame: a durable, attractive, and almost completely thermally broken window. The units we chose have a U-value around 0.22 (R-4.7) and a CR (condensation resistance) value around 68, which is one of the highest we’ve found stateside. Here, too, we have an affordable, easy-to-source product with no change in the installation. Any window crew can install the windows and not screw them up.
That’s true at every step in this wall assembly. You would have to work really hard to make this wall fail. Which is awesome.
Photos by Michael Anschel
Got a Comment?
Click here to submit a Letter to the Editor. We value all comments, corrections and questions.
If we think others will benefit, we may publish it in print. Letters should be exclusive to JLC, Professional Deck Builder or Tools of the Trade. We do not publish open letters or third-party letters. Writers of letters selected for publication will be notified. Letters may be edited for clarity and shortened for space.


