
We’re regularly called on to put a wood-framed “chimney” box on top of a roof, and often it’s called out to be covered with stucco (or stucco’s cousins, adhered stone and “thin brick”), so it looks more like a masonry chimney.
There are a lot of ways to connect this to the roof so it won’t leak, but we find that if you take a couple of extra steps during the original construction, roof replacements will be much easier later on and less likely to leak. Since we tend to stay in touch with clients for decades, it could just as easily be us doing the roof replacement, so it’s nice to make it easy to succeed.
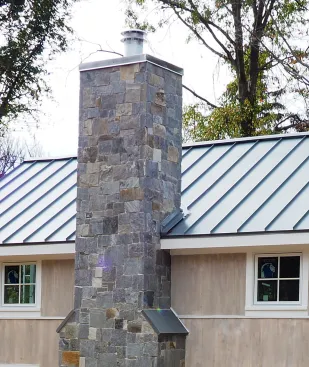
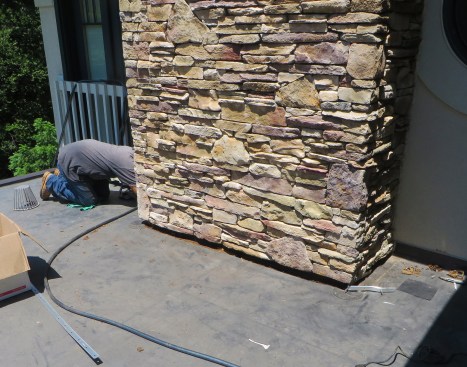
Roof intersection for a framed chimney clad with adhered stone.
Chimney Cladding Types
Stucco, “thin brick,” adhered natural stone, and adhered manufactured stone veneer are fairly common on chimneys in our area. We have used all four of these different-looking finishes, which, to my way of looking at it, perform similarly and should be built similarly. They each normally consist of two heavy base coats of mortar embedded in metal lath that’s fastened to the structure.
Stucco is a troweled-on finish coat, either a lime-based plaster or a heavy acrylic coating that simulates a masonry coating but is more flexible.
Thin brick comprises slices of brick about 3/8 inch thick that are adhered to the mortar base in a standard brick pattern. The companies who make it provide corner pieces, which, once installed, look like a full brick wrapping around the corner. Ordinary brick mortar is applied between the thin brick pieces, and the result is nearly indistinguishable from full-thickness bricks.
Similarly, adhered stone or thin stone refers to thin pieces of natural stone that are adhered to a base coat and have mortar placed between them. Again, companies who sell the material make corner pieces to make the finished look realistic.
Adhered manufactured stone veneer (AMSV) is typically made of concrete pieces that are molded to look like real stone and are adhered to the base coat.
Joe Lstiburek famously called these types of finishes “lumpy stucco,” and that aligns with our experience with them. The assemblies tend to get quite wet and stay damp, releasing water in all directions as they dry. I’ve seen enough pictures of spectacular failures (for example Mark Parlee’s JLC article “How to Destroy a Wall in Two Easy Steps,” Sep/2017) that we treat them with utmost respect.
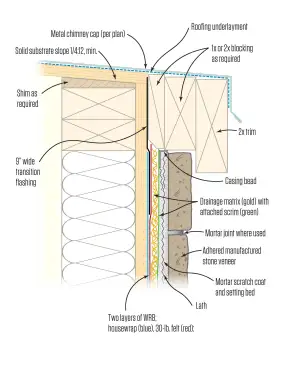
It’s reasonable to expect water on the back of the base coat, and the building structure behind the cladding must be protected. We use two WRB (weather-resistive barrier) layers and a drain space as our installation standard. While the most recent code versions now allow only one WRB provided there’s a drain space, we have continued using two and a drain cavity for redundancy. It’s also the case that, in our market, framers usually install a first WRB (felt, a housewrap, or a coated OSB like Zip System or other integrated WRB sheathing), and stucco contractors are used to installing a second, less permeable WRB like felt paper. We like having one layer of less permeable material, and we like the extra protection. The whole assembly aligns with what our trades would normally do anyway.
Chimney Base Details
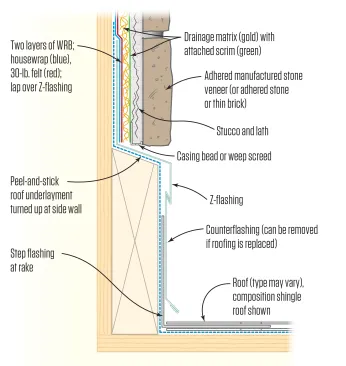
The base flashing for a framed chimney consists of three parts: the step flashing, the counterflashing, and the through-flashing.
Three-Piece Flashing at Roofline
This isn’t rocket science. The gist of a good installation is to keep the stucco (and adhered decorations like brick or stone) several inches above the roof plane so you don’t have to touch it when you reroof. Our preference is to install metal flashings flush with or a little bit proud of the stucco, all around the base of the chimney (it looks more like a deliberate plinth that way).
I am a big believer in three-piece flashings for these situations. At the roof level, we use standard step-flashing pieces that weave between the shingles. A Z-shaped “through-wall flashing” tucks behind the stucco (and the WRB layers behind it). Last, a vertical counterflashing tucks under the Z and covers the top of the step flashing. This third piece—the counterflashing—is key. It’s removable since it isn’t attached to the roof and doesn’t run behind the stucco, and, once it’s off, reroofing is a breeze, as the edge of the roof is exposed and easy to rework. When we’re being really clever, we bend a hook in the bottom edge of the Z-flashing and on the top of the counterflashing, and they connect; but we’ve used rivets or screws in addition to, or in place of, the hook bends.
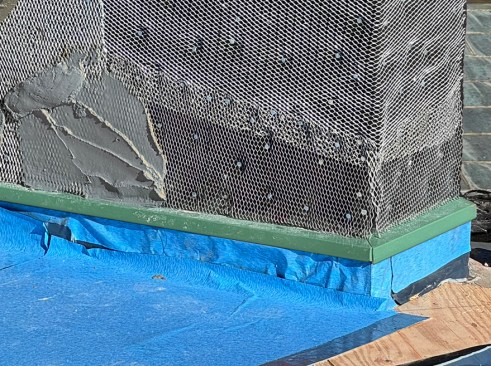
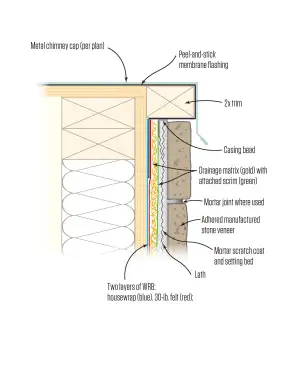
Through-flashing can be installed before the cladding. In this case, the author’s company has installed a peel-and-stick roof underlayment first.
Once the roofing and step flashings are installed, a second counterflashing will cover the step flashing and connect to this through-flashing.
As a base for these flashings, we normally ring the bottom of the chimney with 2×6 lumber. This does get a bit tricky at corners and roof crickets, and we sometimes trim the bottom of the lumber to align the tops. Since code-required step flashing is 4 inches tall, and stucco (and its cousins) requires a minimum 2-inch clearance from the roof, we try to keep the lumber a minimum of 4 inches tall, no matter how much cutting is needed. A 20-degree cant on the top edge can also facilitate installation and drainage.
Without a pronounced curb at its base, a chimney can look disconnected from the roof. This approach also makes replacing the flashing during a future reroof especially challenging.
There are illustrations out there showing a simple 2-inch gap between the top of the roofing and the bottom of the stucco or stone, with no padded out base. The two downsides to this method are that it can look a little silly when a ponderous stone chimney has a visible lack of support, and it makes reroofing quite challenging. There’s little chance a roofer will be able to replace the step flashings that run up behind the base coat—what’s there is probably full of fasteners, and tucking new 4-inch flashings behind the stucco will be a tiresome challenge. (We find ourselves replacing step flashings on many reroofs, because shingle widths and code requirements for flashing heights keep changing, not to mention that older step flashings can be worn or bent.)
Of course, we manage for a few additional quality points. As mentioned, any stucco or adhered masonry in our climate should have two layers of WRB and a drain space behind them; we expect water will run down the WRB and drain out on to the roof at the bottom, so lapping everything correctly is crucial. Similarly at the top of the chimney, we have to keep water out, and we often have to manage an order-of-operations issue, where the metal chimney cap is installed after the stucco.
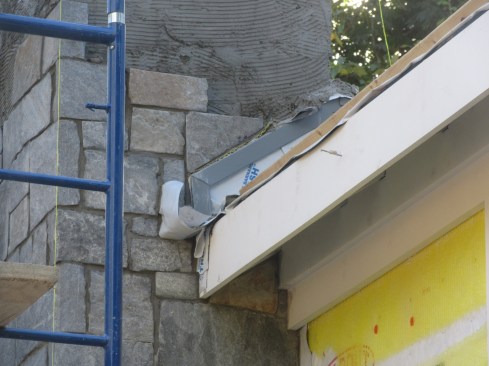
One way to facilitate the cap install is to ring the top with 1- or 1 1/2-inch-tall wood strips to cap the cladding (stone, thin brick, or AMSV). The chimney top can be measured and fabricated while the stucco work proceeds. This wood ring can be wrapped with flashing tape or ice-barrier membrane down onto the WRB for windblown rain protection and, later, the metal chimney top can be fastened to it. This works much better than trying to fasten into the cladding without damaging it. Whenever we’ve tried that, it hasn’t exactly always gone per plan.


