I have been installing, inspecting, and field-testing windows and doors for more than 20 years. After performing thousands of window tests in the field in California and across the U.S., I still am unable to solve one mystery: Why does the eastern half of the U.S. install windows using the American Architectural Manufacturers Association (AAMA) “A” methods, when the western states generally use the AAMA “B” methods?
AAMA “A” methods (A and A1) apply the side flashing on top of the side nailing flanges. The “B” methods install the side flashing on the rough opening before the window is set in place, resulting in side flashing under the nailing flanges. These may seem like very minor details, but they have important consequences. On a set of drawings, the differences may not be recognized. Issues that are always present like flashing wrinkles and substrates that are less than ideal are never drawn. Therefore I believe, on a jobsite, where humans are involved, the “B” methods are more robust, reliable, and durable.
Here’s why I prefer method “B.” Sealant under the nailing flange is a critical detail for keeping water out. But with the “A” methods, this detail is covered up when the flange is flashed, and so is difficult to inspect.
The “B” methods allow for a more complete inspection by superintendents, who look for “squeeze-out” to verify that the sealant has been correctly applied.
I have worked on countless projects where window-installation failures were caused by installers doing a poor job applying sealant under the nailing flanges. In a way, it’s understandable why this happens so frequently: Installers want to work as fast as they can in order to finish as early as possible and to make as much money as possible, especially when they are hired for piecework.
Common Problems
Think about it: How much sealant can an installer carry around? Say the installer leaves the bin carrying 24 tubes. After he has installed about seven windows, he will start to run low on sealant. And when he’s on scaffolding at the other side of the house from the bin, it’s only natural that he will try to make his supply of sealant stretch as far as possible. He begins to use less sealant and rationalizes it by thinking, “The flashing goes on top, so I don’t have to worry about it.”
Next comes the peel-and-stick side flashing (often officially referred to as self-adhered flashing, or SAF), which creates additional problems.
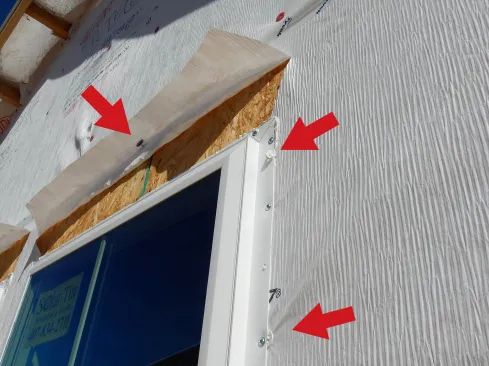
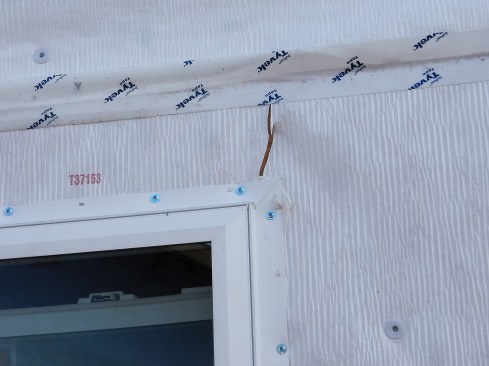
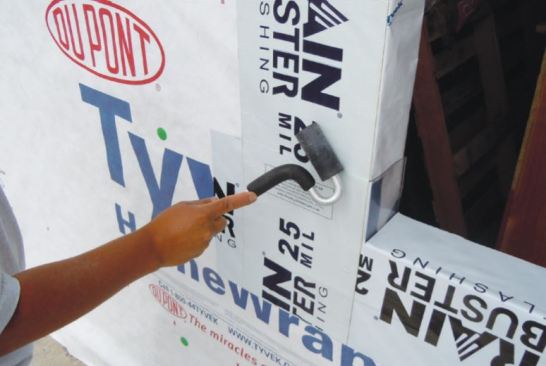
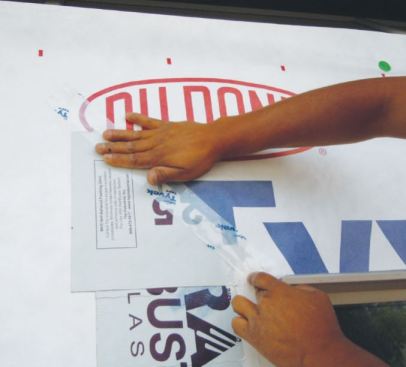
This photo shows several problems, identified with arrows: The top arrow shows where a nail is used to hold the head flap up, creating two unnecessary holes in the WRB. The head flap should be temporarily held in place with tape. The middle arrow shows sealant squeeze-out left to harden like a worm. Any SAF applied over this will not perform well. The lowest arrow shows where a cap fastener is placed too close to the nail fin. As a rule of thumb, fasteners should be no closer than “three fingers” from the rough opening; Tyvek says 6 inches.
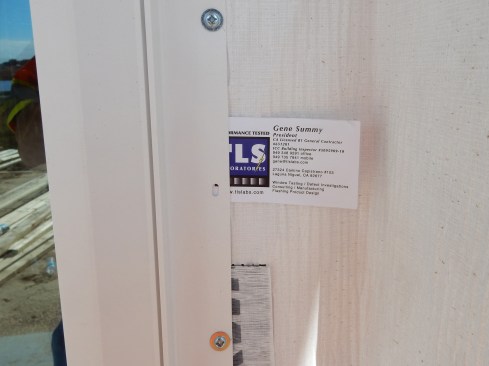
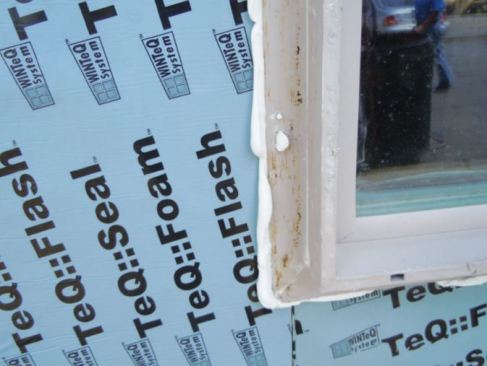
Not enough caulk. Here, there is no sealant squeeze-out at the flange edge or through the pre-punched holes. Also, window nailing flanges are typically not straight and flush; they are dimpled everywhere there’s a fastener. For wavy nailing flanges, sealant is critical. Butter your sealant excess squeeze-out over the fasteners to reduce the dimpling effect. Fasteners should be placed 8 to 12 inches on-center. Use exterior-grade, self-tapping pancake screws to help reduce the problem. I believe deck screws would work just fine as long as they are drilled through the vinyl avoiding the pre-punched nail holes.
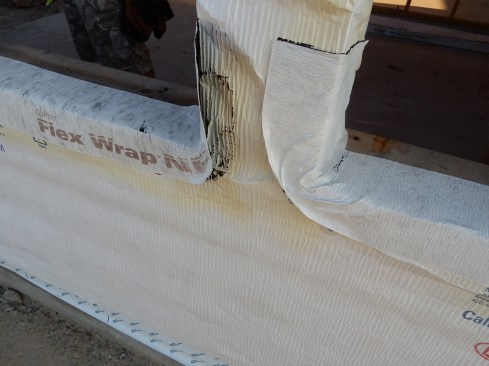
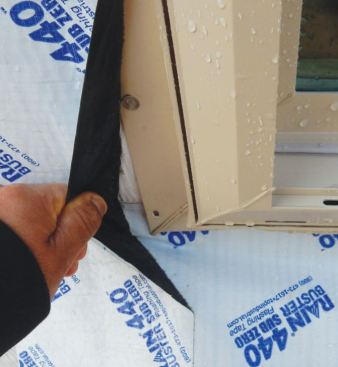
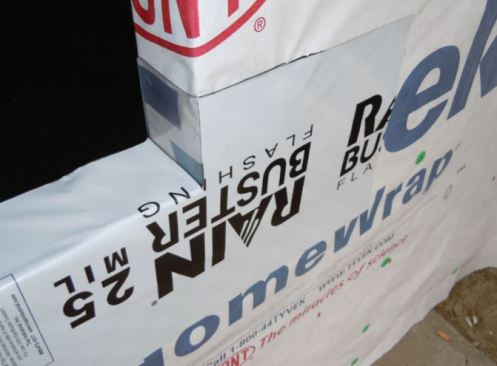
The flexible flashing shown here was not properly J-rolled and didn’t adhere to the drainable housewrap. It’s doubly important to J-roll SAF to drainable WRBs due to their wrinkled (or dimpled) surface. Also, if using a flexible flashing, ensure the product is correctly applied without creating wrinkles, and without overstretching the material. Ensure the inside corners are tight to the RO and, if need be, apply staples at the outer radius edge to avoid withdrawal of the material.
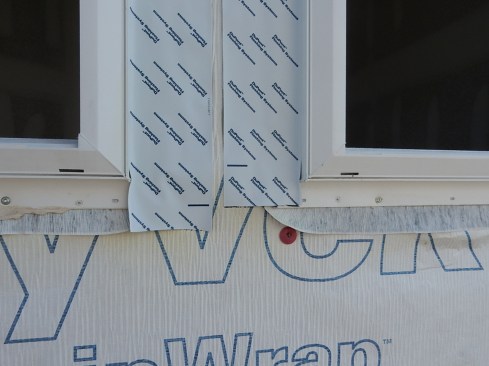
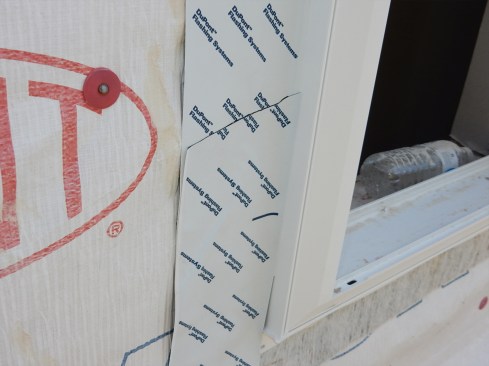
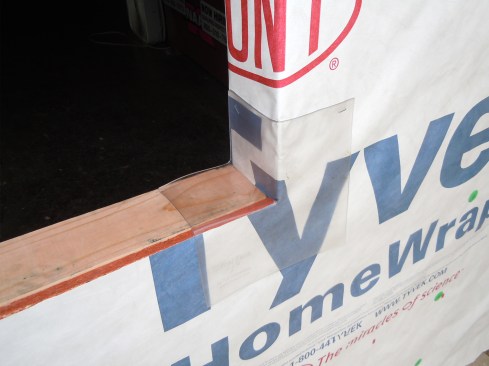
In addition to the side flashing running too short, the cap fastener is too close to the opening. If the side flashing had been extended downward to cover the flexible flashing, it would have at least partially covered the cap fastener. When water gets under the SAF for reasons previously discussed, it will use the fastener penetration to get in the wall.
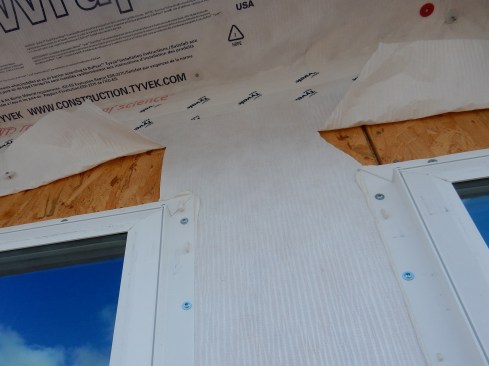
Poorly adhered flashing is common. The SAF is often applied with hand-pressure only, not properly J-rolled. This means the flashing does not have an even, flat surface to stick to. Air gaps and wrinkles develop under the flashing. And, if the weather is cold or wet, adhesion problems develop as well. These can lead to even worse problems if the flashing has not been shingled properly. Install continuous-length flashing, if possible. If not, do not reverse lap the SAF as seen in this photo. With a drainable housewrap, water can migrate laterally much easier than if the housewrap is not drainable.
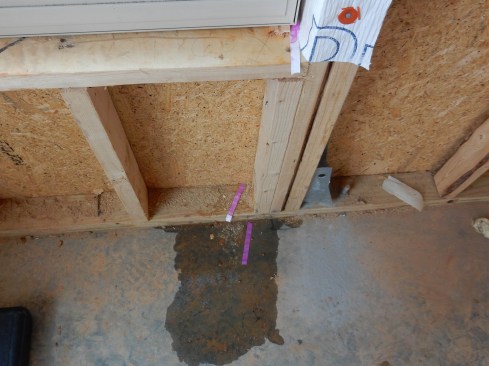
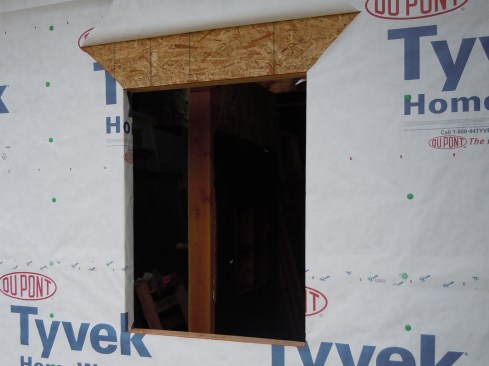
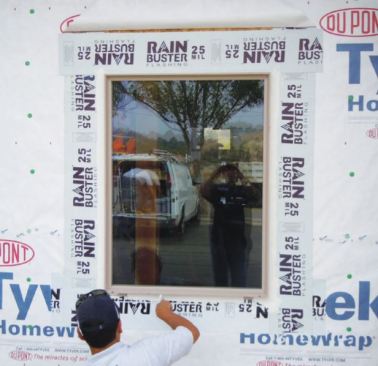
This photo is the interior view of figure 1. When there are adhesion problems after the nailing flange has been covered with the SAF, there is a strong likelihood that water will migrate to the cracks and holes, and then enter the building. I’ve seen this frequently when performing water tests. We regularly water-test windows and wall systems using ASTM E 1105 as our guidelines. We also use AAMA 502 and AAMA 511.
I commonly see WRB head laps sliced at different angles and lengths. Head laps should be cut at 45 degrees and to the width of the head and side flashing—no more, no less. Take the time to properly measure, mark, and cut the WRB.
In this case, the GC didn’t properly train the workers who installed the windows. The installer cut a head lap … well, you can figure out the rest. Builders need to adopt a method for installing windows and doors and own it. Taking ownership means everyone involved in the process understands every step.
Sealant Solution
Sealant is often denigrated as a temporary solution that will dry up and fall out. In the past, that might have been true. But the exterior-grade sealants used today will probably hold up just as long as any of the other exterior water-barrier materials. And the fact is, you can’t leave sealant out of the assembly—it’s required by every window manufacturer out there. This means sealant is part of the building code, and for good reason: Sealant is a necessary fluid material that fills in the imperfections and deviations created when the different materials in the window assembly join one another.
Once you own the fact that sealant is integral to the assembly, I contend that the real benefit of a B-method installation is that this method takes into account the less-than-perfect conditions that exist on jobsites—dimpled, cracked, dirty, and wet nail fins and wall surfaces are a given on the jobsite, and the “B” methods go a long way toward accommodating them. A typical sealant installation starts with a bead of sealant along the edges of the rough opening. This gets applied over the SAF in a continuous bead along the sides and top, but usually not along the bottom of the opening, so any trapped water can drain away. When you install the window, be sure all pre-punched holes in the nail fin have sealant oozing through them when the fasteners are placed.
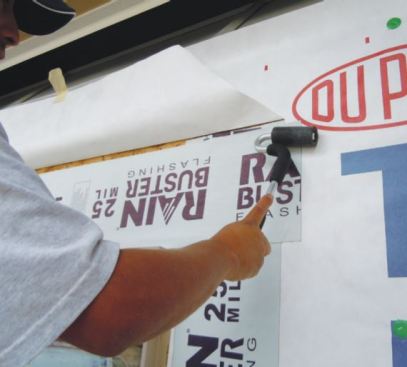
Buttered sealant. You can “enhance” this method with a “buttered sealant” application. Before the squeeze-out from under the nailing flange has set up, apply an additional “cap bead” of sealant on top of the nailing flange, and butter it flat with a putty knife. A 2-inch-wide swath of sealant will help ensure that any cracks and pre-punched holes in the nailing flange are covered. Be sure to keep the cap smooth. If you’ve applied it correctly, it won’t have dimples at fastener locations or excessive build-up at corners.

Training Is Critical
Builders need to adopt a method for installing windows and doors and own it. Taking ownership means everyone involved in the process understands every step. And by “everyone,” I don’t mean just field managers, but also the assistant field managers, the window installers, even suppliers. And this involves training. Training should not be a one-time event. It needs to be on-going until it becomes routine. Our special forces in the military have the right idea: When they train for an operation, they immerse themselves in the procedures until they become natural. I subscribe to the old saying that “amateurs train until they get it right; professionals train until they can’t get it wrong.”
“B” Method Step-by-Step
The real benefit of a B-method installation is that it takes into account the less-than-perfect conditions that exist on jobsites—dimpled, cracked, dirty, and wet nail fins and wall surfaces are a given on the jobsite, and the “B” methods go a long way toward accommodating them. When I train people, the following are the procedures I keep everyone focused on. Note: these steps focus on plastic housewrap, such as Tyvek, Typar, and the like; if black paper or a liquid-applied membrane is involved, the procedures will be different. Also, for the SAF material, it’s imperative to choose a flashing product that’s compatible with the sealant product. I suggest using the same manufacturer for both the sealant and the flashing. Or use a butyl-based membrane, which is compatible with a wide range of sealants.
Step 1. Cutting the Housewrap/WRB. Properly measure, mark, and cut the housewrap at each rough opening. I recommend using an “I-cut” and turning the flaps into the opening. I believe it’s a more foolproof method. It’s too easy for installers—who are typically in a rush—to overcut the housewrap when cutting the sides flush to the opening. Cut a flap in the housewrap at the head at a 45-degree angle and to the width of the flashing, temporarily hold it up with tape.
Step 2. Install Plastic Corners at Sill. Staple the flashing corners in place at both sides of sill. The rigid-plastic corners help seal the sill’s three-directional corner from pinhole openings in the membrane flashing, as well as providing protection if the window is roughly slammed into to place. It’s worth noting, I typically set the flashing corners in sealant, especially if a drainable housewrap is installed. Also, here, the housewrap has been cut along the RO’s sill. I prefer wrapping the housewrap into the opening, holding it taut with a couple of staples.
Step 3: Install pan flashing (above) followed by the side flashing (above right), using 9-inch SAF as a minimum. Roll the material flat with a J-roller, being careful not to create wrinkles. I don’t often see installers use a J-roller, but this tool helps improve adhesion of SAF, even in cold and wet conditions.
Step 3 (cont.): Each end of the sill flashing should extend at least 9 inches (the width of the flashing material) beyond the opening so the side flashing can fully lap over it. If a second layer of the envelope, such as stucco, or brick or stone veneer, will be applied, install a bib or apron under the window pan flashing so this second layer can be tucked under it. This will ensure that water drains to the exterior.
Step 4: Install the head flashing last, being sure each end extends past the side flashing.
Step 5: Apply a plumb, 3/8- to 1/2-inch bead of sealant along the edges of the window opening, then install the window level, square, and plumb. Ensure that squeeze-out exists everywhere sealant is used. Sealant is typically not recommended along the bottom, though some do apply it there, leaving gaps at the corners so any water that gets in can drain out. Either strategy is fine if it is correctly implemented.
Step 6: Butter the squeeze-out flat, being sure to cover pre-punched holes and cracks in the nailing flange. If severe damage to the window is discovered, now is the time to alert field managers so they can process a replacement.
Step 7: Next, add the enhancement (see “Buttered Sealant” description above.) The “buttered sealant” technique is an enhancement to Methods B and B1 that has been used on the West Coast for more than 10 years by large production builders with spectacular results. Since the time it was first implemented, warranty claims from leaking windows have fallen dramatically.
While not required for Method B, many builders cannot let go of applying self-adhered flashing over the nail fin. If you insist on adding this, be sure to butter the squeeze-out flat before it hardens. You want as flat a surface as possible so there won’t be any voids or any build-up that might interfere with cladding materials. Also, if you use a second-layer SAF, be sure to use a butyl-based flexible flashing product. After the additional side flashings are correctly applied on top of the nail fins and J-rolled flat, apply a final, small bead of sealant to the edge of the membrane against the window frame. Tool this into place to eliminate all wrinkles and gaps. You want to do this up each side and across the top of the window.
Step 8. As a final step, drop the flap of housewrap down and tape it closed at the ends. If the flap needs to be taped along the bottom edge, use short pieces with gaps between them so if any water gets behind there, it can drain out.
Notice I have not wasted time telling you how to clean the nailing flanges. If you want to, please do. But here I am prescribing a method that accounts for normal jobsite conditions.
I believe the “B” methods provide the greatest level of redundancy, which is necessary to overcome real-world job conditions and human error. Chris Yount, of the Fortifiber Building Systems Group, sums it up best: “Successful waterproofing is a series of redundant steps to manage water away.”
Next: See “Installing Flanged Windows: Two Strategies Compared (Part 2)“