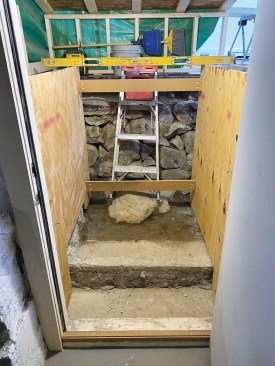
In the area where I do a lot of my work, there are a lot of older homes with stone foundations, and often the entry into the basement is in bad shape. In this particular case, the home’s basement originally had a porch-style entry with stone foundation walls and a roof, which had been replaced with a simple metal bulkhead door some years back. The homeowners wanted to replace the badly corroded metal door, but the bulkhead foundation walls and concrete steps leading down into the basement were also deteriorating and unsafe. In my repair proposal, I recommended not only installing a new bulkhead door unit but also removing the concrete steps and replacing them with pressure-treated stringers fitted with composite treads. I also recommended raising the height of the curb above the level of the driveway.
Demo and Prep
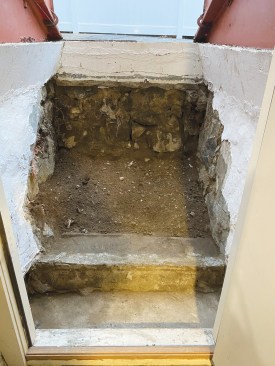
The riser heights on the old concrete stairs varied by more than an inch, making them unacceptable to my building inspector. But removing them was easier said than done, despite their cracked and crumbling appearance. Using a combination of a sledgehammer, a pick ax, pry bars, and a rotary hammer, I began chipping away at the stairs from the bottom up. As I worked, I shoveled the debris into 5-gallon buckets and piled it up in the driveway for later removal.
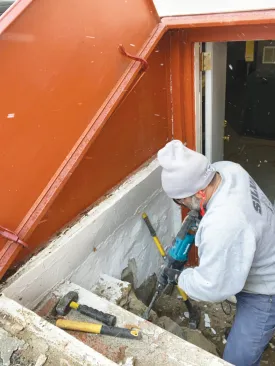
The author started by demolishing the bulkhead entry’s existing stone steps, working from the bottom up.
He cleared out the rubble by collecting it in 5-gallon buckets and temporarily piling up the debris in the driveway.
Because I was concerned about water getting into the basement, I left the existing bulkhead door in place during this phase of the project. That way, I had easy access to the stairs, but could close up the door at the end of the day and not worry about rain or snow falling overnight.
Once I finished removing the stairs and loose sections of concrete from the bulkhead entry’s stone foundation, I removed the old metal bulkhead door and replaced it with a temporary shelter. This involved removal of some vinyl siding, as well as some underlying courses of cedar shingles, the home’s original siding. This preparation would later enable me to properly flash the new bulkhead door to the existing wall.

Next, he removed the vinyl siding and some underlying cedar shingles around the metal bulkhead door and framed a temporary shelter.
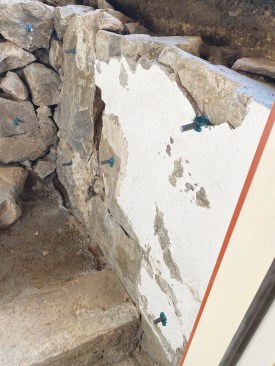
To prep the bulkhead walls for a new concrete overlay, he drilled holes in the old concrete and stonework for epoxied rebar dowels.
Framed with 2x4s and covered with a plastic tarp, the temporary shelter was light enough to be picked up and moved out of the way while I was working. At the end of the day, I could slide it back in place over the bulkhead entry to keep the work area dry and relatively warm overnight, even during a cold and wet New England January.
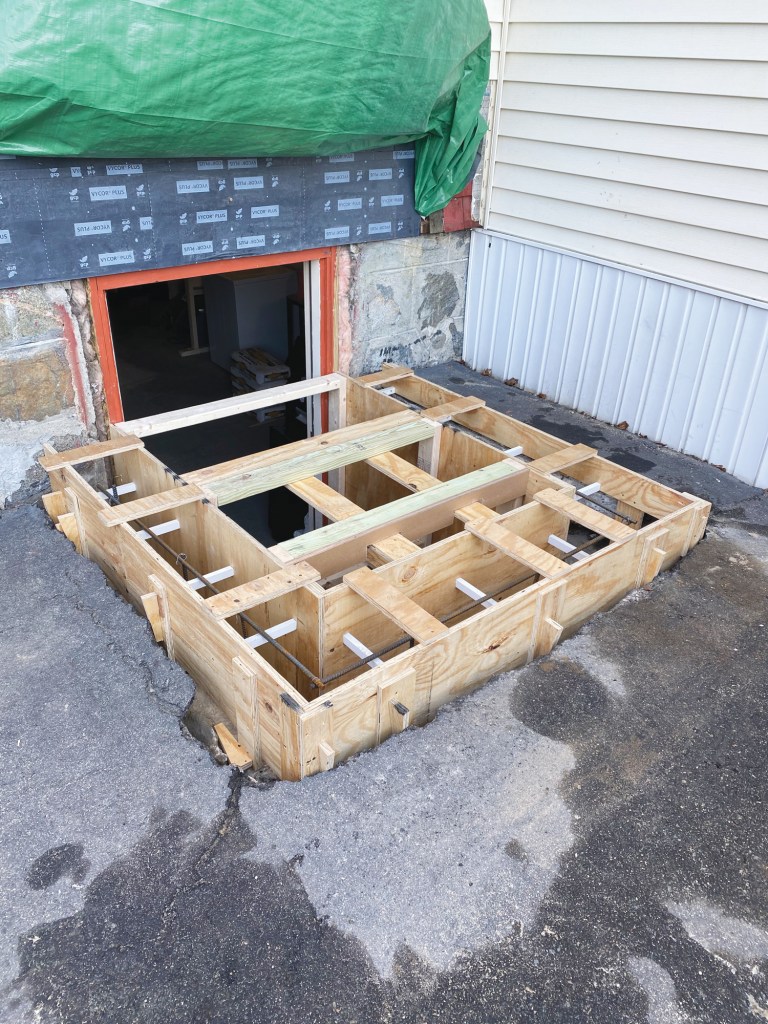
Formwork
I didn’t want to totally replace the existing stone bulkhead foundation, but I wanted to reinforce and smooth out the walls without losing too much stair clearance. To do this, I planned to cap the walls with a thin concrete overlay while forming and pouring a new, higher curb. The trick would be securing the new curb and thin walls to the existing stone foundation.
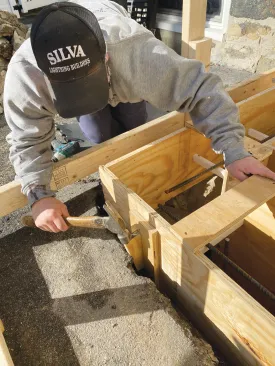
I started by drilling evenly spaced 5/8-inch-diameter holes in the existing concrete and stone, using a carbide-tipped masonry bit to drill the holes as deep—up to 4 inches—as possible. After blowing dust out of the holes, I injected Simpson Strong-Tie’s SET-XP epoxy anchoring adhesive into them and then inserted short lengths of #4 (1/2-inch diameter) rebar into the holes, with 2 inches of the rebar exposed.
Next, I measured and cut the form walls from 3/4-inch CDX plywood, using a track saw to make sure the panels were square and the edges were straight, and scribing them as needed to fit over the concrete curb and some extra-wide foundation stones. Following the very first rule I ever learned about construction from my very first boss—start every project level, plumb, and square—I took care that my form walls were parallel to each other and level across the top.
I used a portable Kreg jig to cut holes for pocket screws in the forms and fastened the side forms to the door jambs. I also used pocket screws to fasten plywood spreaders to the forms to brace them.
After cutting the end panel to width, I attached plywood cleats to its edges, then slid the panel into position and screwed the cleats to the side panels.
To form a higher curb and smooth out the bulkhead walls, the author cut sheets of 3/4-inch plywood into forms that would be filled with concrete.

Using a combination of cleats, wedges, and internal PVC spacers, he braced the forms so that they were as plumb, level, and square as possible.
Next, I ripped the plywood to width to form the outside edge of the curb, which is raised about 12 inches above the level of the driveway. Plywood cleats held the inner and outer forms together at the top, while I used spacers cut from PVC stock to help hold the forms together and hold up the rebar that I dropped in to reinforce the concrete. I also braced the outer forms with wedges tapped into place between the plywood and the cut edge of the asphalt driveway.
The outer form for the curb was braced with wedges driven between the plywood and the cut edge of the driveway.
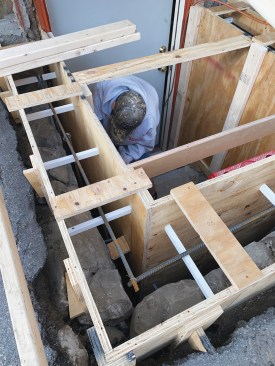
In addition to the rebar dowels drilled into the existing bulkhead stonework, #4 rebar was used to reinforce the new concrete.
As I assembled the forms, I added lengths of #4 rebar oriented horizontally to help reinforce the concrete walls.

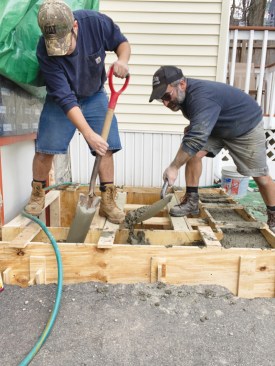
The fully braced formwork for the new bulkhead foundation is ready for the pour.
Pouring Concrete
Mixing up more than a yard of concrete on site is hard work, but in this case, ordering a short load of ready-mix wasn’t an option. The house is located on a narrow lot on a tight street, so we still would have had to deliver the concrete from the chute into wheelbarrows, then roll it up the driveway to dump it into the forms. Instead, I ordered a couple of pallets (42 80-pound bags of concrete mix per pallet) and hauled my two-bag mixer along with my son Carter to the jobsite to help me with the pour.
Prior to the pour, I used a 3-inch roller mounted on a painter’s pole to apply Quikrete bonding agent to the existing foundation. I’ve made a habit of using bonding agent whenever working with old concrete, masonry, and stone to improve adhesion between the old materials and new concrete. Sometimes the bonding agent can be added to the mix, but it can also be brushed or rolled onto the surface just before the concrete is poured, so that the surface is tacky.

The author and his son spent about a half-day mixing up more than 50 bags of concrete on site.
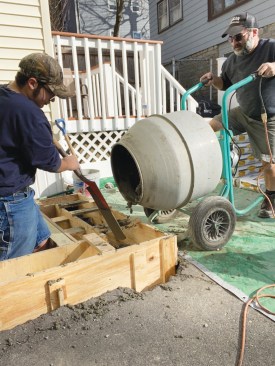
Here, the author pours concrete from the mixer directly into the form, while his son, Carter, uses a shovel to distribute the concrete.
Mixing up the 50 bags or so needed to fill the forms ended up taking about four or five hours. Fortunately, the day was sunny and mild with temperatures in the mid-40s, warm for a January day in New England, so I wasn’t worried about freezing temperatures. I also knew that, before leaving the jobsite, I would be able to cap the space again with my portable shelter and crack the door to the basement open, which would keep things warm overnight.
During the pour, Carter and I used shovels and a long pole to consolidate the mix, eliminate voids, and help push the concrete into all the cracks and crannies in the existing stone foundation. After screeding the top level and floating the surface, I allowed the concrete to set up, troweled it smooth, then applied a brush finish so there would be good adhesion with the PVC cap that would separate the new metal door from the concrete surface.
Both shovels and a long pole were used to push the concrete to the bottom of the forms and eliminate voids.
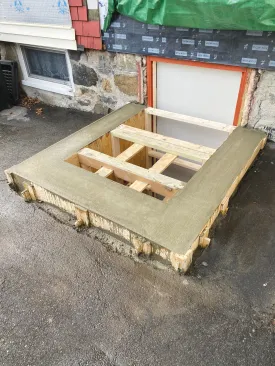
Raised several inches above the level of the driveway, the new curb will block rain and snow from entering the bulkhead entry.
Finishing Up
Metal bulkhead doors can be—and often are—installed directly over a concrete curb, but this is where I typically see the worst corrosion get its start. So I like to install a wood or PVC sill to keep the metal bulkhead door frame separated from the concrete. On this project, I opted for a PVC cap because it would also help me to solve the transition at the wall between the home’s irregular fieldstone foundation and the wall sheathing.
I cut the cap from 3/4-inch-thick PVC sheet goods, sizing it to be slightly wider than the curb to help shed water, and joined the pieces together with pocket screws and PVC adhesive. Installing the cap as a unit rather than in separate pieces made it easier to fit it to the wall and then to fit the metal door to the cap. Scribed PVC rippings added to the vertical part of the cap fill in the gaps between the cap and the house. I fastened the cap to the concrete with pairs of 2 1/4-inch-long flat-head Tapcons about 10 inches on-center, bedding the cap in beads of OSI Quad Max sealant and filling the fastener holes with 3/8-inch-diameter plugs that I cut from PVC.
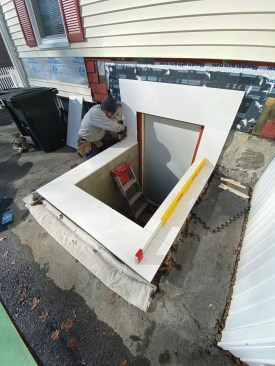
The author fabricated a PVC apron to frame the entry for the bulkhead door.
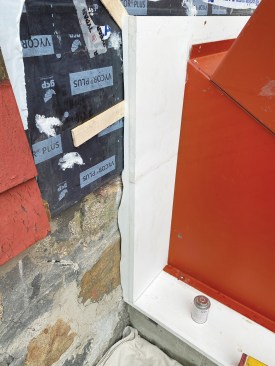
With PVC rippings scribed to the irregular stone foundation and added to the assembly, the one-piece design made flashing it and fitting the metal door to the wall easier.
Since the PVC cap was level and square and formed a perfect 90-degree angle where the horizontal leg met the vertical leg at the wall, it only took a few minutes to install the Gordon metal bulkhead door. First, I applied a continuous bead of sealant to the base of the frame, then set it into place and fastened it to the cap with short #8 stainless steel pan-head screws.
Before cutting the stair stringers, I parged the interior walls of the bulkhead with type S mortar, adding a bonding adhesive to the mortar to help with adhesion. As I applied the mortar, I used a mason’s brush to smooth it out and add a stuccolike texture to the finish. This filled in voids and should help prevent water from penetrating into the bulkhead area.
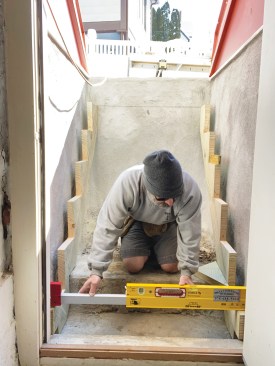
After parge-coating the bulkhead foundation walls with mortar, the author cut pressure-treated stringers, which were then fitted with low-maintenance PVC stair treads.
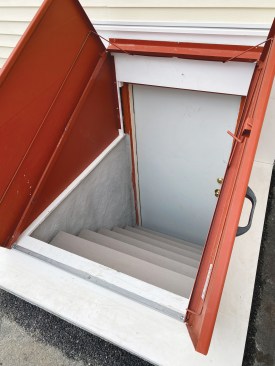
Isolated from the concrete curb by the PVC apron, the new metal bulkhead door will provide years of dry, trouble-free access to the basement.
Finally, I cut five matching stringers for the new stairs. It’s always nice to have wide treads, but in this case, I didn’t have a lot of room to work with and ended up with 9 1/4‑inch treads and 8 1/4-inch risers. Fortunately, these numbers were acceptable to my building inspector, because the basement already had another means of egress, and these were considered to be secondary stairs. For him, the most important issue was that the riser heights were consistent from the top to the bottom of the stairs.
To minimize maintenance, I made the treads from PVC decking with a textured finish, which will provide better traction when wet than pressure-treated lumber would. For each 9 1/4‑inch tread, I used two 5 1/2-inch-wide deck boards, ripping one to 4 inches to provide a small nosing and allow a small gap between the boards for drainage.
Photos by Emanuel Silva
Keep the conversation going—sign up to our newsletter for exclusive content and updates. Sign up for free.


