If practice makes perfect, then based on what we see these days, there needs to be a lot more practice when it comes to installing weather barriers. This is doubly true in coastal areas, where wind-driven rain and short drying cycles mean that any exterior cladding — be it wood, brick, vinyl, or fiber cement — is especially prone to leaking.
I am a licensed general contractor in northern California, but these days my livelihood is in training builders to meet the ASTM E-2112-07 window and door installation standard through Installation Masters, a certification program developed by the American Architectural Manufacturers Association (www.installationmasters.com). That means my work centers on best practices for stopping water and air penetrations through building enclosures, and I get an opportunity to talk to a lot of builders about what works and what doesn’t work when it comes to sealing out air and water.
I believe we’re going through a renaissance of sorts in this country when it comes to weather protection. There’s increasing emphasis in building codes on reducing water damage, and it’s only going to get more intense as current best practices become standardized and these standards bring more detailed requirements into the codes.
Basic Code
The current code is a bare minimum, in my opinion. To put it bluntly, it’s the worst we can do. Like getting a “D” in math, there is room for improvement. And in coastal conditions, where the exposure to frequent high winds increases the risk of water intrusion, there’s no question: we have to do better.
The latest version of the International Residential Code calls for weather barriers (officially called water-resistive barriers, or WRBs) behind all exterior claddings, including brick and stucco. The code specifies a 2-inch horizontal overlap and 6-inch vertical overlap between successive courses. And most important of all, the materials that make up this plane must be organized to keep bulk water from entering the wall cavity while allowing water vapor to pass through.
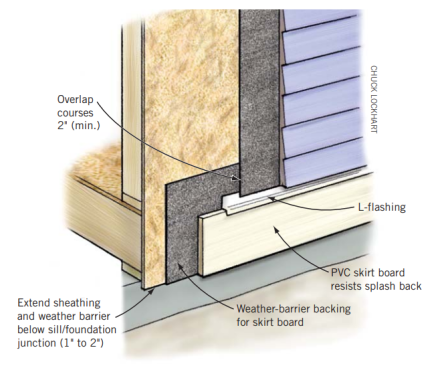
Code Minimum. All overlaps in a building wrap must overlap 6 inches where two pieces join vertically, and 2 inches at horizontal seams. The first course should begin around a corner a minimum 12 inches (or to the first stud) and overlap the sill plate 1 to 2 inches.
To accomplish this, courses must be overlapped the same way you install roofing materials — the lower course goes under the upper course. And the material must be permeable; that is, it must allow water to evaporate through it and not accumulate.
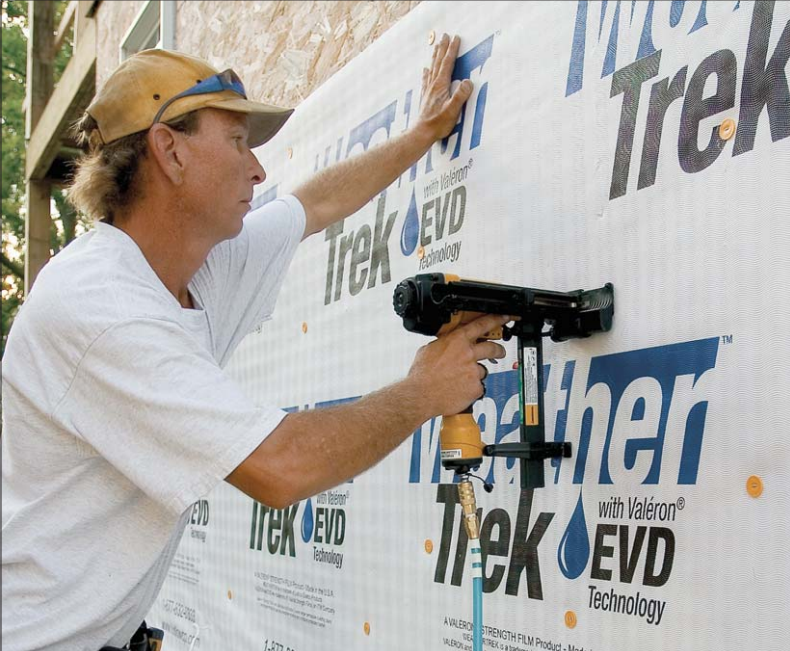
Defeating the wind. The basic code does not specify a fastening schedule, but it does require builders to follow manufacturer’s installation instructions, and each manufacturer of weather barriers has its own requirements. These specs are not trivial, nor are they simply designed just to sell you accessories like tape and cap nails. Fasteners are critical for protecting the exterior in that time between the installation of the weather barrier and the completion of the cladding. Like roofing underlayment, it’s part of drying-in the home. But it’s also very vulnerable to the wind before the cladding gets installed. I wish had a dollar for all the times I’ve driven by homes under construction that have large pieces of underfastened housewrap flapping in the breeze.
Fastener spacing is generally 6 to 18 inches along vertical framing and 16 to 24 inches horizontally. The vertical spacing depends on local weather conditions and exposure time. More exposure to wind requires closer spacing.
You can expect to use some sort of cap fastener — a plastic cap held in place by a staple or nail. It’s true that 1-inch-crown staples are also allowed in most cases, but this is more of a concession to what has always been done rather than best practice.
Watch the EdgesWhen you think of the weather barrier as a protective membrane, there are a few details that can derail the protection, and these need close attention. In fact, water intrusion is almost never a problem in the large field of a wall. It’s primarily at the edges where problems are going to occur, and this is where you need to sweat the details. • Gable ends must be covered to provide uninterrupted water protection. • Cantilevers must be detailed carefully. These are not only vulnerable entry points for air (see “Insulation That Works,” page 22), but they can be wind catchers as well. • Cuts, tears, and other damage must be taped to keep out air and water and to prevent the wind from working at the edges, creating an even larger rip. • Mechanical penetrations. Mounting blocks and other penetrations must be flashed. This works much the same as window flashing. Start at the bottom and work up shingle-style. • Roof wall intersections. These can be difficult and require preplanning to get the lower framing prepped for integration with the weather barrier. |
Staples just don’t have enough surface area to pin down the wrap when the home is subjected to a stiff breeze. Think about the contact area of a 1-inch-crown staple compared with a 1-inch-diameter cap: the cap is going to hold in a much higher wind. Also, the profile of the cap is less likely to allow water to enter the building than is the staple. (An obvious exception here is a stucco and cultured stone exterior, which typically needs the metal lath to be stapled in place.) Small hammer tackers are out entirely. Just how much holding power do you think these tiny staples really have? It’s certainly not enough to hold a sheet from getting ripped off by the wind.
Tape is not required but is a good way to deny the wind a toehold at the edges. Taping all vertical joints is especially recommended for keeping out water that might get behind the siding from finding its way under the weather barrier as it drips down a wall.
The weather barrier should be pulled tight and cover all exterior faces of the building — everything that sees rain, wind, and sun. Take note: Even the unconditioned spaces, such as attics and crawlspaces, must be covered. Too often, installers feel it’s unnecessary to wrap gable ends, but in my mind this practice shows a fundamental disconnect in understanding what a building wrap is for. True to its accepted industry name, a WRB (water-resistive barrier) is first and foremost intended to keep out water, and gable ends see just as much wind-driven rain as any other part of the wall. The fact that the space beyond the wall is unconditioned has nothing to do with the water-resistive performance of the wrap. Leaving gable ends uncovered presents an opportunity for water that gets behind the cladding in the gable area to soak the wall and run underneath the building wrap below.
Also, be sure to “modify” door and window openings right way before wind pressure has a chance to undo your work. “Modification details” are the industry term for cutting the wrap at the opening and securing the edges to the perimeter of the rough opening in preparation for window and door installation.
Beyond Code
So far I’ve detailed only the basics, the minimum. This gives us a D, if you will. But in the extreme conditions we see in coastal regions, we’re still likely to fail the big test.
Beyond the basic codes and manufacturer’s guidelines there are several application details that have been used successfully by builders on both coasts.
Two layers. A two-layer weather barrier provides redundancy. If water gets through one layer, or one layer is compromised by exposure to the elements, the second provides protection.
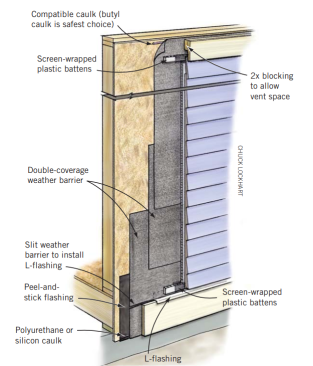
Code Plus Coastal climates prone to high wind pressures and driving rain demand more than current codes require. The detail shown here, which results in a double-coverage weather barrier, provides a level of redundancy that will reduce the chances of rain getting drawn into the wall by wind pressures and capillary action. A positive separation between the cladding and the drain plane created by battens affords further protection.
There’s another reason for considering this level of redundancy: surfactants that leach through the cladding can compromise any weather barrier. Surfactants are compounds that reduce the surface tension of water and allow it to slip right through most housewraps. Soap is a surfactant, which is why it works to break down grease and dirt when we wash our hands, and why you don’t want a trade contractor adding soap to a stucco mix to improve the workability of the mix. Other examples of surfactants include the water-soluble extractives that leach out of wet cedar and redwood, or additives sometimes found in synthetic stucco and cultured stone base layers. The soap used when pressure washing an exterior can also break down the weather barrier’s ability to hold out water.
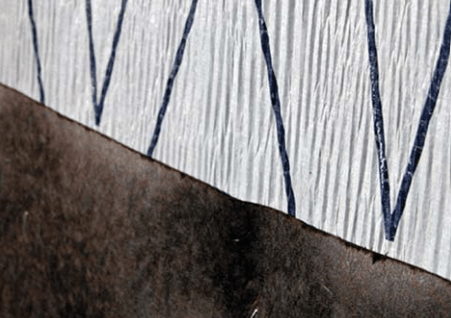
Half-lap coverage. Before housewraps, the primary weather barriers were asphalt-treated building papers and roofing underlayments, and in some parts of the country this is still the only weather protection provided. In severe coastal conditions, a half-lap or double-coverage detail using these traditional materials works well (see illustration, previous page).
Rain screens. We have been using rain-screen technology for many years in brick-veneer walls. The code-minimum 1-inch gap allows any water soaking through the brick (and there is plenty of that) to drain away before it contacts the structure.
The ideal rain screen creates a disconnect — a gap — between the exterior cladding and the weather barrier. Bulk water must be allowed to drain down and out of the wall cavity, so the system needs a clear way to exit. In addition, ventilation from top to bottom will promote drying and protect the weather barrier from damage.
Bond breaker. Under stucco, a drainable housewrap must have an intervening layer of building paper to prevent the stucco from filling up the drain channels. Otherwise, water penetrating the stucco is likely to seep right through the membrane.
There are several ways to create this drainage and drying space. The easiest (but least proven) method is to install a drainable housewrap — one with crinkles or dimples intended to allow water to drain behind. Bear in mind, however, there’s not a lot of research verifying how well these products perform, and the drying capacity is certainly limited.
Behind stucco, drainable wraps have added limitations: stucco will simply fill up the drainage channels, and moisture is at risk of seeping through the WRB. It’s critical that any drainable weather barrier include a “bond break” layer between the drainable layer and the stucco.
FIVE MOST COMMON INSTALLATION DEFECTSIt is not difficult to find examples of weather barriers being installed incorrectly. In talking to builders and code officials around the country, these are the problems I hear about all the time: • Improper lapping of upper and lower courses of housewrap. • No window flashing whatsoever. • Improper lapping of window flashing. • Inadequate number of fasteners for securing housewrap. • Backward installation of housewrap (printed side facing the wall). Typically, the UV resistance is on the label side. |
As exposure to higher wind pressures and wetter climates increases, the need for a positive separation between the cladding and the weather barrier increases. This separation can be created with some sort of strapping. The traditional strapping was made from 1-by material, usually something decay resistant like cedar or redwood. Strips cut from CDX exposure-1 plywood have seen good service and, of course, pressure-treated plywood is a good option (for more information about implementing such a rain screen, see “Best-Practice Wall Shingles,” March/April 2007).
There are now plastic corrugated materials available that can be applied either horizontally or vertically with no fear of creating a water dam we might find in the traditional solid strapping. Coroplast is one material that can be ripped into strips, and plastic battens (www.battensplus.com) come ready to apply. Cor-a-vent, a product derived from the roof ventilation industry (www.coravent.com), provides a 3/8-inch-thick alternative that can also be ripped into strips.
To complete the rain-screen detail, there needs to be ventilation at the top and bottom. Be sure to include fiberglass screen to keep the bugs out while allowing airflow.
Photos by Bill Robinson, except where noted. Drawings by Chuck Lockhart.


