A few years ago, I had some clients who completely changed how I finish large walk-in closets. This couple was determined to have the perfect master closet in their new house. Normally, laying out a large closet takes me about a half hour, but on this project, we spent more than an hour analyzing the average hanging length of dress shirts and debating whether pants should fold over a hanger or hang from the cuffs. Three days later, I finished the design discussion by finding just the right amount of shelf space for rolled-up socks.
After that experience, I began building closets with adjustable closet rods and shelves; now I don’t have to worry about the perfect location for anything. The clients can customize the closet when they move in, then easily change it the following year as their needs evolve — without even having to call me for help. All I need to know is how many rods and shelves they want.
I precut MDF vertical supports and poplar face-frame stock, then cut and install the components on site. Standard 5mm pins support the shelves. I finish the closet with H¤fele’s oval rod system and other accessories (800/423-3531, hafele.com). This approach gives my closets a more elegant look than I’d get using stock components, yet installation takes about the same amount of time, and material costs are comparable. Plus the technique can be adapted to any size room and for other types of storage, including pantry cupboards and bookcase shelving.
Layout
I still involve the homeowners in the layout process, but since all of the components are adjustable, we focus primarily on the position of the vertical supports that divide each wall into compartments. I try to keep the spacing between 24 and 36 inches; 32 inches is a perfect compartment width. If I go much wider, the shelves and the rod holders have to support a lot of weight and can start to sag.
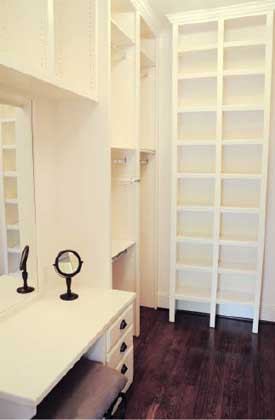
The depth of each compartment can vary. For example, clients occasionally want to store luggage or enclose their hanging clothes, which requires 24-inch-deep compartments. But usually I build 16-inch-deep open compartments and fit them with closet rods; this depth also works well for sweaters, jeans, and linens that are stored on shelves. Twelve-inch-deep compartments are fine for shoes and general storage.
I lay out compartments to minimize dead space in the corners, resorting in some cases to installing two-tier lazy Susans (such as you’d find in a kitchen base cabinet) for shoe storage. I start compartments at least 24 inches away from end walls to ensure good access to both hanging clothes and items stored on shelves.
I tweak the layout on each wall until my compartments are close to 32 inches wide and corners have at least 24 inches of clearance; then I draw lines on the floor to indicate the shelf support positions and help the client visualize the layout. This is also helpful for locating specific accessories, such as makeup areas or three-part mirrors.
Height. When the ceiling height is 8 feet or less, I typically extend the vertical supports all the way up. With ceilings that are 10 feet tall or higher, I’ll either extend the supports all the way up — which allows for three stacked hanging sections that each measure at least 36 inches high (the minimum useful height) — or stop at 8 feet or lower and leave a top shelf around the perimeter of the closet.
Cutting the Parts
I rip the supports from 4-foot-by-8-foot sheets of 3/4-inch-thick MDF in my shop. If I need vertical supports taller than 8 feet, I use precut MDF shelving stock, which is sold in 16-foot lengths and 12-inch and 16-inch widths. It comes with a bullnose, which I rip off to leave a square edge. I use a combination blade with at least 50 teeth in my table saw because it leaves a clean enough cut in the MDF that I don’t need to worry about planing the edges.
My shop has a 32mm boring machine with which I can quickly cut all of my 5mm-diameter shelf pin holes. (I also own an inexpensive 32mm jig in case I need to drill the shelf holes on site.) I space the two columns of holes 1 1/4 inch from the front and back edge of the support; I position a third column — for the closet rod clip — about 11 inches from the back. For middle partitions, I drill the holes all the way through the material, which makes doubling up the vertical supports unnecessary.
While in the shop, I also rip enough 2-inch-wide poplar face-frame stock to trim the shelving units; this time, I run the stock on edge through my planer to remove kerf marks. If the design calls for any inside corners, I rip some 1 1/4-inch-wide face-frame stock as well. The face frames add a lot of stability to the MDF, especially in tall closets.
Installation
Using plumb and level lines drawn on the walls during layout, I first install the vertical supports. In new construction, the floors and walls are usually level and plumb, but in remodeling, sagging floors and tilting walls need to be accounted for.
The joinery isn’t fancy: I use 2 1/2-inch-long 15-gauge finish nails and a few pocket screws when fastening the MDF supports and cleats to the wall framing, floors, and ceiling; and I fasten the butt-jointed MDF pieces together with 1 1/4-inch-long 18-gauge pins, pocket screws, and glue. I install face frames the same way; blind pocket screws in the corners help keep the pieces aligned. After assembly, I clean up the joints and edges with a random-orbit sander.
Shelf edges can be finished a number of ways. Although shelving with prefinished bullnose edging looks good and is quick to install, a simple applied band — either with or without a profile — is an easy way to dress up a shelf and make it a little stronger. For shoe storage, I cut wider poplar aprons and attach them to the shelf with plugged pocket screws.
Finish Details
In addition to adjustable shelves and closet rods, most customers want custom features and accessories. I usually apply moldings and paint to match other woodwork in the house, and I often install cedar closet liner in some of the compartments, gluing it up right over the drywall. Large three-part mirrors (which should be planned for in the layout stage) are another popular option.
Most of the accessories I install — including tie, shoe, and belt racks and pull-out wardrobe rods — are chosen from H¤fele’s extensive and well-organized hardware catalog. Because these accessories are designed to be used with frameless cabinetry, they sometimes need to be padded out to clear the face frame.
Even the drawer boxes for the built-in makeup area shown in this article were mounted using H¤fele’s drawer slides. The boxes were built from 9mm Baltic birch plywood, with the bottoms simply stapled and glued to the butt-jointed sides.
Cost. While the size and complexity of the closets I build varies a lot, I use a simple rule of thumb to estimate at least some of the costs: It takes about one man-hour of labor per compartment to rip the material, drill it, and make shelves. I figure installation time by the job.
Gary Striegler is a builder in Springdale, Ark.


