I once thought that old wood-veneer paneling needed to be torn out and replaced with new drywall to properly give paneled rooms a smooth, painted finish. But about 25 years ago, a good friend of mine showed me how he skim-coated paneling with Durabond setting-type joint compound (USG, 800/874-4968, www.usg.com), a technique he’d used to renovate several of his apartments. To this day, those walls are as smooth and sound as can be, even after years of being rented out to families with youngsters.
Over the years, I’ve skim-coated a lot of paneling. It seems that in the late ’60s and early ’70s, almost every home received some sort of wood-veneer-paneling makeover. In fact, a few government-subsidized projects, such as the housing built for workers involved in the construction of Chicago’s O’Hare Airport during World War II, actually required wood-veneer paneling on the interior walls. In one of those developments —
now a comfortable Chicago suburb of small homes called Harwood Heights — we recently contracted to do a kitchen-cabinet replacement. Our clients wanted to brighten up their kitchen with new paint before installing their new cabinetry. To help keep their costs down, our proposal included skim-coating the paneling instead of hanging new drywall. Here’s how we did it.
Prepwork
Durabond is much harder than regular drying-type joint compounds, so it resists cracks and checks caused by seasonal changes in humidity, which makes it a very sound filler for finishing paneling. It also sets up much faster, so we can complete projects in a more reasonable time frame (usually one to two days from start to finish) than if we installed new drywall.
But for the Durabond to adhere the way it should, the paneling needs to be properly prepped.
My first step is to remove any inside corners and scribe trim. Baseboard removal is optional; it’s really only necessary if new baseboards are planned.
Then I examine each of the walls carefully, pressing all areas with my hands to make sure the paneling is firmly attached to the framing. Where it’s loose, I secure it with a crown stapler or a finish nailer.
Corners. On outside corners, I nail up conventional metal corner-bead, which I then feather either with regular joint compound (if time allows) or with Durabond.
On inside corners, if there is a significant gap, I use paper drywall tape embedded in Durabond to ensure that cracking or hairline checking won’t appear later on. If the gap is minimal, I just caulk the corners after priming.
At the corners where the walls meet the ceiling, I use the same approach. On this project, the ceiling had a popcorn finish, so I used caulk.
Working With Durabond
There are a number of different versions of Durabond, with different setting times. For this project, I used Durabond 45 for the skim-coat filler. As its name implies, Durabond 45 remains workable for about 45 minutes and is ready to sand in approximately one to two hours, depending on the relative humidity and the consistency of the final mix.
Durabond also comes in other versions with different curing times. For custom-closet “same-day” wall preparation, we use Durabond 20 to fill holes from removed closet hardware and for other quick fixes. Sometimes we use a heat gun to help speed up the curing process so that we can sand even sooner.
Mixing. The challenge here is to gradually mix water with the powder and stir until you have a good putty-type mixture without lumps. You don’t want the Durabond to be too soupy (it’s pretty easy to add too much water), because that can slow down the drying time and cause shrinkage.
Since there’s only so much Durabond 45 that you can apply before it starts to set up, I don’t usually use a mechanical mixer. This 10-foot-by-16-foot room took a few hand-mixed batches.
After mixing, I allow the Durabond to slake for about a minute before applying it to the walls.
Application. I use standard joint-compound tools to apply the Durabond. If the overall texture of the paneling is very smooth, only a narrow mud knife is usually needed to bridge the grooves, which greatly reduces the amount of compound you have to sand.
But because the walls in this project were in poor condition, I had to use wider knives, resulting in a corresponding increase in sanding time.
It’s possible that some paneling will require only a single coat of compound, so it pays to check for smooth, full buildup to see if a second coat is really necessary.
Sanding. Even though setting compounds are harder to sand smooth than regular joint compounds, you can still use a pole sander. To keep the mess to a minimum (and the customer happy,) we always try to use some sort of dust-collection method.
In some cases, we’ll rent Porter-Cable’s drywall sander/vacuum unit, which allows us to finish sanding rooms like this one in about an hour.
Finishing Up
Finally, we apply a quality primer with good adhesion and color-blocking properties before painting the room.
As always, it never pays to skimp on the quality of the final finish. We have found that about 48 hours of “curing” is required for full hardness and durability of the primer and paint. Be gentle with the new walls for at least that period of time.
It took us 32 man-hours and $46 in materials to finish smooth this room’s 412 square feet of paneled wall, including cleanup.
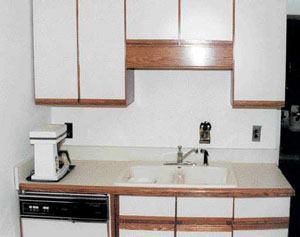
Before
After
All the existing door and window casings, bases, and ledges remained in place, and we didn’t have to reset any electrical boxes. If we’d rented a power sander, we’d have saved about six man-hours of labor (but would have had to add the $50 rental fee). Now, if only we had a quick cure for shag carpeting.
Ron Rodewald manages ClosetMaxx Custom Closets, a family-owned remodeling business in Crystal Lake, Ill.


