Crawlspace foundations typically follow regional building practices. Although they can be found in most parts of the country, there are regions—like ours—where they are the go-to foundation choice. Here in the Southeast where we work, you will typically find either slab-on-grade construction or pier-and-beam foundations built with CMUs. Basements are rare in our area because water-table levels are typically high, and the reduced height of a crawlspace compared with the height of a full basement is one way to assist in proper water management.
However, crawlspaces have a well-earned reputation for being problematic. Due to their typical lack of accessibility, most are neglected and become damp, dark, mold- and mildew-prone environments that homeowners tend to ignore … that is, until they have a problem.
Vented vs. Unvented
Traditionally, crawlspaces are built as vented assemblies, with foundation vents sized according to IRC guidelines and installed in the stem walls to allow unconditioned air to flow freely underneath the floor framing. These vents can be closed in the winter to keep winds from blowing cold air through them and left open in summer to allow for some airflow, in the belief that this will help maintain appropriate humidity levels and dry out the space. To keep water from freely flowing through the masonry walls, many vented crawlspaces are partially filled with sand to a level higher than the outside grade.
When it became clear that these construction methods don’t help much with moisture control, the building code in Virginia where we work (which is modeled on the IRC) began requiring an approved Class I polyethylene vapor retarder placed over the bare ground to reduce moisture migration from the ground into the air of the crawlspace. Of course, this approach doesn’t account for the humidity level of the outside air freely flowing through the vents; in addition, most plastic vapor retarders aren’t installed very carefully anyway. It’s common to find large gaps in the plastic sheeting around piers, at lap joints, and along the perimeter walls of the crawlspace. And by the time construction is completed and multiple trades have crawled and worked over the vapor barrier, it’s likely to be wrinkled, littered with debris, and compromised with several tears and holes exposing the ground that was initially intended to be covered.
Fortunately, improved vapor barriers with greater durability are now available, with woven fiber reinforcing as well as higher mil thickness options. But our understanding of building science has also improved, and now the IRC no longer requires ventilation openings in the foundation, as long as the subfloor area is treated as part of the structure’s conditioned space. Altering a vented crawlspace to an unvented assembly is the first step to conditioning the crawlspace, while proper air-sealing and insulation complete the effort. The crawlspace can then be conditioned (like the spaces of the house above) with supply air from the house HVAC system. To help sell our clients on this process, we explain that the superior crawlspace environment translates to durability, higher performance, and an overall healthier home environment.
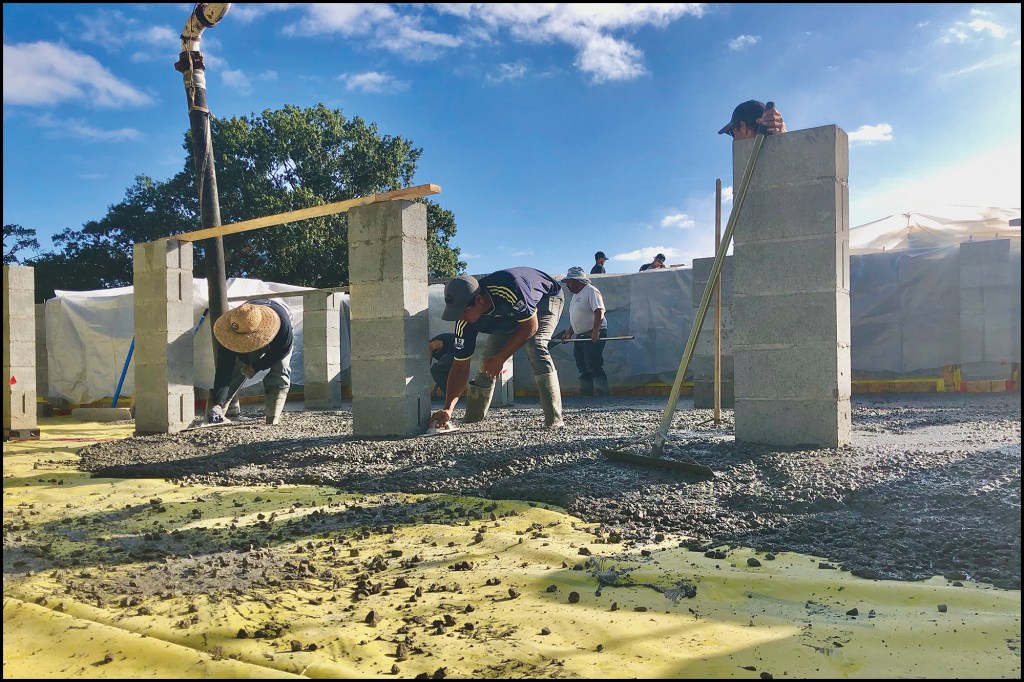
Concrete Slab Floor
To mitigate the concerns of some of our clients who have had bad experiences with crawlspaces, our company has been offering the option of finishing crawlspaces with concrete slab floors. The slabs are fitted with floor drains piped to daylight, and a sump pump to provide backup should a floor drain fail. In addition, the drains can pull double duty if a pipe were ever to break in the crawlspace, giving the water a way out and preventing the space from flooding. To prevent pest infiltration and unwanted airflow into the crawlspace, we fit the drain lines with check valves.
After the house is dried in, we also install evenly spaced lighting throughout the crawlspace. Proper lighting seems to help prevent the abandonment of the space and fosters a higher willingness to enter it, thereby minimizing much of the neglect experienced by a typical crawlspace.
Finally, we also like to include a dedicated dehumidifier in this upgraded package. While conditioned supply air will bring the temperature in the crawlspace in the summer down to reasonable levels, humidity levels still remain quite high and could potentially promote some mold growth. With a dedicated dehumidifier, this risk is drastically reduced, if not eliminated (figure 1).

Figure 1. Spraying the underside of this concrete porch floor with foam insulation is a necessary step in turning the crawlspace beneath into conditioned space (left). With a slab over the crawlspace’s vapor barrier and with lighting and dehumidification, the space is easier for the homeowner to maintain (right).
Drain Design
When you are incorporating a new design element into a project, the law of unintended consequences has to be considered. With a concrete slab in the crawlspace, you are essentially creating a bathtub underneath the house, and so a plan for multiple drain locations in the slab becomes a requirement (figure 2).
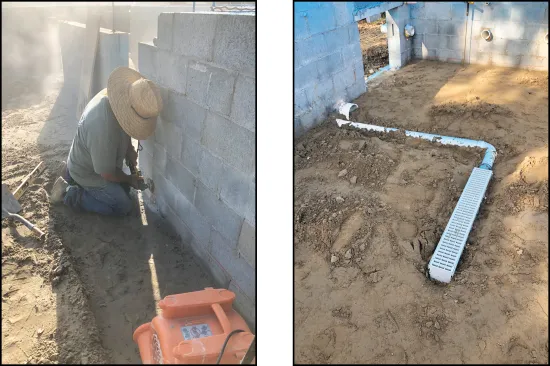
Figure 2. A worker preps the interior of a CMU wall to accept a layer of rigid foam by grinding off mortar drops and other irregularities (left). Installing drains prior to placing the vapor barrier and pouring the slab helps avoid trapping water underneath the house (right).
Planning for drains happens early in the project. We start by evaluating the pier layout, overall foundation design, and the site plan to determine the proper path for piping and water runoff from the crawlspace. Working closely with our civil engineer, we determine the best location for the drain piping outlet (on small projects) or outlets (on large projects). We also consult with our plumber, who can offer practical experience as we develop our plan for drain locations and exit points from the house. In certain localities, it may be necessary to tie this into the main waste line, in which case a check valve would also be required to prevent backflow of sewer gases.
Immediately after concrete footings have been placed, we focus on drain installation. Depending on how much dirt is excavated, it can make sense to come in with a skid steer and scrape off the high areas, but before that step can happen, a grade for the drains needs to be set. Again, we work closely with our plumber and concrete contractor to help set grade for the drains and high points out from the drains. You don’t need to create a steep slope, just enough to get the water moving; we usually don’t specify more than 1/8 inch of fall per foot.
On a typical drain layout, we try to place one drain between each row of piers (depending on the size of the house’s footprint), using the piers as the high point. But like most details on custom homes, every layout is unique. For example, on a recent project, our plumber suggested using the existing natural slope of the site and sloping the slab from one end of the house to the other, with a large linear drain installed at the low end. This saved us from having to bring in a lot of fill and relevel the space.
Once all trades involved approve the drain locations, we grade off the house footprint down to around 6 to 8 inches below the top of the concrete slab, thus allowing for 2 to 4 inches fill sand to be brought in later. While this grading tends to cause some cave-ins and footings to be covered in sand, the extra step of cleaning off the footings is well worth it compared with trying to remove excess material working around all the CMU piers and walls after they are installed.
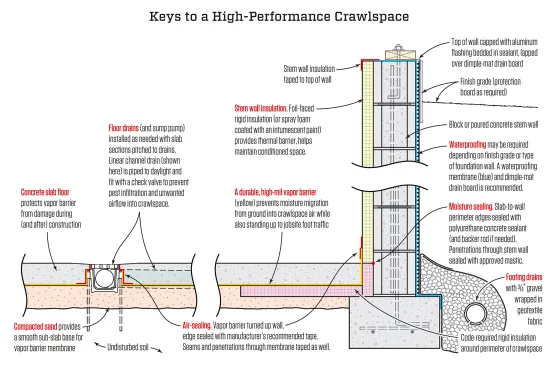
The conditioned crawlspace details used by the author’s company were developed in conjunction with architect Steve Baczek and include a slab floor over a well-sealed vapor barrier. To prevent water accumulation, the slab is fitted with floor drains.
Working from our plan, I then use spray paint to mark the exit locations for drainpipes on the ground and on the footing. I make sure to provide schedule 40 pressure-rated pipe as a “sleeve” through the block wall, sizing the pipe one size up from the actual 3- or 4-inch-diameter drainpipe (depending on how many drains have converged on that particular exit point). The benefit of this is two-fold. First, the sleeve provides a clean pathway through the block wall, so that a tradesperson won’t need to come along later and use a large maul or hammer drill to create the opening, leaving a jagged hole in their wake. Second, if any weight was ever to settle over the pipe, the sleeve provides some protection to the smaller pipe to prevent crushing or cracking from occurring.
When all the CMU stem walls and piers have been laid up, it’s time to knock down any remaining high spots in whatever spoils were left from excavation and start snapping chalk lines. Once the perimeter top-of-slab lines are marked, I transfer the marks onto the piers.
Vapor Barrier
Per code, conditioned and unvented crawlspaces require insulation. So before pouring the slab, we install a continuous 2-foot-wide layer of 2-inch XPS foam around the perimeter of the building. We start by spreading the sand evenly so that it comes up to 3 or 4 inches below our marks for the finish slab elevation, then tamp the sand with a plate compactor. Next, we use a concrete rake to excavate a 2-foot-wide-by-2-inch-deep trench in the sand along the perimeter walls (figure 3).

Figure 3. A crew member preps the perimeter of the crawlspace for a continuous 2-foot-wide layer of 2-inch XPS foam (left, right).
Using a track saw, we rip some of the sheets of XPS foam into 6-inch-wide strips, which we attach to the foundation walls at our grade marks with Poly Wall Quick Grip adhesive and a powder-actuated nailer shooting 3-inch nails through attached washers. This will allow for a full 4-inch depth for the slab after the 2-inch-thick horizontal sheets of XPS foam are butted up against the 6-inch-wide rippings (figures 4, 5).

Figure 4. Then 6-inch-wide XPS strips are fastened to the walls (left), with the top edge of the foam aligned with chalk lines marking the top of the slab. Here, the foam is aligned to the chalk line and cut around a 40 pressure-rated pipe as a “sleeve” through the block wall (right).

Figure 5. The linear drains are roughed in (left) and the perimeter foam is installed, the sand base is raked smooth in preparation for the vapor barrier underneath the slab (right).


