Converting a conventional basement into living space is probably the least expensive way to add useable square footage to a home. My company, Tri-State Basement Systems, helps homeowners realize this extra space. As specialists in basement waterproofing and foundation repair — and as a Bilco ScapeWel dealer and installer — we install several ScapeWels every year.
These oversized plastic window wells provide below-grade rooms with extra light and ventilation. Even more important, their built-in steps allow occupants to get out of the basement and away from the house in an emergency. For my money, installing a ScapeWel (203/934-6363, www.bilco.com) is the easiest way to satisfy code requirements for a second means of egress when a basement is converted to living space.
The units come in six sizes, in depths from 48 to 62 inches and in widths from 42 to 66 inches, measured on the inside. Two-step models project from the house 41 inches, and three-step models project 49 inches.
Excavation
Installing a ScapeWel is a pretty straightforward process and can usually be accomplished from start to finish in two days. At least a week before the planned installation, I call Dig Safe to have any underground utilities marked in the area we’ll be excavating. On the day of the dig, we bring in our compact excavator, which we tow behind a one-ton dump truck. In the bed of the truck we bring along a load of gravel for backfilling.
While we’re digging, we station a spotter to watch for anything that might not have been identified by the utility-locating service, such as buried cables for landscape lighting or pipes for irrigation and site drainage. An extra set of eyes helps us avoid mishaps.
We overdig the hole by about 2 feet, so that we have a little extra room to work in. We also need enough space to backfill with 12 inches of gravel on all sides, which is the amount required by the manufacturer.
Cutting the Foundation
After digging the hole, we mark the location of the window opening on the foundation with a lumber crayon. Our concrete-cutting subcontractor requires that we mark the cut. It’s important that we provide a clear line for him to follow; a bad cut can make framing the rough opening more difficult. In areas where the foundation coating prevents us from using the crayon, we scratch the cut location into the tar with an old recip-saw blade.
We always arrange for the concrete-cutting sub to show up in the late morning on the first day; that way, while he’s making the cuts, we can eat lunch and prepare the header, jack studs, and rough sill that will be installed later.
The concrete-cutter makes the cut with a pair of hydraulic-powered saws. Since the pump that powers them runs on gas, we don’t have to supply electricity, but we do have to provide water to control dust and cool the blade.
The cutter begins by using a conventional cutoff saw with a 16-inch diamond blade. It cuts to about 6 inches deep. Once the blade on that saw is maxed out, he switches to a ring saw. Without an arbor, the ring saw can cut much deeper — all the way through a 10-inch-thick foundation from one side.
The sawing creates a mess on the inside of the basement as the concrete slurry seeps through the cut, so we always warn customers to move or protect their belongings. On this job, the cut took about an hour. Costs for the service generally range from $600 to $720, depending on the thickness of the concrete.
If you install a ScapeWel and decide to cut the foundation opening yourself, it’s important to make the horizontal cuts first and then the vertical cuts, so the blade doesn’t get pinched.
Once the cuts are made, we pull the pieces out of the hole with the excavator.
Installing the ScapeWel
Next we prepare the opening. We start by bringing in the four-ply header. Four pressure-treated 2x8s combined with four 1/2-inch layers of treated plywood match the thickness of the foundation pretty closely. For the jack studs and rough sills we use PT 2x8s, secured with Tapcons and urethane construction adhesive.
In accordance with the manufacturer’s dimensions, we mount the side panels of the ScapeWel to the foundation, making sure they’re plumb. We use 1/4-inch galvanized wedge anchors spaced about every foot.
Once the sides are mounted, we install the step sections that form the back of the well. The step panels snap onto the sides and are fastened with deck screws. We make sure the well is square, then run in 2 1/2-inch deck screws with a cordless drill.
Once the well is assembled and braced, we start backfilling. The manufacturer’s instructions suggest backfilling by hand, but we’ve never had any problems using the machine. Our operator is careful to backfill around the well evenly and in small lifts.
Providing Drainage
While we were excavating the site shown on these pages, it became clear that the clay soil wouldn’t drain very well — if at all — and we grew concerned that the new window well might fill with water. So we went looking for a functioning foundation drain that could handle any groundwater or seepage that found its way into the bottom of the well. When we didn’t find one on the outside of the building, the GC — who’d worked on other homes in the area — suggested that we check under the basement slab, where we did in fact find a functioning footing drain.
Our next problem was how to connect an exterior drain in the bottom of the well to that interior footing drain. In situations like this one, our expertise in basement waterproofing comes in handy.
After drilling through the foundation wall in two places with a 2 1/2-inch core bit, we installed a pair of 2-inch T-shaped drains that connect to a special hat-shaped pipe over the holes. The flat pipe runs into the footing drain, and the floor is patched with bagged sand mix.
The pipe, which is more commonly used for controlling seepage through foundation cracks, is only 1/2 inch thick, so it can be covered or hidden more easily than round pipe.
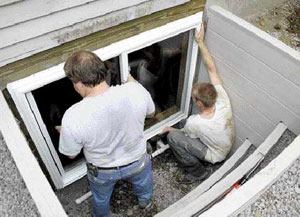
Installing the Window
With the ScapeWel backfilled and the drainage system in place, we can install the window in the opening. We use an all-vinyl sliding unit. Given the proximity to grade and the high-humidity environment, we think vinyl is a smart choice. And we use sliders because they’re easy for children to operate and don’t rely on a mechanical balance system that can fail or become less effective over time.
We caulk the nailing fin per the manufacturer’s instructions and plumb the window, then fasten it with 13/4-inch roofing nails. In the project shown, trimming out the window was not part of our contract; it would be handled by the GC.
When we do trim the window, we install self-adhering flashing over the nailing fins and use cellular PVC trim. We like the plastic trim because there’s no ongoing maintenance and no chance for rot.
The final step is to install the acrylic cover. Small metal clips hold the cover in place while allowing it to be easily opened in the event of an emergency. The manufacturer also offers a sturdy steel cover that can be used in locations where there’s a good chance someone could fall into the well, or where it’s required by code.
We charge $4,500 to install a 54-inch three-step ScapeWel like the one shown.
Scott Anderson owns Tri-State Basement Systems in Berlin, Vt.


