Although my company specializes in high-end jobs with custom trim, it’s not often that clients request arched passageways. When they do, I use a simple approach that allows me to efficiently tailor the details to any size opening.
Arch Layout
The trim detail I typically use is not a true ellipse; instead, it’s a modified form that starts as a tight radius (almost always 12 inches) and blends into a much greater radius at the top, then back into the same tight radius on the other side. Guiding the casing stock through my Woodmaster profile molder (800/821-6651, www.woodmastertools.com) is much easier to do with two radiuses than with a true ellipse.
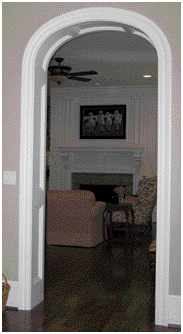
For doorways wider than 4 feet, I match the upper radius to the width of the R.O., which results in an arch with plenty of spring height. For narrower openings, like the 44-inch R.O. shown here, I use a tighter upper radius to give the arch more height. For this opening, I used 34 inches.
Each of the side jambs ends up 1 1/2 inches thick, so to leave room for shims, I made the inside arch width 40 inches.
I lay out the arch on a scrap of sheathing, first marking its 40-inch width, then swinging a 12-inch-radius arc through each of the two end points. I use an extension arm screwed to the scrap of sheathing, and trammel points to swing the 34-inch-diameter upper arc.
Bending the Trim
After laying out the arch, I fasten 6-inch-tall metal L-brackets to the plywood, spacing them about 6 inches apart and holding them 1/8 inch off the layout line. This allows room for the 1/8-inch-thick flat metal that I use to provide a continuous clamping surface between the brackets. The last part of the form is a second piece of flat metal, which goes around the outside of the strips to spread out the clamping pressure and keep the wood fibers from breaking during the bending process.
Because I almost always begin and end my “elliptical” arches with a 12-inch radius, I had a couple of clamping fixtures fabricated to make it easier to start and finish my forms. But simply using L-brackets the whole way works, too.
The glue-up shown here measures 4 1/2 inches tall by 1 3/16 inch thick, and is made of five layers of wood. It’s wide enough that I can get a 2 1/4-inch-wide arch-top “stile” and a length of panel molding from one setup.
To get a tight glue-up with uniform thickness, I resaw 1/4-inch-thick strips of poplar on my band saw, then lightly plane both faces of the strips at least once. Most of the time, I’m resawing 5/4 stock, and can get three strips from one board.
Glue-up. I use a glue roller to spread yellow glue on both faces of each strip, which helps ensure even coverage. After the strips are stacked, a few wraps of 5-inch-wide shrink-wrap plastic around the ends keeps things under control.
Depending on the temperature and humidity, I have between 10 and 15 minutes to finish clamping before the glue begins to set up, so I use an impact driver to tighten the clamps. I start in the middle and work toward each end, where I leave several inches of extra material.
While the glue-up is still in the form, I mark the point where the curved trim crosses the long layout line that indicates the base of the arch. Later on, I will transfer this mark to the back of the glue-up with a chisel so it doesn’t get lost during sanding or routing. When I cut the trim, the mark will tell me exactly where the joint needs to be.
I try to wait at least three hours before unclamping, to let the glue cure. I know from experience that it’s better not to hurry.
Milling. I make indexing marks on the back of the glue-up before ripping, which helps me keep track of the pieces and mill them in such a way that finished parts are installed next to each other, just the way they were glued up. Then I use a handheld planer and a benchtop planer to clean up one straight edge before ripping the curved stock to width.
I cut the panel molding profile with a router, making a couple of light passes before the final cut. All the excess sawdust has to be removed before I make the final pass or it’ll get in the way of the bearing and make bumps in the molding.
To help keep the router steady — since it’s sitting on just a 1 3/16-inch edge — I add a block of wood to its base. This “training wheel” looks a little funny but saves a lot of sanding time.
Assembling the Arch
I cut four 2 1/4-inch-by-8-inch poplar rails for the paneled arch and make a pair of pocket-screw holes at each end. Two of the rails act as temporary spacers at the ends of the curved stiles. The other two divide the top panel into three sections, and are typically positioned 2 or 3 inches above the point where the 12-inch radius blends into the top radius. When I first install the rails, I turn them so the pocket screws are on the finished side, since they will be unscrewed and removed later on before permanent installation.
To keep the bottom of the stiles at the correct width as the frame goes together, I also install a couple of 40-inch-long spacers at the base.
For the curved panel itself, I rip two 11 7/8-inch-wide strips of untempered 1/8-inch-thick hardboard. These lengths of hardboard get glue-laminated together, and are cut long enough to run past the end of the curved stiles by about 2 inches. Later, when I attach the two side panels, staples through this extra material will help fasten the sections together.
Because hardboard is so flexible, ripping it is a two-man job, and so is stapling it in place. It’s especially important to get started straight, or you’ll end up with a real mess at the other end. Since regular trim staples would shoot right through the hardboard, I use a Grex upholstery stapler, a lot of staples, and a healthy bead of glue on the stiles.
Building the Side Jambs
Whenever I’m making paneled jambs, I like to match the layout to the doors in the house. On a house like this one, with 10-foot-tall ceilings, there’s plenty of room for an arched top, so I make the side jambs 7 feet tall to match the doors. The finished width of the paneled jambs is 12 1/2 inches (two 2×6 walls with a 1/2-inch space between and a layer of 1/2-inch drywall on each face).
I pocket-screw the frames together, which gives me great joints that require very little sanding (plus I don’t have to wait for glue to dry). If there’s room, I add 3/4-inch-thick plywood to the back of the frame, which stiffens the assembly and provides good nailing.
To finish the side jambs, I install panel molding, fastening it in place with a .23-gauge headless pinner. When I fit panel molding, I use a block plane to put a slight underbevel on each miter to make sure the face of the joint comes together. The short pieces go in first; then I cut the long pieces tight so I can bow them a little in the middle and pop them in place.
At this point I fasten the arched top to the side jambs, spreading glue on the hardboard that extends past the base of the arch and using pocket screws to join the straight stiles to the curved stiles. With the screws pulling everything together, I can clamp and staple the extra length of hardboard into the back of the top rail on the straight frame. Normally, pocket screws should not go into end grain, but they seem to hold fine with the help of the hardboard.
Once both sides are fastened in place, I remove the two temporary bottom rails from the arch. I also remove the two upper rails — after marking their positions on the curved stiles, because they’ll be reinstalled. To hold the two straight side jambs in alignment, I fasten another 40-inch spreader across the bottom, at floor level.
Curved Panel Molding
Fitting joints in curved trim always involves an element of trial and error. To make the process easier, I cut the curved sections of panel molding from the length of trim made from the same blank as the stile; this helps ensure that the curves match.
After installing a short length of straight molding across the bottom of the arch, I cut and fit the first pair of miter joints. When the bottom joints fit, I cut and fit the upper pair of miter joints. Temporarily removing the rails makes this method possible.
Once both bottom panels are trimmed out, I glue and nail one of the rails back in place. I can no longer use the pocket-screw holes, but the glue and headless pins hold the rail securely.
Then I install the next section of panel molding, starting with the lower short straight section and fitting as before. If all goes well, by the time I have to cut and fit the last joints, I have the angles and bevels down pat. If I get off a bit on the last cuts, I can always make a small width adjustment on the last rail.
Curved Casing Trim
Measuring a little over a full inch in thickness, the curved casing trim is made up of two layers of MDF glued together. I do all the hard work of cutting the profile in the curved blank with the help of my Woodmaster molder.
Casing blank. I use the curved jamb as a guide to lay out the inside edge of the curved blank on a sheet of MDF; then I rough-cut to the line with a jigsaw, and finish up the cut with a flush trim bit mounted in a router. To create the 1/4-inch reveal on the casing, I make one pass with a 1/4-inch rabbeting bit and a second pass with a flush trim bit.
Next I use a compass to scribe a line 4 1/16 inches back from the finished inside edge, and cut the outside edge to within a fat 1/16 inch of the line with a jigsaw. A belt sander is ideal for smoothing the outside curve down to the line. I use this first curved blank as a pattern for the second blank, then I glue and clamp the two together to achieve the thickness needed for the molding profile. After the glue dries, I clean up the edge of the second blank with a flush trim bit.
Cutting the profile. I profile the casing with the Woodmaster. This machine handles curved and straight trim essentially the same way; I just need to make sure that the wooden guides I clamp in place are positioned to keep the curved blank centered.
Before running the blank through the molder, I mark each end of the trim to indicate exactly where the straight lines on the layout begin. Later, I’ll use these references to mark the cut lines. Because I have a lot of time invested in the curved casing trim, I also do a full-scale drawing on the floor to see how everything lines up before making the final cuts.
I join the straight and curved sections of trim together (30) with Hoffmann dovetail keys and glue (866/248-0100, www.hoffmann-usa.com), then nail the whole assembly to one side of the jamb before installation. Having the trim in place helps to center and plumb the jamb. Once the shims are in position, the temporary spacers can be removed and the second side trimmed.
After installation, nearly all the joints need to be finish-sanded. Although a random orbit sander works on the flat joints, many of the moldings require hand-sanding. Experience has taught me that even when I think I’m done sanding, I should go back and check again after the first coat of primer.
Gary Striegler is a builder in Springdale, Ark.


